Fine-Tuning Large Language Models with Hugging Face and MinIO

Introduction
In a previous post, I presented feature extraction, which is a technique for utilizing pre-trained Large Language Models (LLMs) to solve a custom problem without having to retrain the model. Feature extraction is one of two ways to use the knowledge a model already has for a task that is different from what the model was originally trained to accomplish. The other technique is known as fine-tuning - collectively, feature extraction and fine-tuning are known as transfer learning.
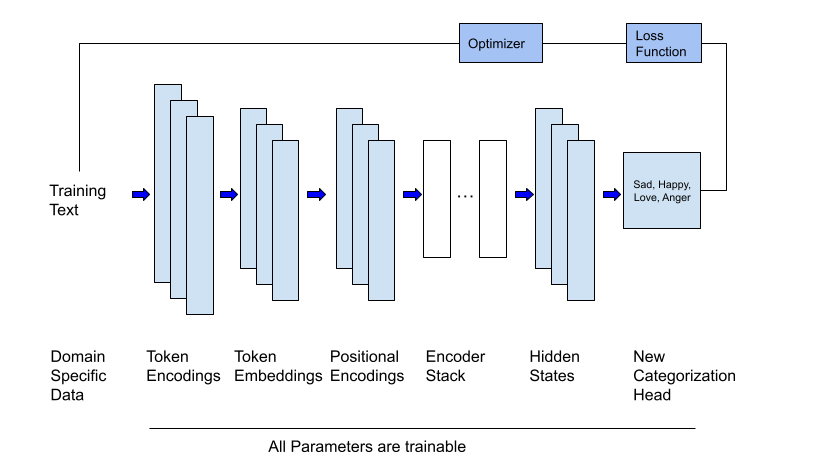
In this post, I am going to present fine-tuning. Like feature extraction, it is a technique that has been used before with deep neural networks. However, unlike feature extraction, this technique requires training. Let’s look at a specific scenario to see how fine-tuning works. Let’s say that you have an LLM that was trained on thousands of websites, thousands of books, and many textual datasets (like the Wikipedia dataset). This model would have a lot of general knowledge. An analogy would be that this model is similar to a smart colleague or friend who seems to know a little about a lot of different topics. Unfortunately, this model (and your friend) can not answer questions that require detailed knowledge about a specific topic. If you were to ask the model, “What should you do if you have a sore throat and your ears hurt? - then you would not get a good answer. To correct this, we can use fine-tuning. It works like this. Start with your original heavily trained model, and then train it some more using data that is specific to a particular domain. In our case, this could be a custom corpus of documents that talk about illnesses, their symptoms and treatments. This technique is especially valuable with models built using the transformer architecture as they are large and expensive to train. This process for transformers is visualized in the diagram below.

The code sample in this post will fine-tune the same model I used in my previous post and attempt to solve the same problem. Specifically, I will download a pre-trained LLM from the Hugging Face Hub that was trained for generative AI (to be a chatbot or to summarize) and use it for detecting emotions. This will require modifying the output slightly since I want text classified and I do not need the model to generate text. (As we will see, the Hugging Face libraries make this easy.) I will then retrain this model using a training set that contains text samples with labels that contain the primary emotion of the text (sadness, joy, love, anger, fear, surprise). When we are done, we will have an LLM that has been fine-tuned for detecting emotions. What will be especially interesting is that we will be able to compare the results with the results from feature extraction.
Before writing code, let’s take a quick tour of the tools we will need to fine-tune a large language model.
The Tools
In my previous post, I went into detail on the tools listed below and how to install them. So, if you are unfamiliar with any of them, then hop on over to that post and give this section a quick read. Also, the reusable functions I created in my previous post to get data from MinIO into Hugging Face’s DatasetDict object will be used here without much explanation. (Don’t worry - these functions are intuitive, so an explanation is not necessary.)
To accomplish our mission, we will need the following tools:
The Hugging Face Hub
If you are new to Hugging Face, then check out their hub. Browse the different models, datasets and spaces.
Hugging Face Transformer and Dataset Libraries
To install these two libraries, run the commands below.
MinIO for Object Storage
To install the MinIO Python SDK, run the command below.
Now that we have a conceptual understanding of the goal and the tools we will be using - let’s get our data set up.
Hugging Face Datasets and MinIO
The Hugging Face Dataset library has built-in configuration to communicate directly with the Hugging Face Hub and download datasets by name. As an example, consider the code below, which will download the dataset we will use in this post directly from the Hugging Face Hub.
The output of this cell shows the type of the underlying object used to hold data.
Let’s take a quick look at the columns so that we understand the features.
The output is:
The emotions dataset has one feature - text - which is the text from a tweet. The label column is that target - it is an integer that is an index into the following array.
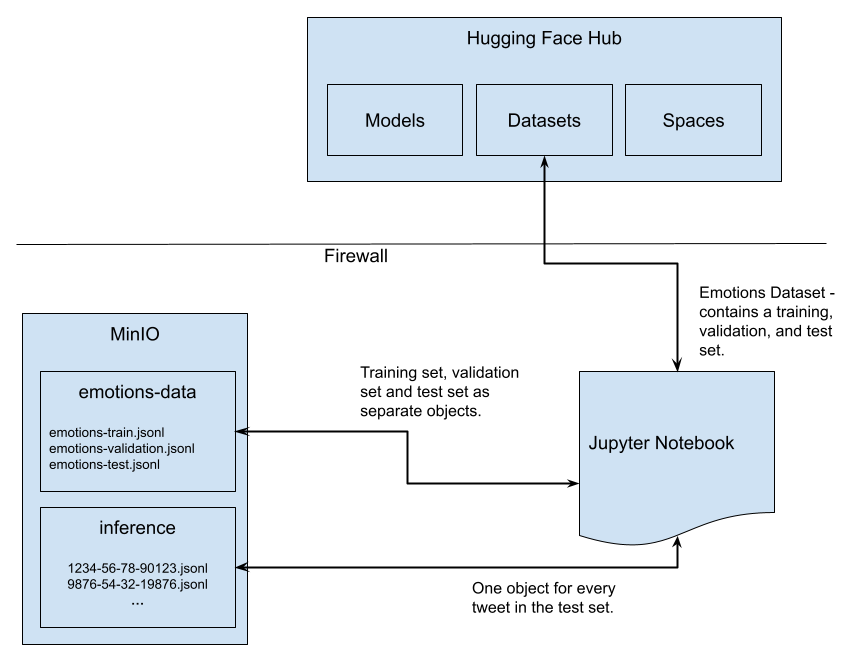
While the `load_dataset` function, as used above, is the easiest way to get data into a dataset, it requires you to upload your data to the Hugging Face Hub. This may not always be feasible - especially if your data contains proprietary or sensitive information. In my previous post, I emulated an enterprise scenario by pulling apart this dataset and creating a JSONL file for the training set, validation set, and test set. Once I had these files, I uploaded them to MinIO. From there, I recreated the DatasetDict object by connecting to MinIO, downloading the files, and reloading them using the `load_dataset()` function. To do this, I created two helper functions, `put_file` and `get_object`, to upload and download a file to MinIO, respectively. I will not present these helper functions in this post for brevity, but I will include them in the code download. The snippets below show how to use them. The first snippet pulls apart the DatasetDict object and uploads each set as a separate object. The second snippet downloads these objects and recreates the DatasetDict object.
Once the data is uploaded to MinIO, your MinIO bucket will have three objects in it. A screenshot from the MinIO console is shown below.

In this post, I want to emulate one more real-world scenario. When a model is in production and being used for inference - data will not arrive packaged up nicely within CSV, JSON or Parquet files. Rather it will be delivered as a bunch of small objects where each object represents a sample that requires a prediction. So, let’s pull apart the test set and create a MinIO object for each tweet. We will use these objects for batch inference. In other words, once we have a fine-tuned model, we will grab all these individual objects and get predictions for them.
The first thing we need to do is create a helper function that will save a JSON formatted string as a single object. The function below will do this for us. Pay special attention to how the text is encoded and then loaded into Python’s `io.BytesIO` class before being sent to MinIO’s `put_object` method.
Now we can pull apart the test set and send each tweet to MinIO as an object. The snippet below will use our helper function to populate the batch-inference bucket.
The output we get is:
When we are done, we will have 2,000 objects in the batch-inference bucket, as indicated by the output of the upload code above.
The graphic below is a visualization of the complete data flow for the experiments presented in this post.

We are now ready to load our model and tokenizer from the Hub.
Load the Model and the Tokenizer
If your machine has a GPU, you will want to make use of it. The code below will create a device object that points to your GPU if you have one. Otherwise, it points to your CPU.
We can now create our model and tokenizer. The Hugging Face Transformers library makes this easy. Notice that the model gets moved to our device.
This code is very similar to the code we wrote when we did feature extraction in my previous post. We are loading the same model - ‘distilbert-base-uncased’ and we are getting the tokenizer that was created for this model. However, there is one important difference - notice that we are using the `AutoModelForSequenceClassification` class to get the pre-trained model. This class added a categorization head to the existing model so that we do not have to. We also pass in the number of labels, which is 6 in this case - one for every emotion we want to detect.
Before we train the model, we must not forget to tokenize our tweets. This is done below. This is the same technique employed for feature extraction.
We are now ready to fine-tune the model.
Fine-Tuning the Model
Before we retrain the model using our training set and validation set, we need to create a function to compute metrics so we know how we are doing. We will borrow a few functions from sklearn (a.k.a. scikit-learn).
Next, we need to set up the training arguments. This is done using the `TrainingArguments` class in the Transformers library.
We can now instantiate a trainer object from the transformer library's Trainer class and fine-tune the model. Remember, this model is already trained using a large corpus of text and has a lot of knowledge about the English language. We are just doing a little extra training to give the model some additional knowledge about emotions.
The train method will take some time to run - especially if you have an older machine. A lot of output will also be generated, but the output of interest to us is the results from the last epoch that shows the accuracy of the model when it is used against the validation set.
92.4 percent is pretty good. For this dataset, fine-tuning works better than feature extraction. During feature extraction, we achieved an accuracy of 63.4% - the model created using feature extraction got confused by emotions that are similar to each other, such as anger and sadness.
Let’s apply this model to the data we put into our batch-inference MinIO bucket.
Making Predictions from a MinIO Bucket
As I stated previously, in the real world, data will not come packaged up nicely in CSV, JSON, and Parquet files. You will most likely be dealing with a lot of small objects where each object represents a single sample - or, in this case, a single tweak. We emulated this scenario earlier by creating a batch-inference bucket in MinIO. A screenshot is shown below.

The functions below will read each object and create a single JSONL file.
Once we have our JSONL file, we can use it to create a DatasetDict object using the load_dataset function, as shown below.
To use the fine-tuned model for predictions, we use the predict method.
The results:
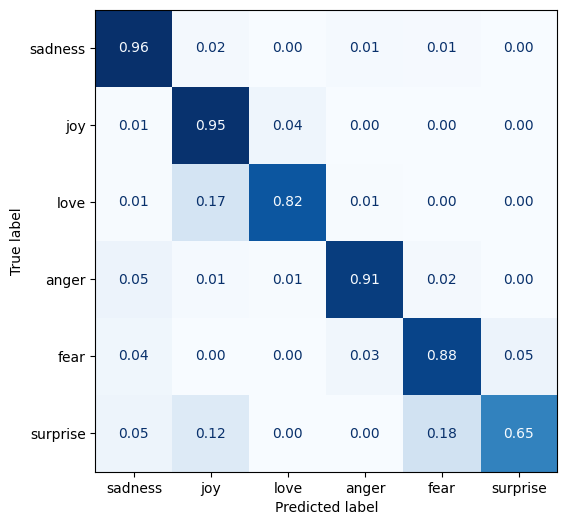
Almost as good as the validation set, with an accuracy of 91.2%. Below is the confusion matrix. (I presented the code to create this in my previous post.)

Summary
Using Hugging Face and MinIO, you can fine-tune open source models with data not fit for the Cloud. In this post, we demonstrated the techniques necessary to accomplish this.
First, we created reusable code that can be used to get data from MinIO into the Hugging Face DatasetDict object. This is important because enterprise data cannot be uploaded and downloaded from the Hugging Face Hub like open source datasets. Organizations will want to secure and manage important data in MinIO and have a way to load it into Hugging Face tools so that it can be easily processed and passed to a model. Additionally, we emulated a batch inference scenario whereby the data was not packed up in nice CSV, Parquet, or JSON files. Rather, each sample was its own object. This required getting a list of all objects in a MinIO bucket, downloading each object (or sample), and passing the data through our model in batches.
Our second accomplishment was downloading a large language model, modifying it slightly by adding a categorization head to it and then fine-tuning it with custom data. This allowed us to take advantage of the knowledge already trained into the model while at the same time giving it additional information (in this case, information about emotions) so it could give answers about a specific problem (what emotion does a snippet of text emit). This represents a serious cost saving for organizations that want to use transformer-based models, which are expensive to train from scratch and may not have detailed knowledge about a specific domain.
Additionally, it should be noted that fine-tuning is not the only way to take advantage of pre-trained models. Another transfer learning technique is feature extraction. I covered Feature extraction in a previous post. Finally, Retrieval Augmented Generation (RAG) is useful for NLP tasks such as document creation, question answering, and summarization. RAG makes use of text in a custom corpus during inference to help a large language model locate a more specific result. RAG, like feature extraction, does not require additional training.
If you have comments or suggestions, then please let us know by dropping us a line at hello@min.io or joining the discussion on our general Slack channel.


