Setting Up A Development Machine with MLRun and MinIO

MLOps is to machine learning what DevOps is to traditional software development. Both are a set of practices and principles aimed at improving collaboration between engineering teams (the Dev or ML) and IT operations (Ops) teams. The goal is to streamline the development lifecycle, from planning and development to deployment and operations, using automation. One of the primary benefits of these approaches is continuous improvement.
In previous posts on the subject of MLOps tooling, I covered KubeFlow Pipelines 2.0 and MLflow. In this post, I want to introduce MLRun, another MLOps tool that should be considered if you are shopping for an MLOps tool for your organization. But before diving in let’s take a quick look at the MLOps landscape.
The MLOps Landscape
While all three of these tools aim to provide full, end-to-end tooling for all your AI/ML needs, they all started with different motivations or design goals.
- KubeFlow set out to democratize Kubernetes. The core of KubeFlow, KubeFlow Pipelines, requires code to be run via serverless functions that are deployed to a Kubernetes Pod.
- MLflow started as a tool for tracking experiments and everything associated with your ML experiments, such as metrics, artifacts (your data), and the model itself. MLflow is aware of the popular ML frameworks, and if you choose, you can ask MLflow to automatically capture all experiment data that it deems important.
- MLRun's mission, which distinguishes it from other MLOps tools, is to eliminate boilerplate code. It also requires the creation of serverless functions, but it takes the concept further since it is aware of the popular ML frameworks—consequently, epoch loops do not need to be coded, and there is low code support for distributed training.
More About MLRun
MLRun is an open-source MLOps framework originally created by Iguazio, a company specializing in data science. In January 2023, Iguazio was acquired by McKinsey & Company and is now part of QuantumBlack, McKinsey’s AI arm.
Let’s take a look at installation options and the services that need to be deployed.
Installation Options
The MLRun website recommends three ways to install MLRun on-premise. Iguazio also maintains a managed service.
On-Premise Options:
- Local deployment: Deploy the MLRun services using a Docker compose file on your laptop or on a single server. This option requires Docker Desktop and is simpler than a Kubernetes install. It is good for experimenting with MLRun features; however, you will not be able to scale out computing resources.
- Kubernetes cluster: Deploy MLRun services on your own Kubernetes cluster. This option supports elastic scaling; however, it is more complex to install as it requires you to install Kubernetes on your own. You can also use this option to deploy to the Kubernetes cluster that is enabled by Docker Desktop.
- Amazon Web Services (AWS): Deploy MLRun services on AWS. This option is the easiest way to install MLRun. The MLRun software is free of charge; however, there is a cost for the AWS infrastructure services.
Managed Service:
Additionally, if you do not mind a shared environment, then Iguazio has a managed service. Iguazio provides a 14-day free trial.
Introducing the MLRun Services
MLRun UI: The MLRun UI is a web-based user interface where you can view your projects and project runs.
MLRun API: The MLRun API is the programming interface that your code will use to create projects and start runs.
Nuclio: Nuclio is an open-source serverless computing platform designed for high-performance applications, particularly in data processing, real-time analytics, and event-driven architectures. It abstracts away the complexities of infrastructure management, allowing developers to focus solely on writing and deploying functions or microservices.
MinIO: MLRun uses MinIO for object storage when you deploy MLRun to a Kubernetes cluster. We will include it in our local Docker compose deployment because, in subsequent posts, we will need to read datasets used for model training from an object store. We will also use it in this post when we create a simple smoke test notebook to make sure MLRun in up and running properly.
Installing the MLRun Services
The installation I am going to show here is slightly different than what is shown in the MLRun Installation and Setup guide. For one, I want to include MinIO in this installation so that our serverless functions can load datasets from object storage. Also, I want separate services for running Jupyter Notebooks and the MLRun API. (MLRun’s Docker Compose file that includes Jupyter has the MLRun API and the Jupyter Notebook services packaged into the same service.) Finally, I put important environment variables in a .env file so that environment variables do not need to be created manually. The Docker Compose file and the config.env file for the MLRun services are shown below. You can also download them and all the code for this post here.
File name: compose-with-jupyter-minio.yaml
File name: config.env
Running the docker-compose command shown below will bring up our services.
Once your services are running within Docker, navigate to the following URLs to check out the consoles for Jupyter, MinIO, MLRun, and Nuclio.
- Jupyter Notebook: http://localhost:8888/lab
- MinIO Console: http://localhost:9001/browser
- MLRun Console: http://localhost:8060/mlrun/projects
- Nuclio Console: http://localhost:8070/projects
Before concluding our exercise on setting up MLRun on a development machine, let’s create and run a simple serverless function to ensure everything is working properly.
Running A Simple Serverless Function
For this demonstration, we will use the Jupyter server. It has the Python mlrun library already installed. If you need additional libraries, you can start a terminal tab and install them. We will need the minio Python SDK. The screenshot below shows how to start a terminal window and install the minio library.
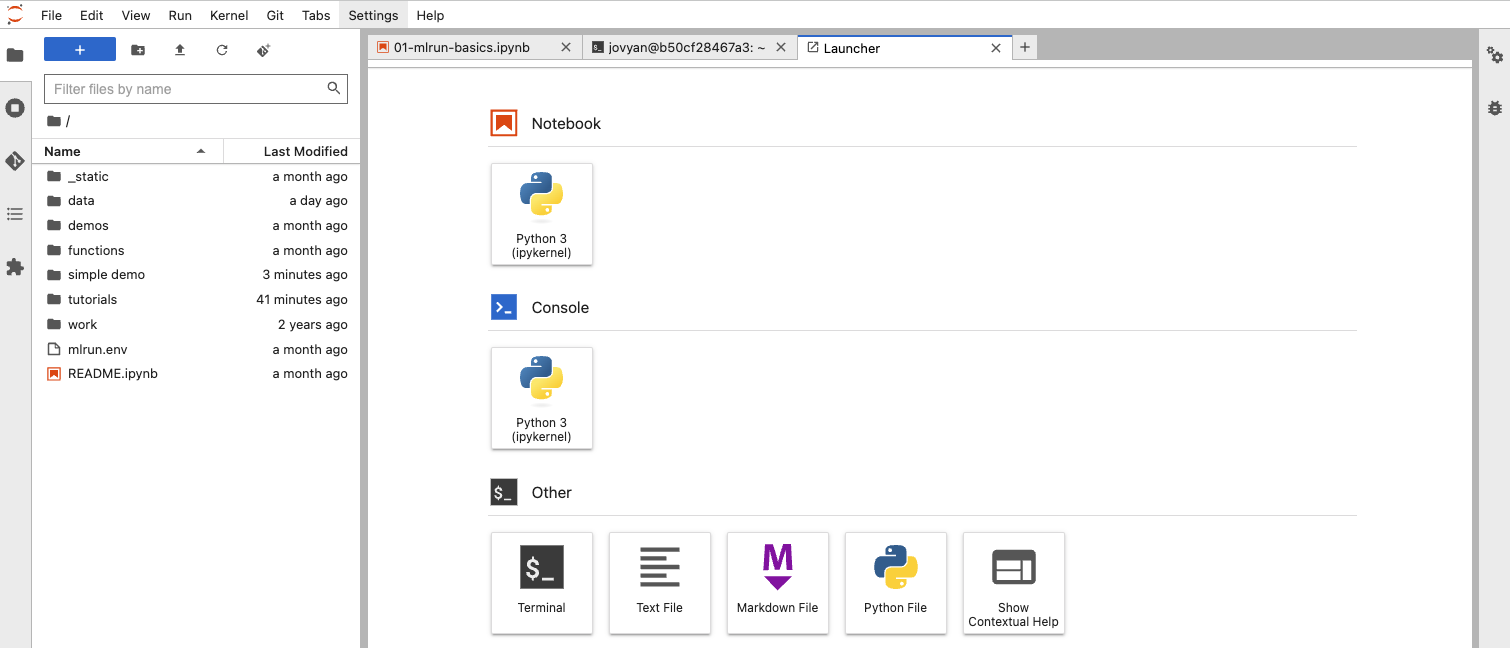
Click the “Terminal” button and you will get a tab similar to what is shown below.

This tab operates just like the Terminal application on a Mac. It allows you to install any library you need into the Jupyter service, where our function will execute.
Once your libraries are installed, create a new folder called “simple demo” and navigate to it. Download the sample code for this post and upload the following files to your new folder:
- simple_serverless_function.py
- simple_serverless_function_setup.ipynb
- minio.env
- mlrun.env
- minio_utilities.py
The function we want to send to MLRun is in simple_serverless_function.py, shown below. The function name is “train_model” - we will not train an actual model in this post. We just want to get a serverless function working. Notice that this function has a “mlrun.handler()” decorator. It wraps functions enabling inputs and outputs to be parsed and and saved. Also, it does not have to be hermetic (using only resources defined within it) - it can use libraries imported at the module level, and these libraries can be other code modules. In our case, we have a minio utilities module located in the same directory.
File name: simple_serverless_function.py
In terms of functionality, all this function does is log the input parameters and, just for fun, I am connecting to MinIO to get a list of all buckets. As part of this simple demo, I want to prove MinIO connectivity. The get_bucket_list() function in minio_utilities.py is shown below.
File name: minio_utilities.py
The “minio.env” file used to hold MinIO connection information is shown below. You will need to get your own access key and secret key and put them in this file. Also, notice that I am using “minio” as my hostname for MinIO. This is because we are connecting from a service within the same Docker Compose network as MinIO. If you want to connect to this instance of MinIO from outside of this network, then use localhost.
minio.env file
As a recap, we have a serverless function that logs all input parameters passed to it. It also connects to MinIO and gets a list of buckets. The only thing we need to do now is package up our function and pass it off to MLRun. We will do this in the simple_serverless_function_setup.ipynb notebook. The cells from this notebook are below.
Import the libraries we need.
The cell below uses the “mlrun.env” file to inform our environment where to find the MLRun API service. It also connects MLRun to an S3-compatible object store for saving artifacts. This is the instance of MinIO we created via our docker compose file.
File name: mlrun.env file
Next, we create an MLRun project. This project will be associated with all of our metrics and artifacts. The project directory you use for this step is the folder where your code is located.
The set_function() method tells MLRun where to find your function and how you want it to be run. The handler parameter must contain the name of the function that was annotated with the mlrun.handler() decorator.
The cell below creates some sample model training parameters.
Finally, we get to run the function, which is shown below. The “local” parameter tells MLRun to run the function on the current system, which in this case is the Jupyter Notebook server. If this is set to False, then the function will be sent to Nuclio. Also, the “inputs” parameter needs to be of type Dict[str, str]; if you use anything else, you will get an error.
Viewing Results in the MLRun UI
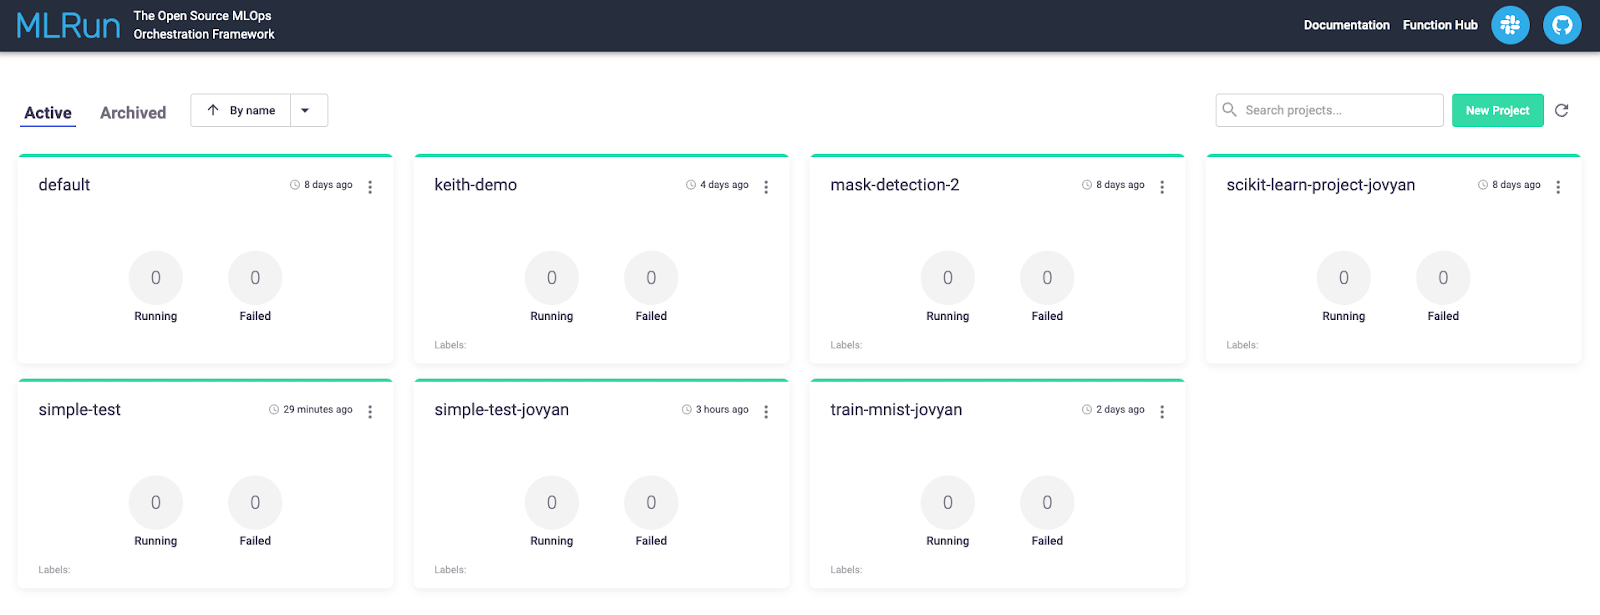
Once the function is complete, go to the MLRun home pages to find your project. Click on the tile representing your project. Our function was run under the “simple test” project.
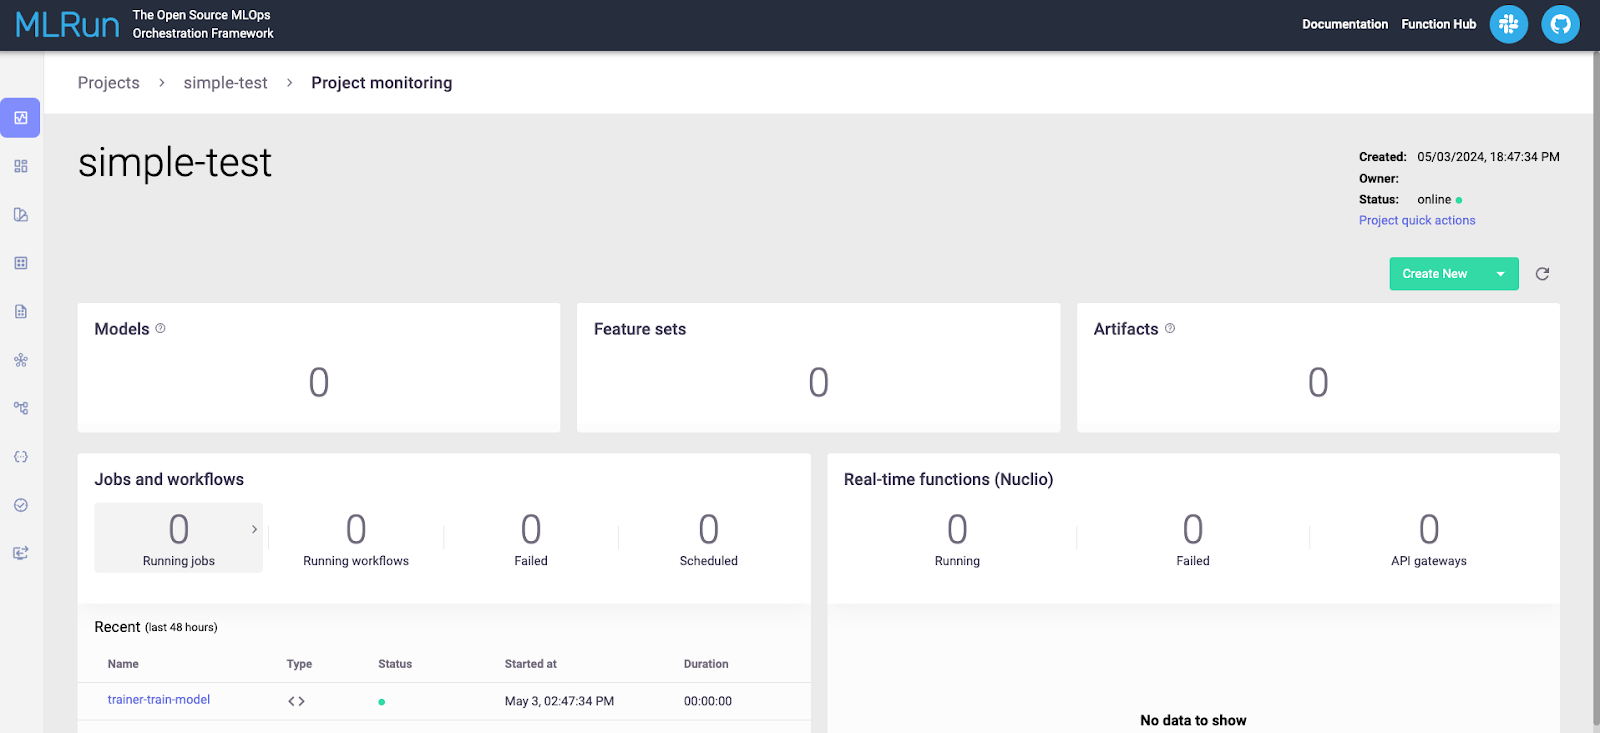
The next page will show you everything related to your project for all runs. This is shown below.
Look under the “Jobs and Workflow” section and click on the run you wish to view. This will show you details about the run, as shown below.
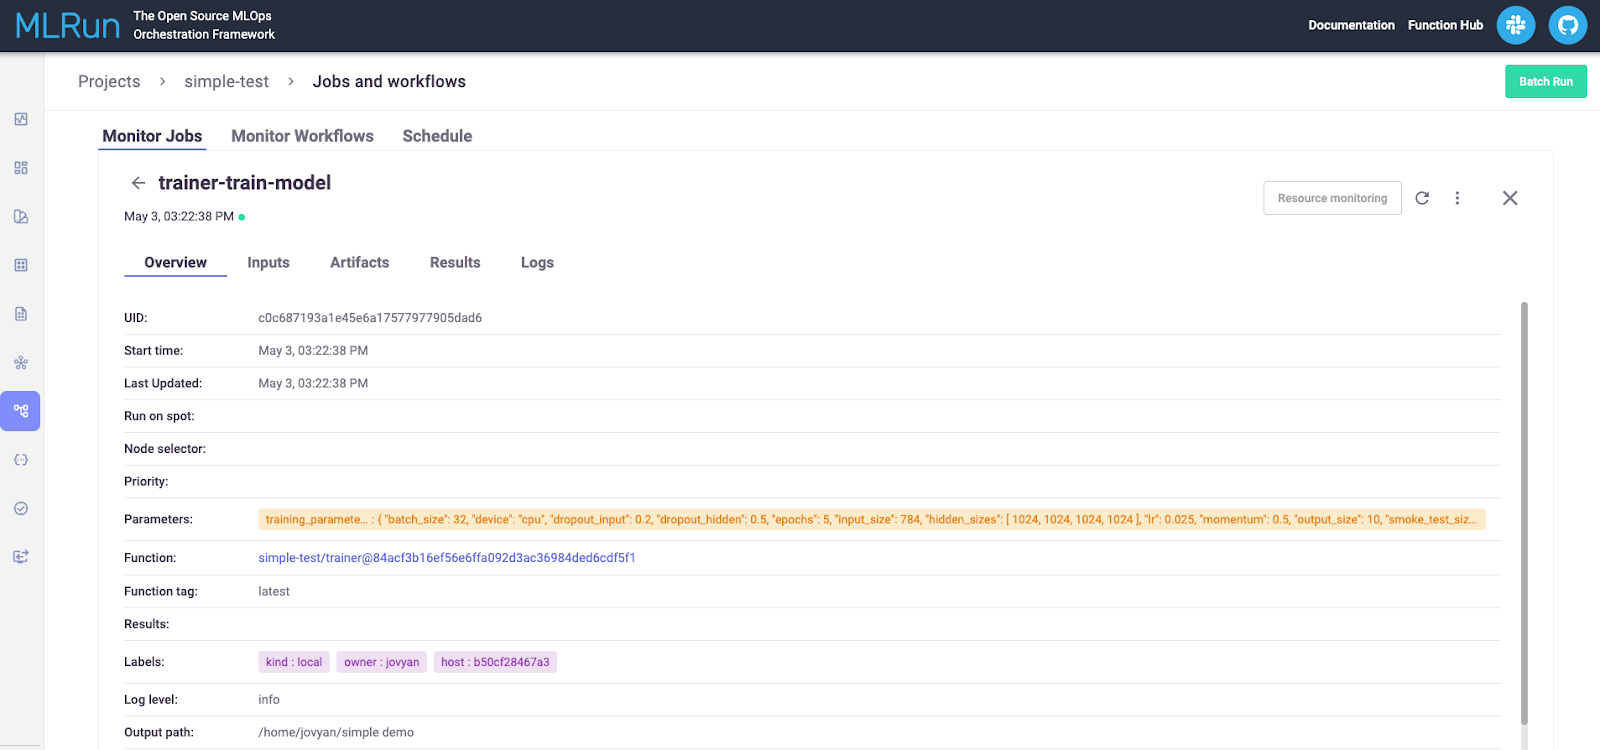
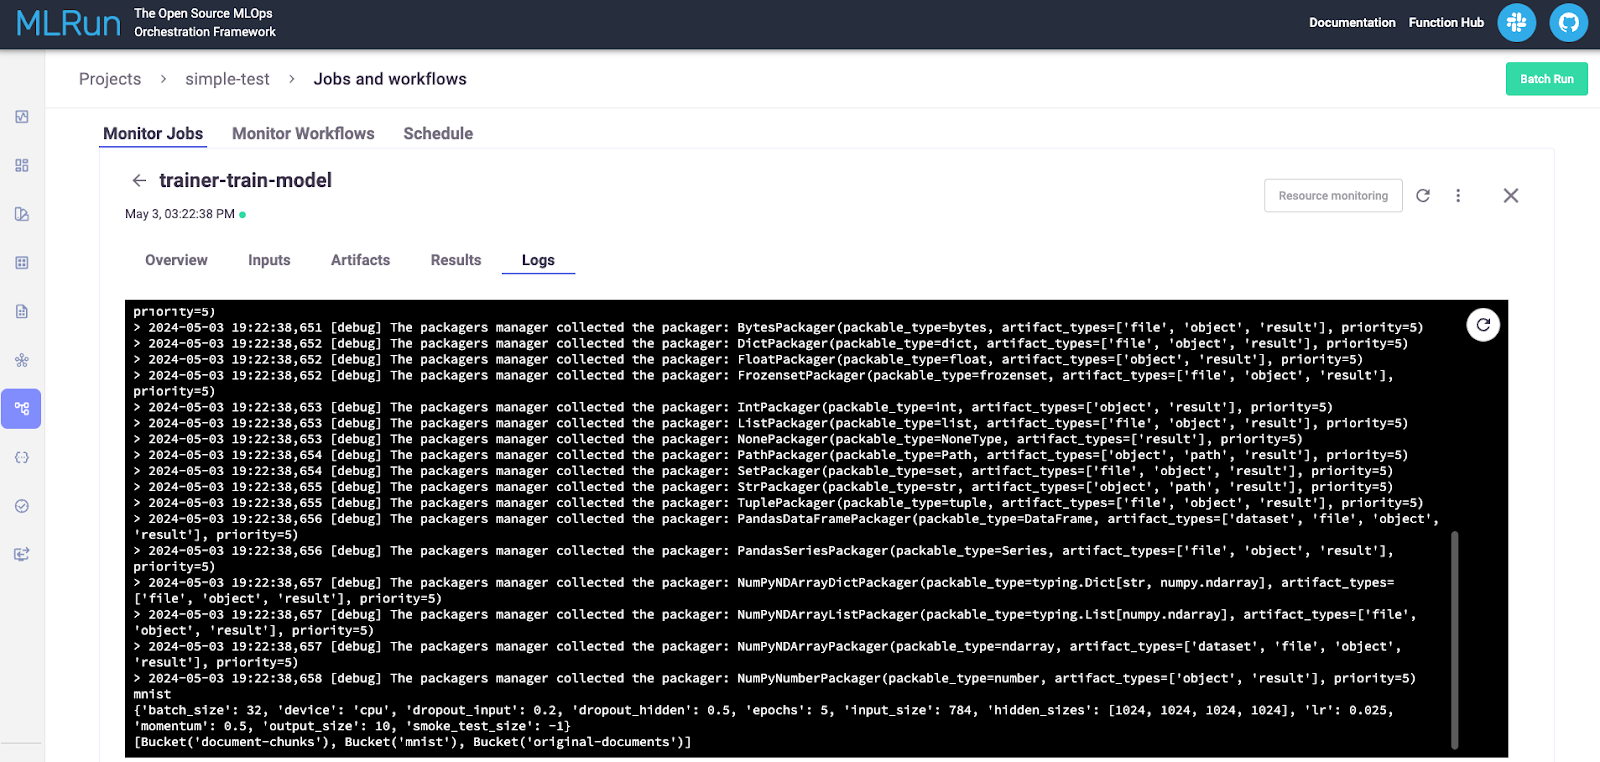
What is useful for debugging is the “Logs” tab. Here, we can see the messages we logged from our simple function that logged input parameters, connected to MinIO, and then logged all buckets found in MinIO.
Summary and Next Steps
In this post, we installed MLRun on a development machine using Docker Compose. We also created and ran a simple serverless function to get a feel for how code needs to be structured to run within MLRun. Our code was able to connect to MinIO to retrieve a list of buckets programmatically. We also configured MLRun to use MinIO for artifact storage.
Obviously, our simple serverless function barely scratched the surface of what MLRun can do. Next steps include actually training a model using a popular framework, using MLRun for distributed training, and exploring support for large language models. We will do this in future posts, so stay tuned to the MinIO Blog.
If you have any questions, be sure to reach out to us on Slack!


