Gone [to Prod] in 60 Seconds
![Gone [to Prod] in 60 Seconds](/content/images/size/w2000/2024/09/gonetoprod-in60seconds-noeyes.jpg)
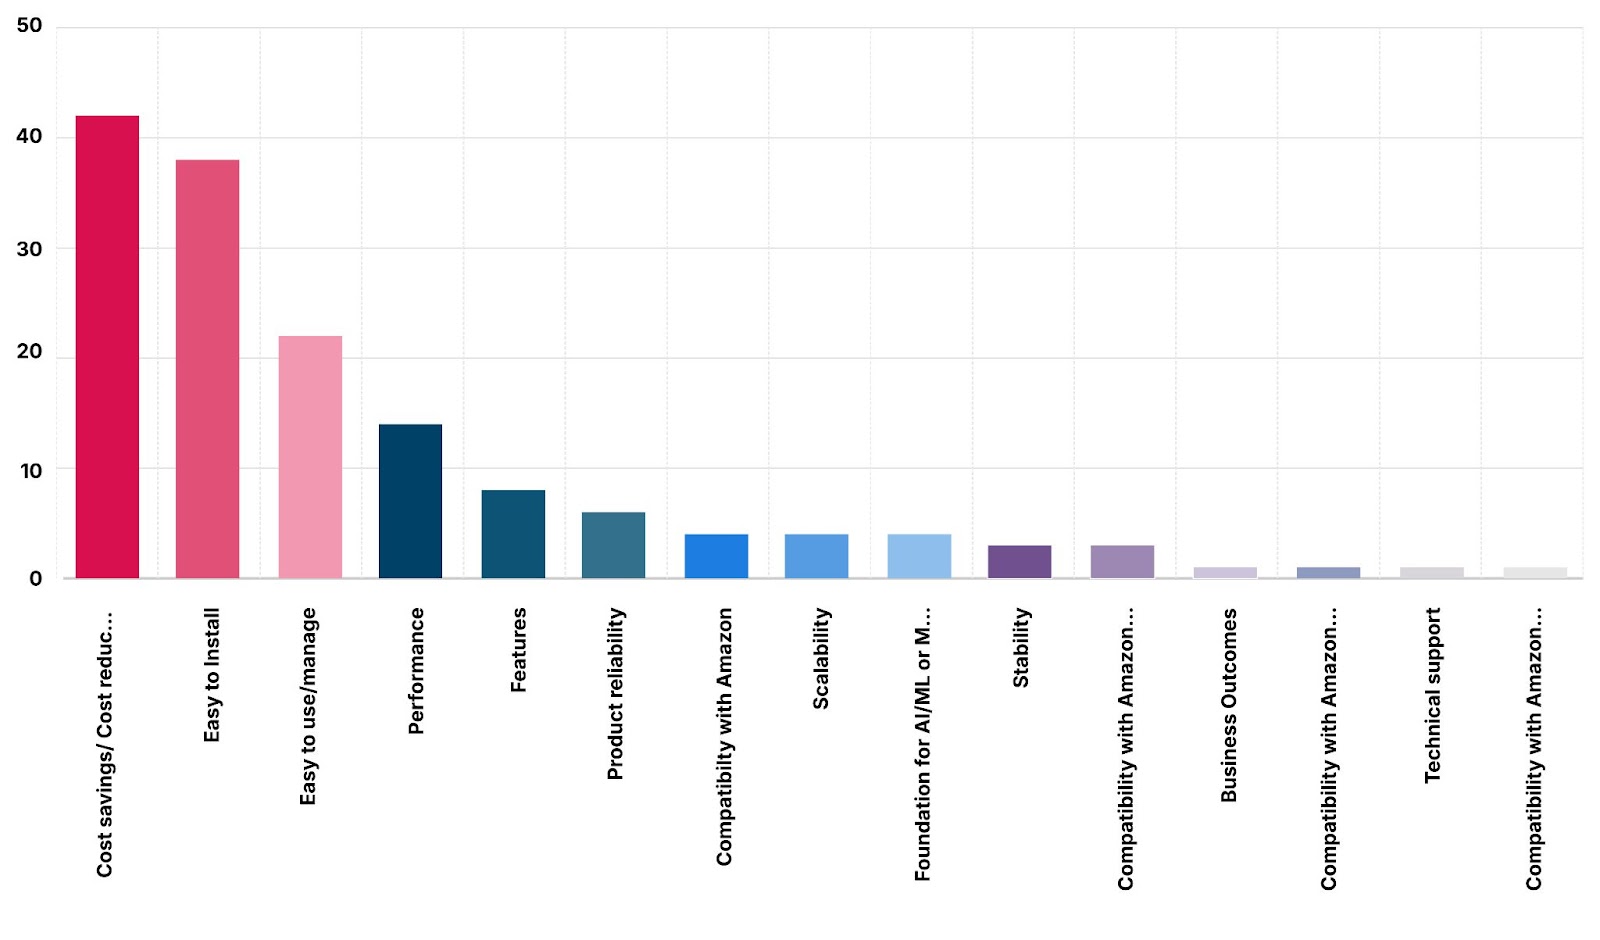
We designed the MinIO with a plethora of features without sacrificing the simplicity of usage or the beauty of our Console UI/UX. To learn what Enterprises want out of their object stores we’ve polled hundreds of people across multiple conferences in the past six months. Two of the top three things that they identify as key features/capabilities are: Ease of Install, Use and Management of MinIO.We often talk about this as the Day One, Two and Beyond class challenges and no one spends more time thinking about this than MinIO. To prove it we are going to get you to production in 60-ish seconds. We encourage you to try it yourself and post your videos. We will respond with a MinIO tshirt for those who come in under a minute.
Why is this important? CTOs and other Industry leaders want their teams spending more time using and learning the product rather than trying to set it up and running. There is no benefit to debugging the install portion of an application, it's more fun to use the application itself once it's up and running. Also the more arduous the install and setup phase the more deterred organizations are to go through with the product because that means more valuable time taken away from engineers on subsequent installs when they want to expand globally to other regions.
Speaking of global, it's important to not only ensure the initial development phase goes smoothly but also the subsequent phases of going to production. No point in getting everything working on a single instance in dev mode but then struggle to set it up in Cluster mode or scale and expand that Cluster.
In this post we’ll show you how quickly you can get a production grade of MinIO cluster up and running in just a few seconds. Not only that, but we’ll also show you how you can expand that cluster quickly in just a few seconds as well.
Kubernetes Cluster Prerequisites
Before deploying MinIO be sure you have the required hardware setup.
- You need a minimum of 4 nodes. These could be VMs or Physical nodes.
- You need Kubernetes running atop of these.
- The Disks, CPU and Memory must meet the minimum requirements.
Add a label to the 4 nodes into pool `zero` like so
Next, use the MinIO Operator's Kustomize configuration. This is where the Kubernetes yaml files for creating our 4-node MinIO cluster are stored. To get access to the config, be sure to email us at hello@min.io.
Deploy MinIO Cluster
Launching the MinIO cluster is fairly straightforward. You can edit the yaml files for fine tuning settings but here we will go with the sane defaults that have already been set for you.
Go ahead and apply tenant configuration to launch pool-0
Check to make sure there are 4 pods in the pool
That is! This is the initial setup that most folks start out with. This ensures you are set up in a way that sets you up to seamlessly expand in the future in a production environment.
Expand MinIO Cluster
Now ideally, MinIO recommends you to capacity plan ahead with enough hardware and storage capacity that you don’t need to add pools to expand the cluster. But on the off chance that you do need to expand, it's not so difficult and can be done in just a few seconds.
The prerequisites are similar to the pool-0. Bring up 4 more nodes without enough resources, be sure to have Kubernetes installed on them and apply the node label. Let's go ahead and do that now.
Add a label to the 4 nodes into pool zero like so
Expanding a pool is a non-disruptive operation which causes zero cluster downtime. Below is a diagram of what we intend to achieve as an end result.

Edit the tenant-lite config to add pool-1
It should open a yaml file, find the pools section and add this below that.
As soon as you save the file, the new pool should be starting to deploy. Verify it by getting a list of pods.
There you have it. Wasn’t that a remarkably easy way to expand?
With a Grain of Salt
Take the above with a grain of salt. To achieve this level of installability and expandability you do have to have the initial hardware and Kubernetes cluster setup to make this as quick as possible. But how many high-performance, enterprise class storage systems out there can you set up in production with the same speed as the MinIO Object Store? I mean think about it, go ahead, name me one, I’ll wait….
Couldn’t think of any? Yes there are storage solutions that can get it in Dev mode quickly, but they are a pain to get it working anywhere near in clustered mode in regular bare metal Linux boxes, let alone adding the complexities of Kubernetes on top of that.
Here at MinIO we built our Object Store with simplicity and ease of install and usage not as an afterthought, but as the foundation. While we have every enterprise-grade feature imaginable (and some others), ultimately an application has to be used and maintained on a daily basis, so the easier it is to set up, use, maintain and automate - the more valuable it is to the organization.
If you have any questions on how to get AIStor up and running quickly be sure to reach out to us on Slack!


