Multi-Site Active-Active Replication

Synchronizing data between multiple data centers is a core competency of any object storage service. MinIO already checked this box with its performance optimized Server-Side Active-Active Bucket Replication. Initially, MinIO only recommended two MinIO deployments.
Active-Active replication supports scenarios such as:
- Same-DC Replication
- Cross-DC Replication
- Same-Region Replication
- Cross-Region Replication
Active-Active replication is a key tool for organizations looking for multi-primary topologies, fast hot-hot failover, and multi-geo resiliency.
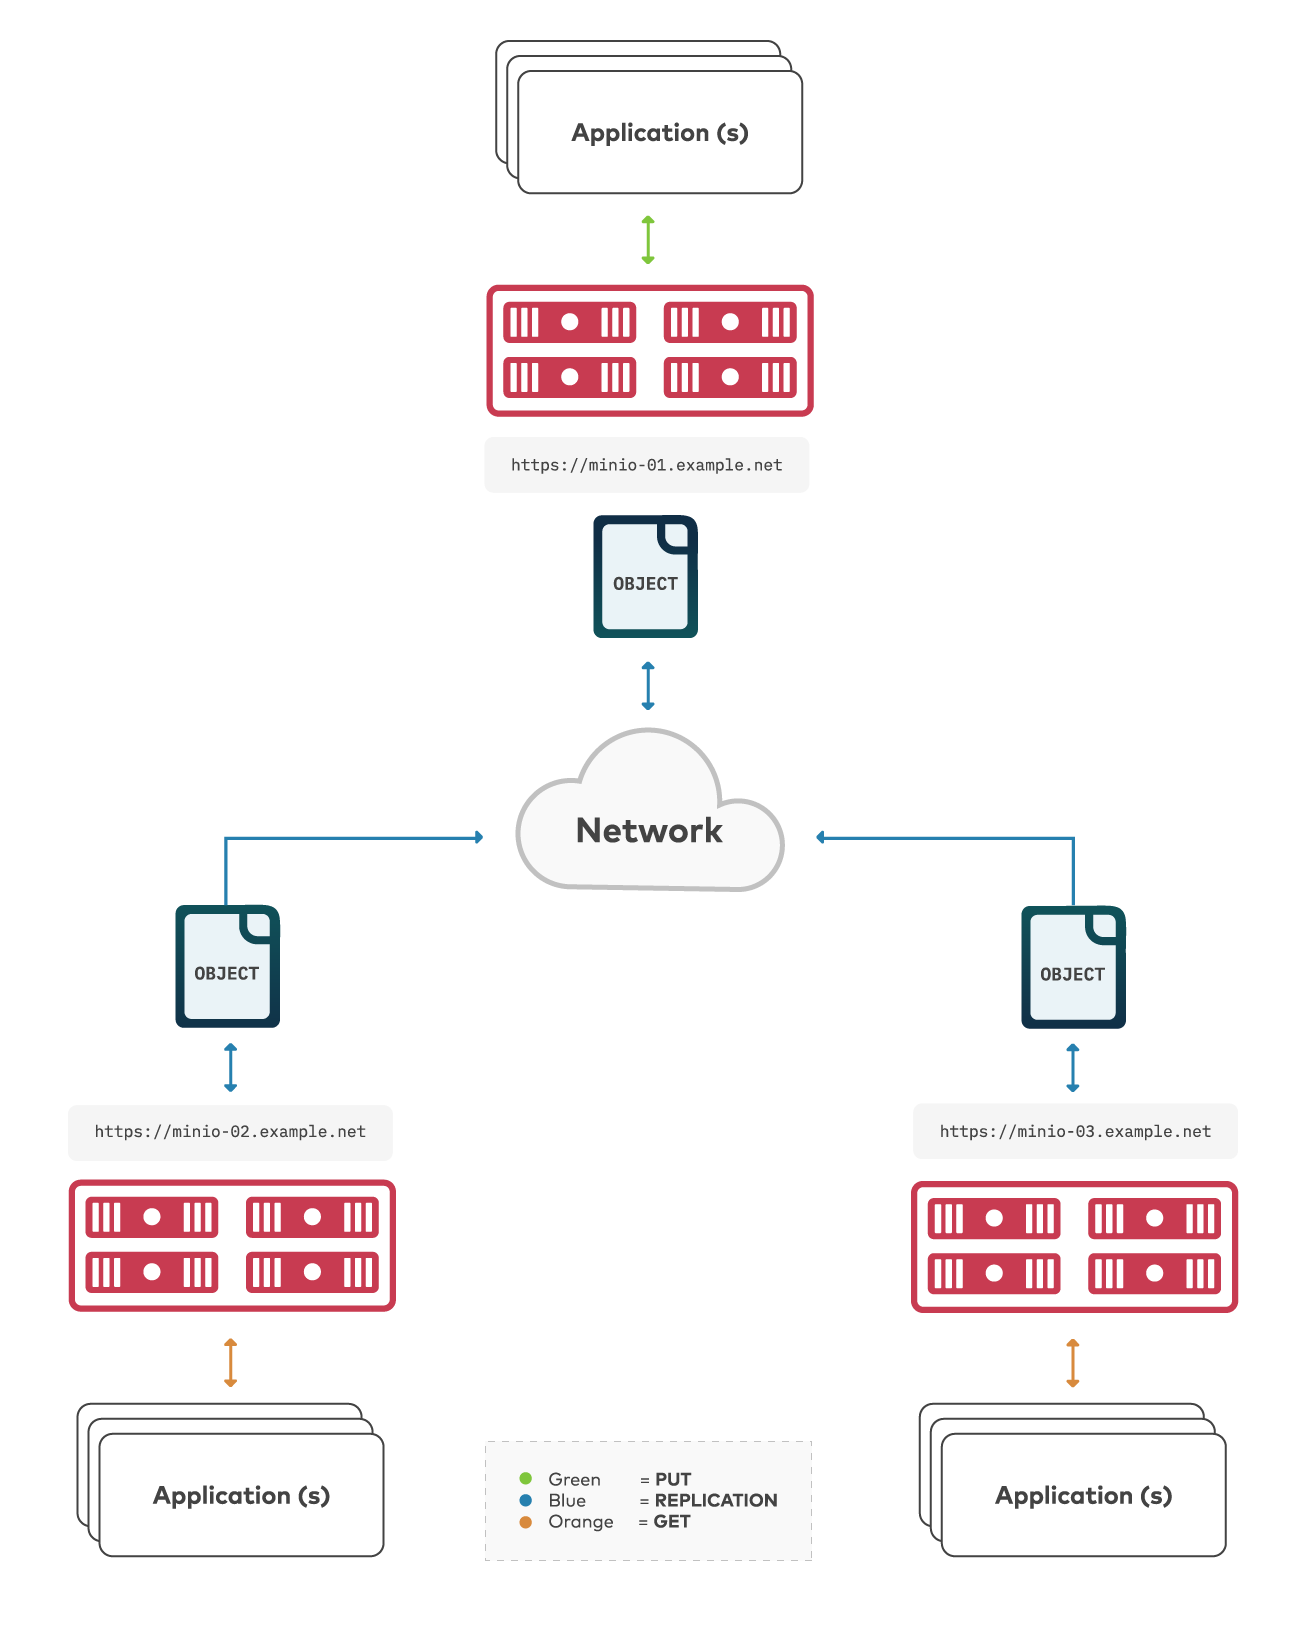
Starting with our latest MinIO server release, MinIO supports Multi-Site, Active-Active replication for synchronization of objects between an arbitrary number of MinIO deployments. Think of multi-site replication like a mesh network - each bucket synchronized across multiple mesh nodes. This further improves the flexibility of MinIO replication for organizations with more complex requirements around multi-DC or multi-region synchronization.
Multi-site replication builds on the Two-Way Active-Active framework and retains key functionality, such as replication of delete operations, delete markers, existing objects, and replica metadata changes. This blog focuses on configuring multi-site replication using the MinIO Console - if you want to learn more about MinIO replication, check out these resources:
- MinIO Introduces Continuous Availability and Active-Active Bucket Replication
- Tiering, Active Active Replication and Continuous Data Protection - Critical Capabilities in the Cloud: CFD11 Deep Dive Session Two
- DOCS: Enable Multi-Site Server-Side Bucket Replication
Architectural Considerations
Multi-Site replication shares the basic considerations for Two-Way Active-Active replication, with a few additional considerations around latency:
Hardware: MinIO recommends the same hardware on all deployments participating in the multi-site replication configuration. Each added MinIO deployment with heterogeneous hardware profiles increases complexity and slows identification of potential issues.
Network: Each MinIO deployment participating in multi-site bucket replication adds to the bandwidth and throughput requirements of all other deployments in the replication configuration. Ensure the entire network - the NICs, switches, and cables themselves - provide more throughput and bandwidth than required for the amount of data replicated between sites.
Latency: Multi-site replication has increased latency sensitivity, as MinIO does not consider an object as replicated until it has synchronized to all configured remote targets. Replication latency is therefore dictated by the slowest link in the replication mesh.
Scale: The main limitation to scale for multi-site replication is the management overhead of each MinIO deployment participating in the configuration. Each MinIO deployment is an independent object storage service - replication only synchronizes objects between configured buckets. Administrators remain responsible for synchronizing server-level configurations, such as Identity and Access Management or network ingress.
Configure Multi-Site Replication
Multi-Site replication starts with configuring the remote MinIO deployments to which the "source" deployment replicates data. We need to do this for each MinIO deployment participating in the multi-site replication configuration. If I have three MinIO deployments, I would have to repeat this step three times total.
We're going to use the MinIO Console to make things easier, although this can also be done with ‘mc’ from the command line. You can start by logging into the Console from your web browser - just enter in the IP address or hostname for any one of the MinIO Deployments. I'm running a distributed MinIO deployment (1 node, 4 drives) locally on port 9001, so I'm just going to browse to http://localhost:9001.
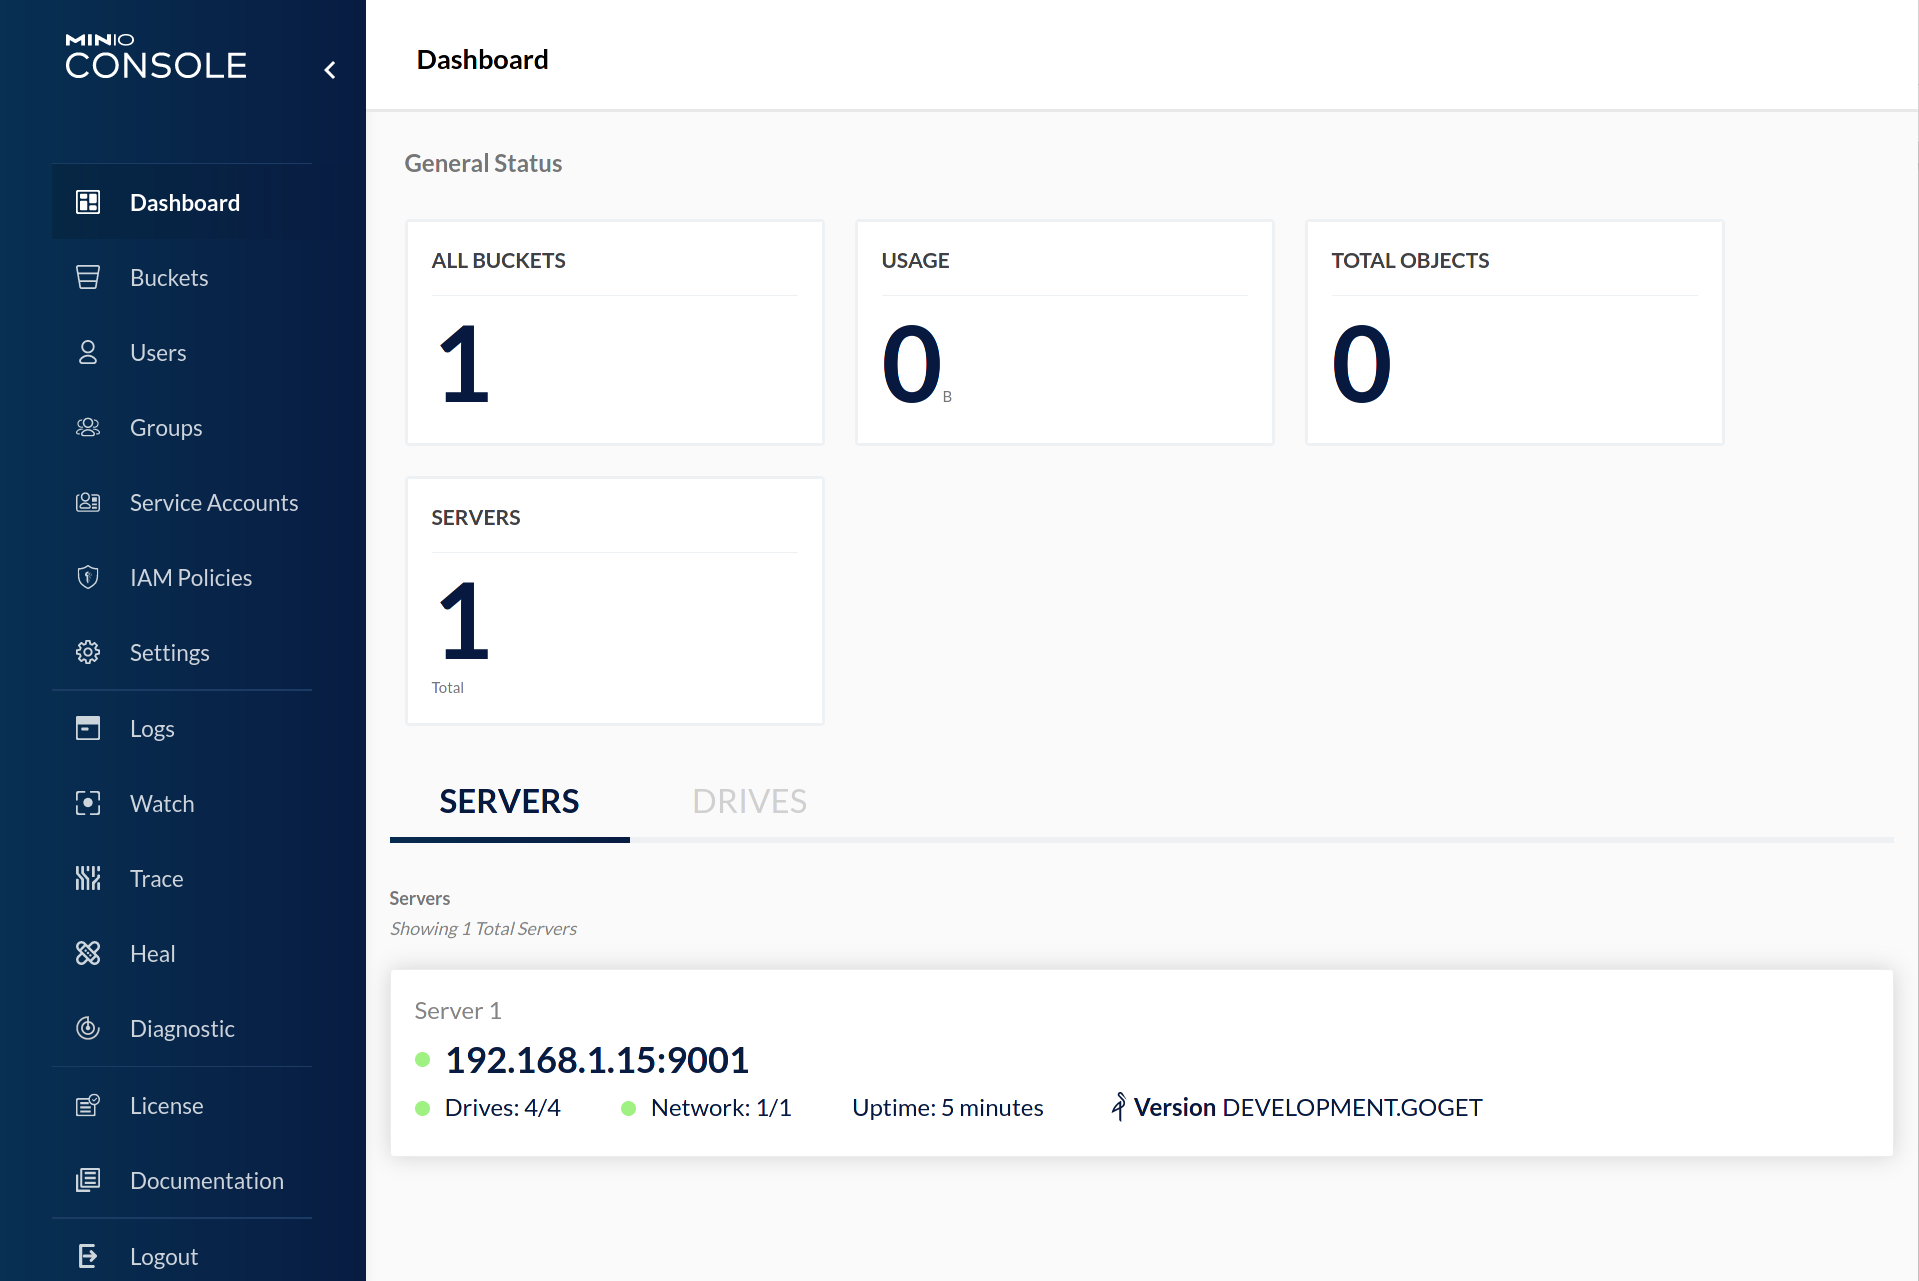
It's important that the user you log in with has the necessary permissions to configure replication. For simplicity, I'm using the root credentials - but for production deployments, you should follow the principle of Least Privilege and create a user (or users) for supporting replication-related configurations.
Once logged in, select Buckets from the left-hand navigation menu. Select the Create Bucket + button in the top right corner to open the Create Bucket modal.
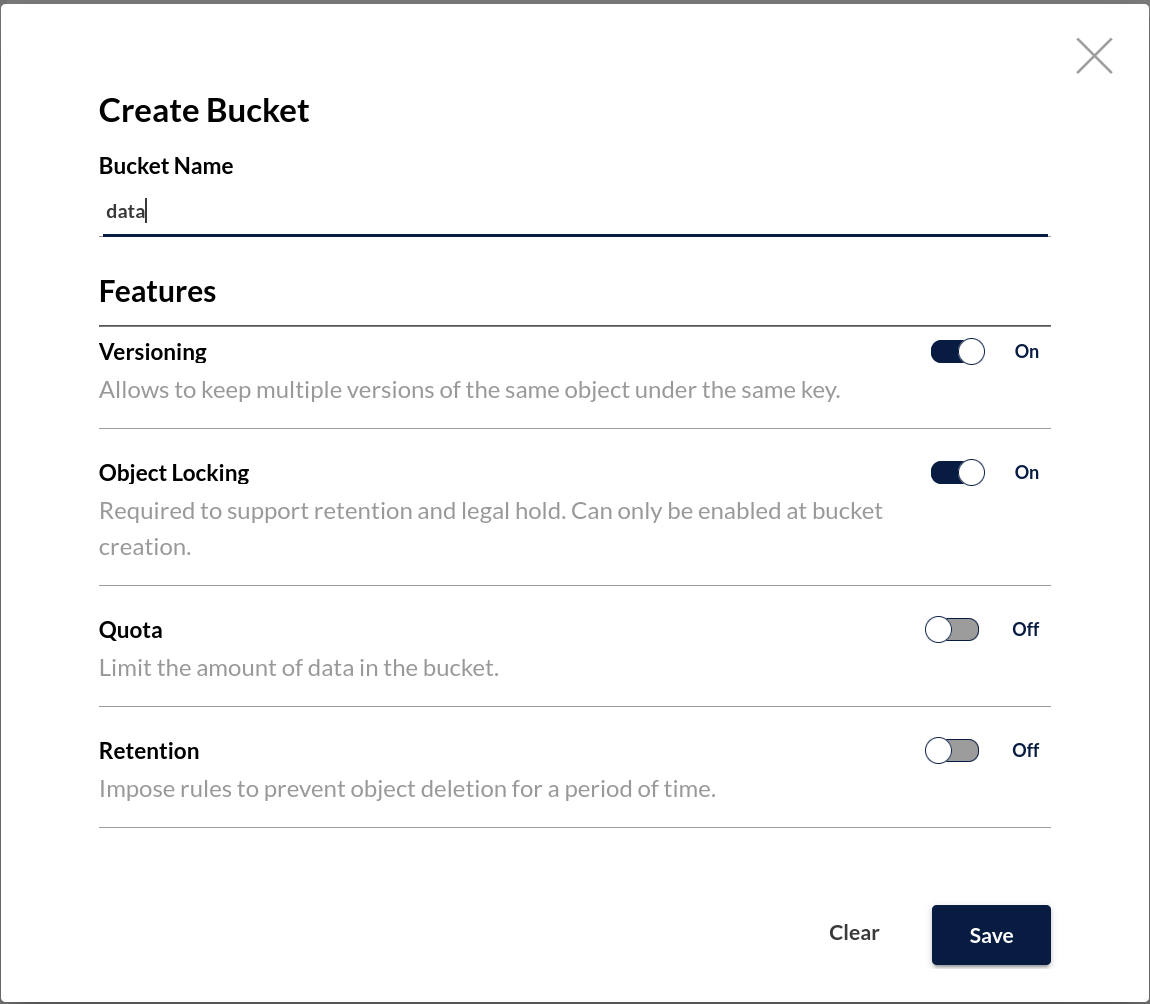
Specify a name for the bucket and enable Versioning. Replication requires versioning, and it's easy to enable it here.
I'm also going to enable Object Locking so I have the option to set retention settings on this bucket later. The AWS S3 spec requires enabling Object Locking at bucket creation, so we have to do it here.
Repeat this step for each MinIO Deployment participating in the multi-site replication configuration. For my local setup, I have three MinIO deployments, so I have to do this three times total. I'm also going to set up multiple buckets so we can showcase a new feature added as part of this release:

Remember - each bucket has to have consistent settings for versioning, object locking, and encryption (if configured) across all MinIO deployments. MinIO requires and enforces this to ensure that an object always has the same behavior regardless of which MinIO deployment it resides on. Otherwise, you could have one deployment where an object is WORM locked while another deployment allows mutations of that object.
Once I have all my buckets ready, I'm going to bulk configure replication for all three buckets.
First, select the Bulk Select button to enable bulk selection. This activates a checkbox for each Bucket. Select the buckets for which you want to configure replication, then select the Set Replication button to open the Set Multiple Bucket Replication modal.
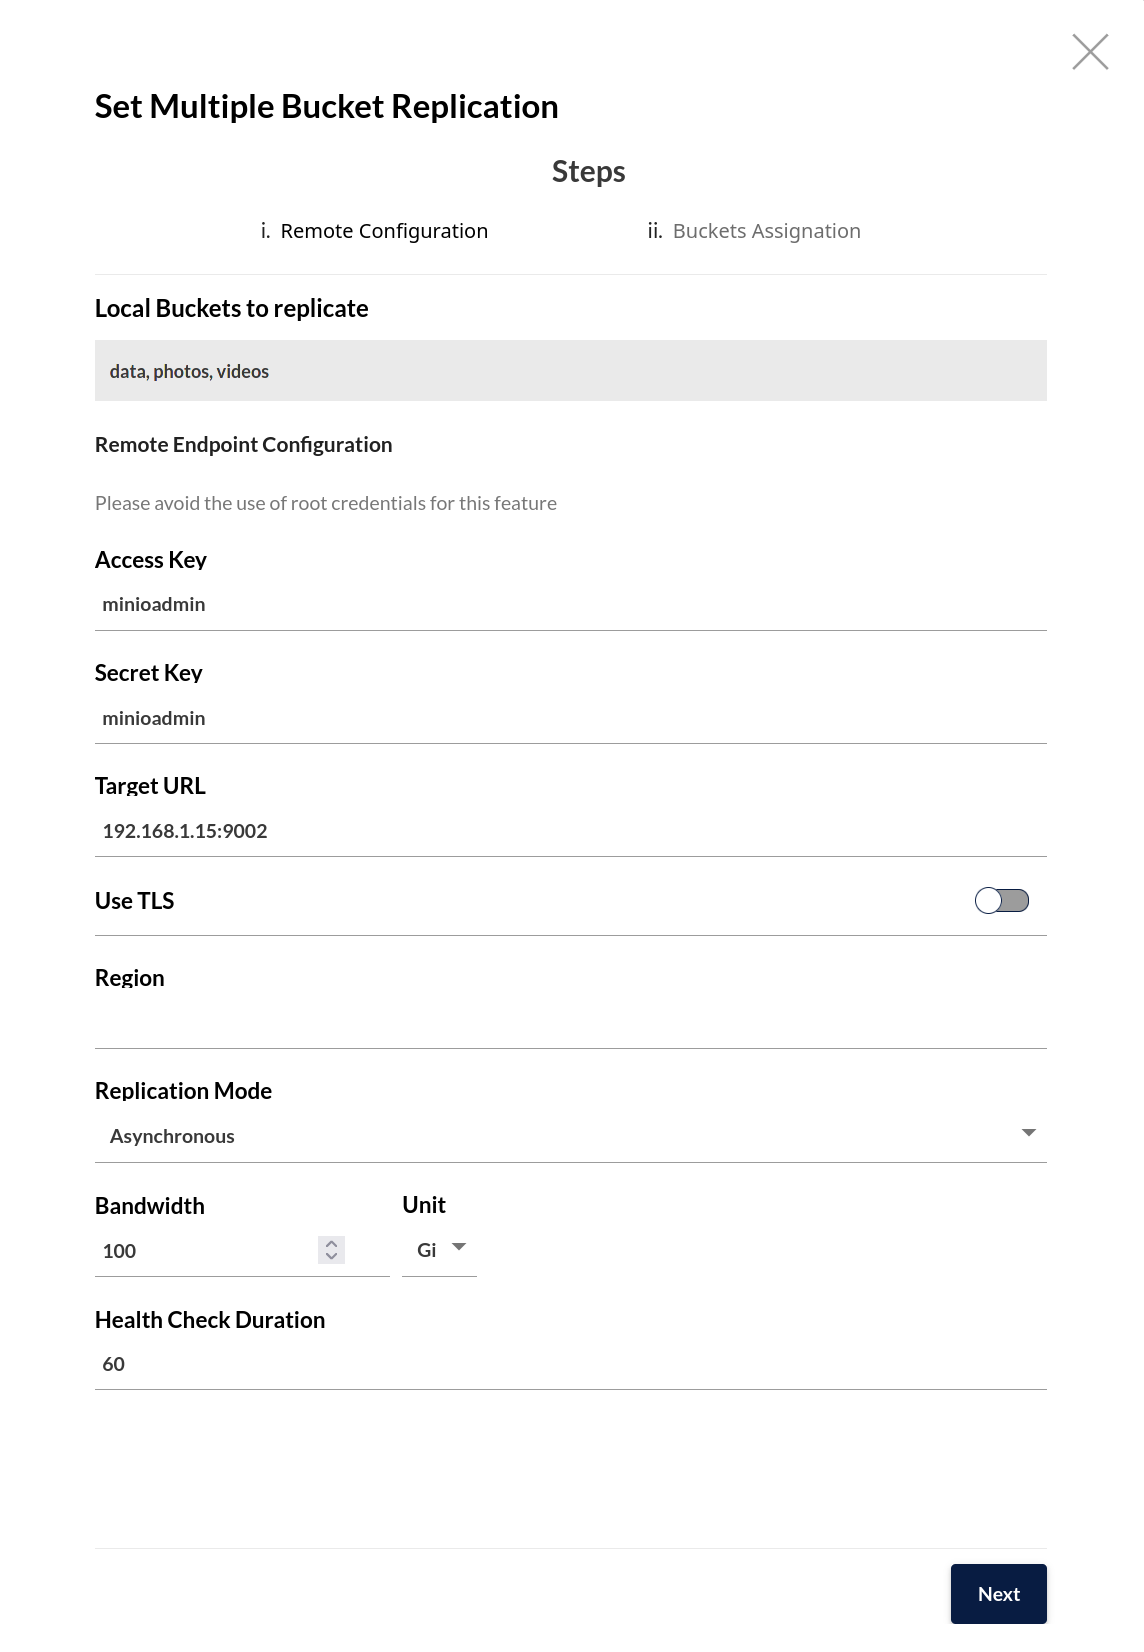
I'm going to fill in the access key and secret key of a user on the remote deployment here - again, one that has the correct permissions - along with the deployment hostname. Since I'm doing this all local, I'm just specifying the IP address and port, and disabling TLS. For a production environment, this should be the hostname of a load balancer managing traffic among the MinIO deployment's nodes.
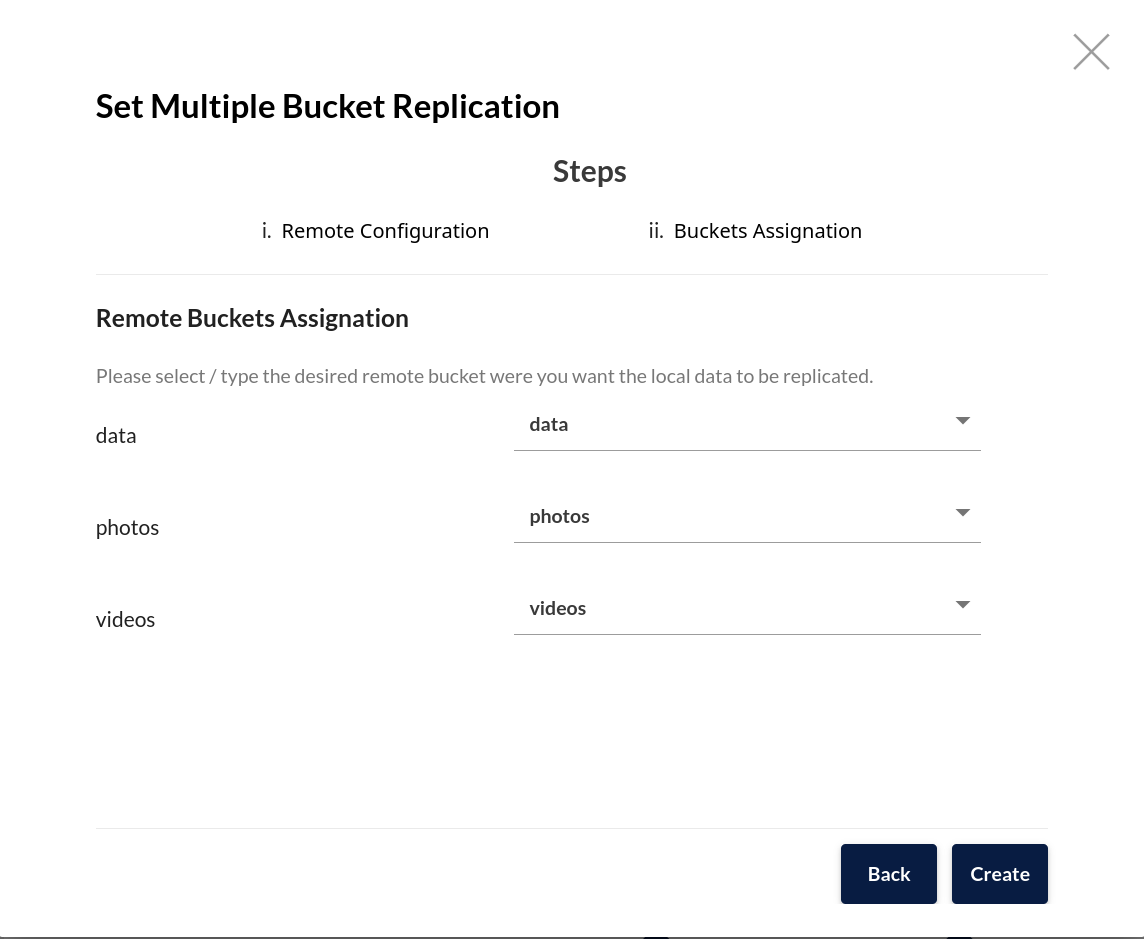
Select Next to begin assigning each bucket their remote target. Since this is active-active replication, I'm using the same bucket name for both source and destination. This ensures applications can consistently access a given object path across all MinIO deployments:
I can review the replication rules I just created by selecting the Manage button to view the Bucket details, then selecting Replication.
Now that I've finished doing this configuration on my first deployment, I need to repeat this process for all of the other deployments. If we were doing this in the shell or terminal, we would use the `mc` command line tool to run multiple `mc admin bucket remote add` and `mc replicate add` commands, once per node, setting unique priorities per rule. The Console handles all that heavy lifting for us in a single UI modal, which significantly reduces the complexity of this procedure.
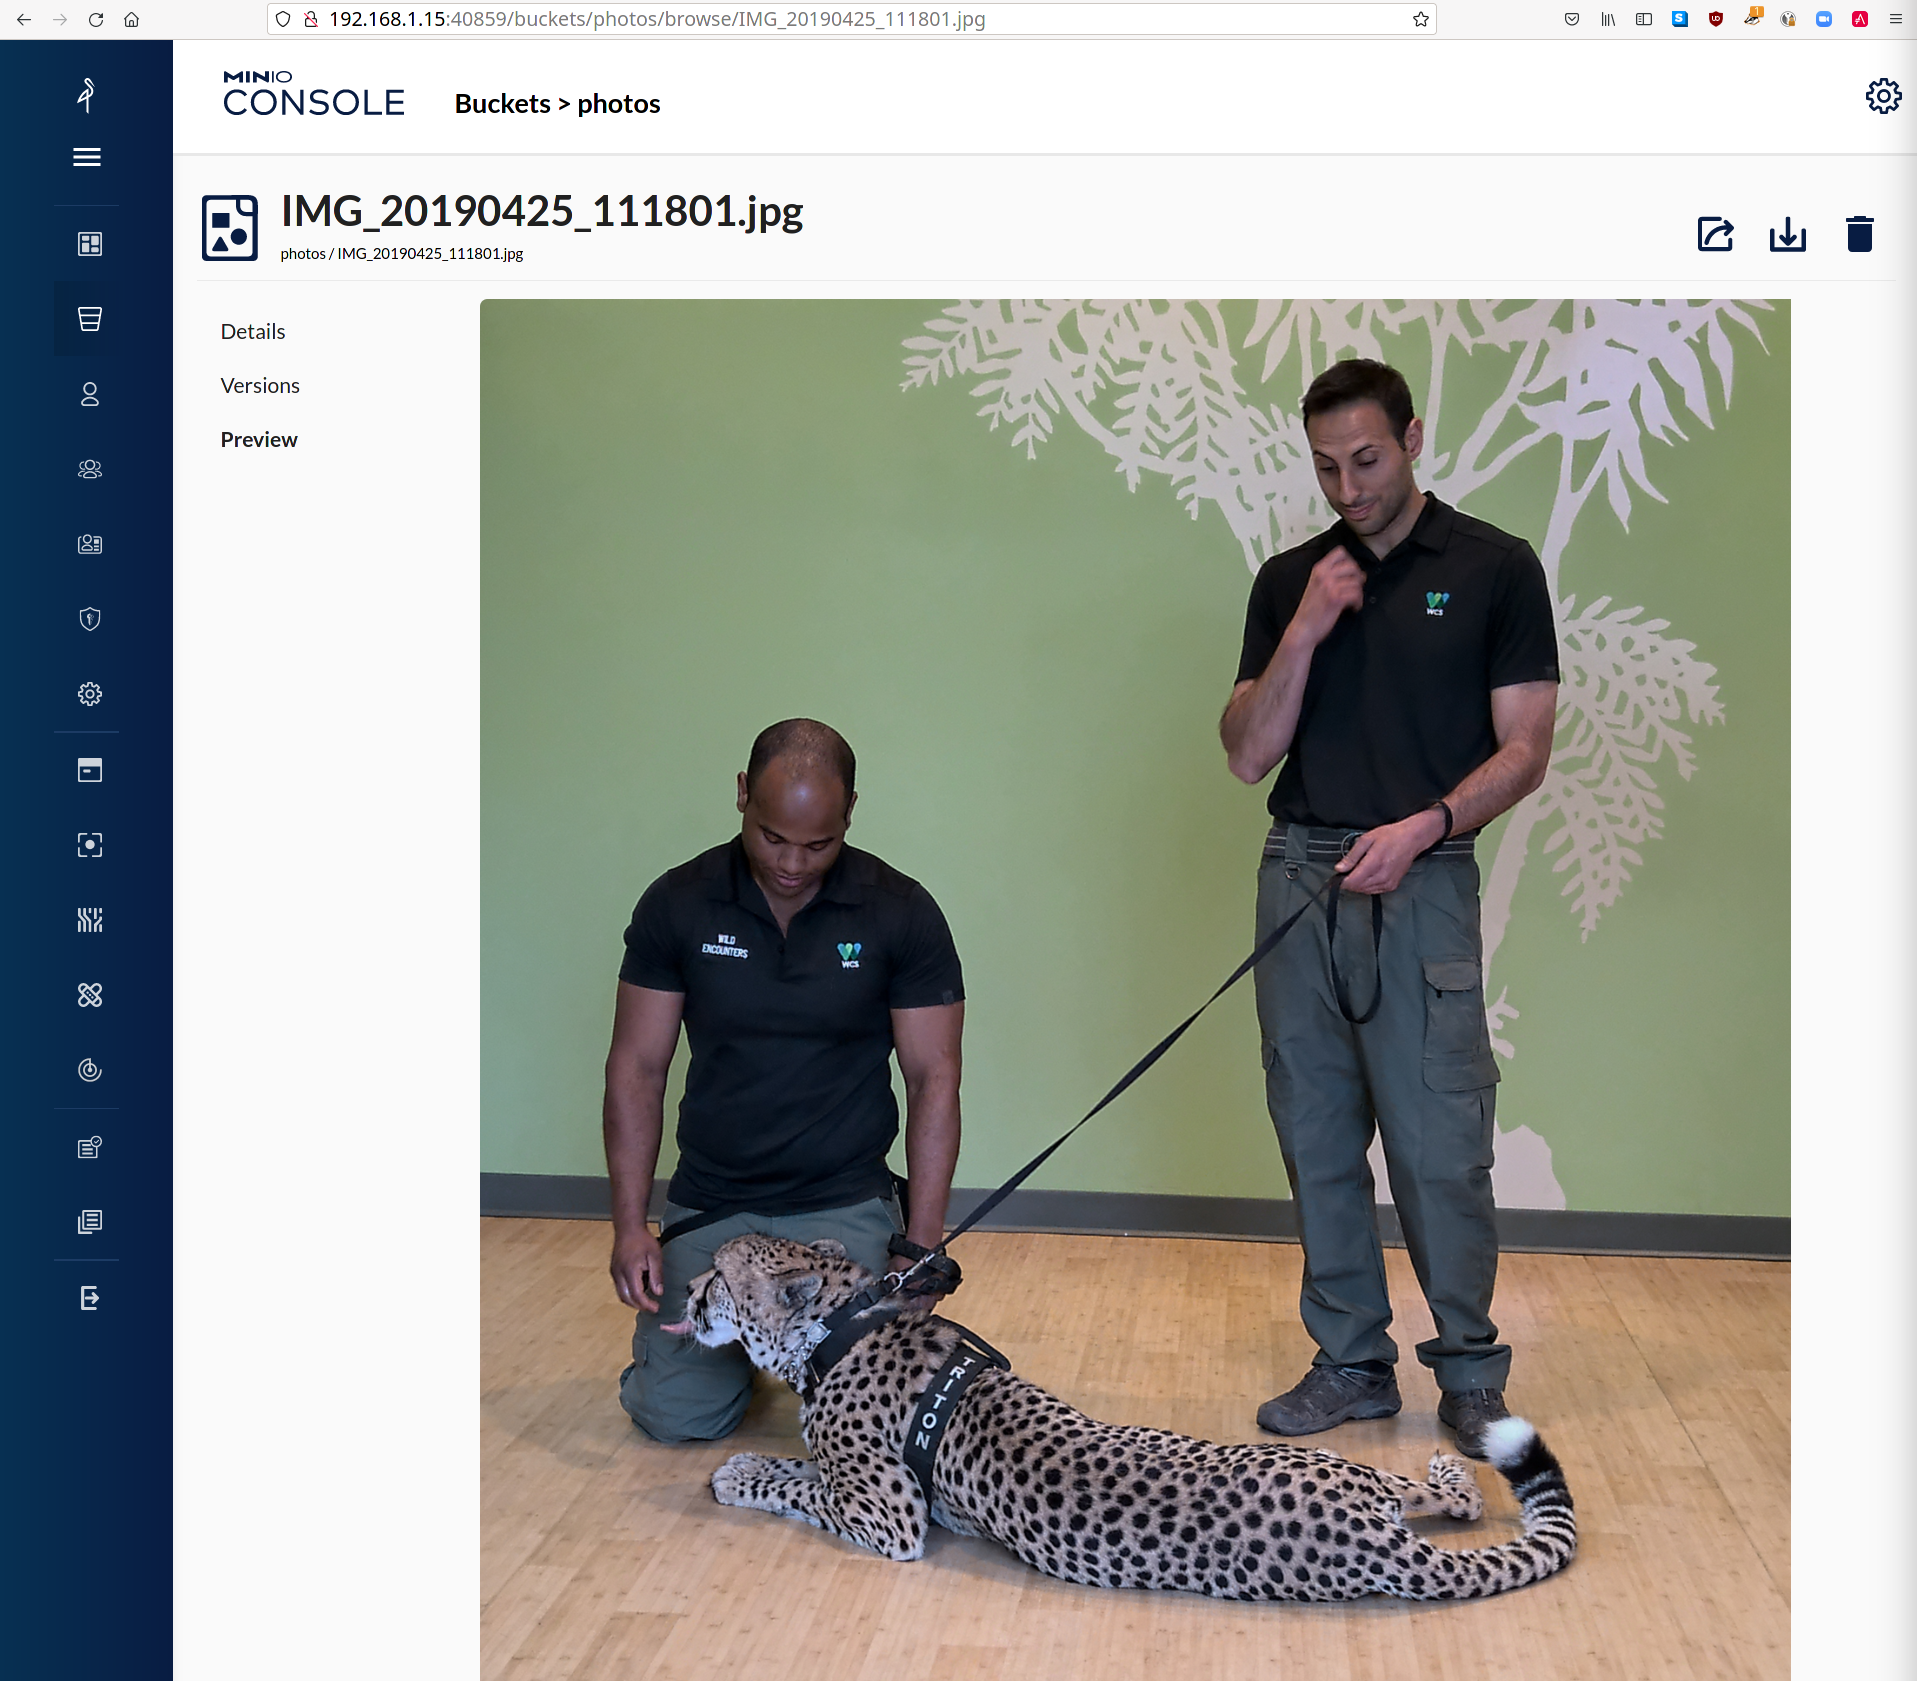
Once I have all of my deployments configured for bucket replication, I can test to confirm by writing a file to any one deployment and attempt to read it from another. I can use the MinIO Console here as well to do a simple file upload into the Photos bucket on one deployment, then check the content of that bucket in another deployment: I'm going to upload a picture of Triton the Cheetah from a visit to the Bronx Zoo in New York:
I'm going to check this same file in another one of my local deployments - this time I'm going to look at the Object Metadata:
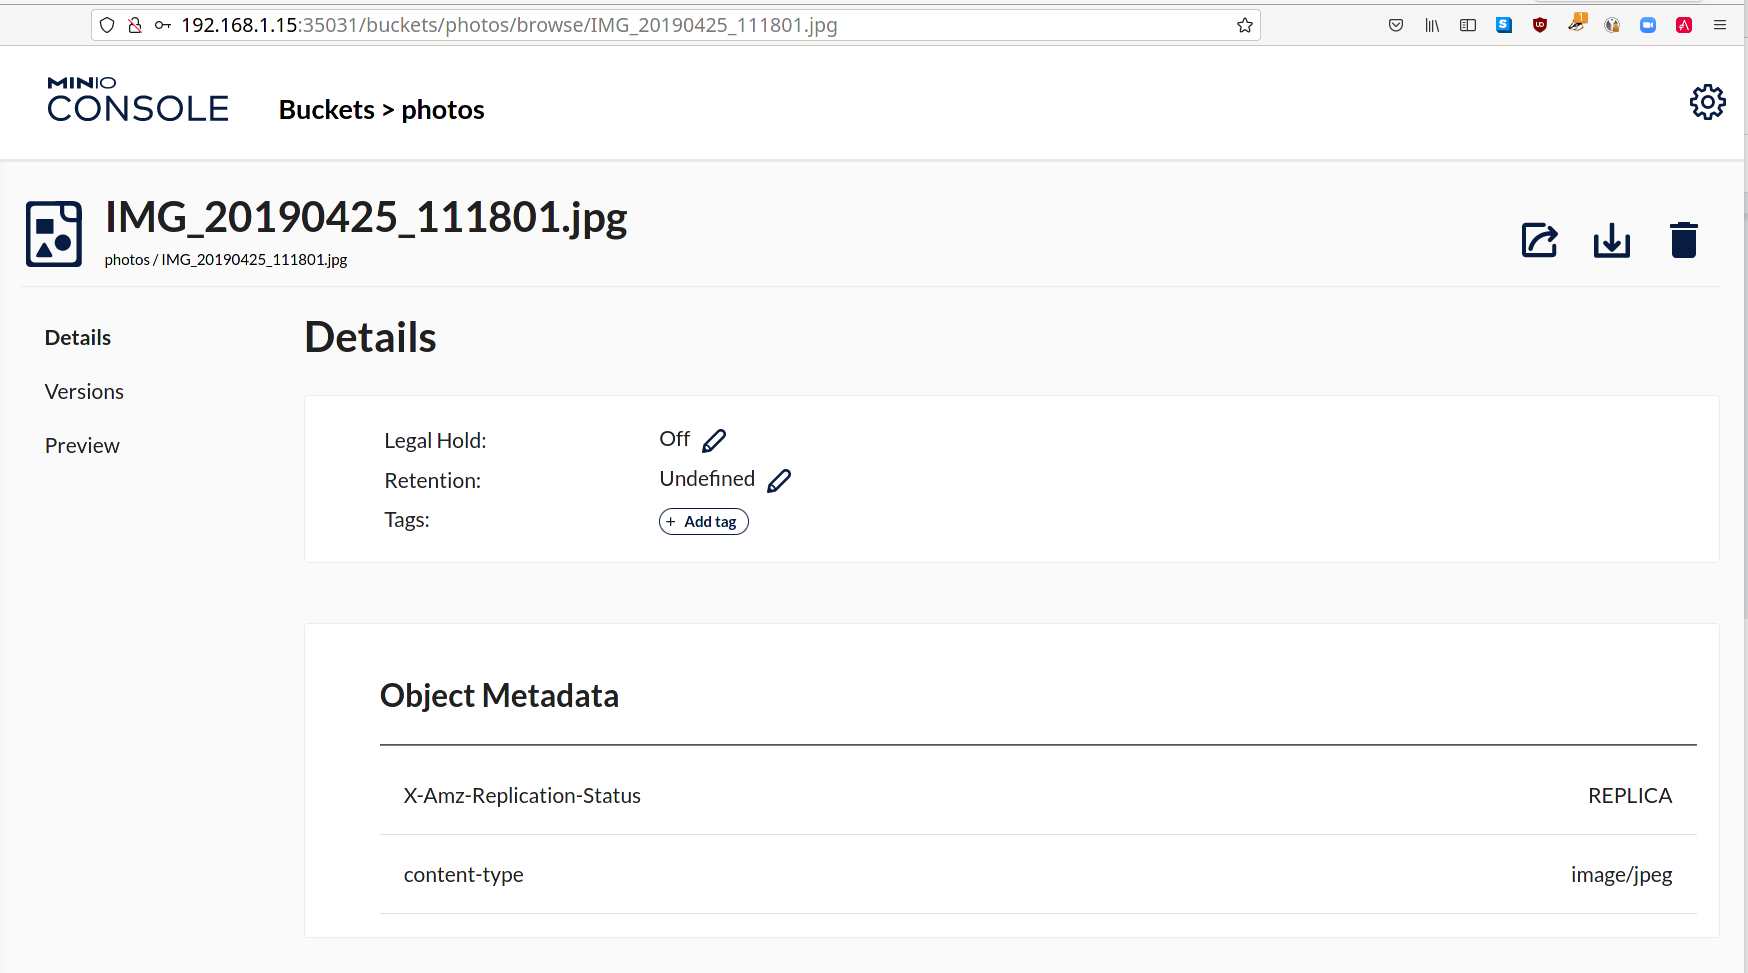
Note the X-Amz-Replication-Status metadata as REPLICA. That indicates this object was replicated from another bucket. If I inspected that same file on the deployment where the object was originally uploaded, the metadata would instead say COMPLETED.
Well what about…
Multi-site replication carries a lot of power, and with that a certain amount of added complexity. We know there are going to be a lot of questions on how to use this feature, and we're going to try to answer some of them here:
What happens when a replication target goes down?
Similar to both One-Way and Two-Way replication, MinIO keeps a queue of unreplicated objects and continuously attempts to complete replication over time. Once the target comes back online, MinIO can start replicating data from the queue to that target.
One caveat here - a lot depends on whether you have configured synchronous or asynchronous replication. We go into more detail here, but the quick summary is:
- Asynchronous replication occurs after returning write success (e.g. PUT, DELETE)
- Synchronous replication occurs before returning write success
That means that applications are more likely to hang and wait with synchronous replication if a replication target goes down.
It's worth noting - with sufficient network infrastructure, MinIO asynchronous replication is near-synchronous. There should be relatively few deployments that require synchronous replication in even one or two-way setups. In a multi-site setup, you should take extra caution before enabling synchronous replication.
How many sites can I have?
There are no limits imposed by MinIO here when it comes to the number of sites you can configure active-active replication between. Experienced users may recognize that our tutorial is essentially configuring multiple two-way active-active replication links for a given bucket.
The only real limit is the operational complexity of managing and maintaining multiple MinIO deployments across racks, data centers, or even regions while maintaining the necessary latency and bandwidth requirements to support near-synchronous replication of objects without compromising overall throughput on the MinIO deployment. This is entirely up to your organization's comfort level.
What should I do with my applications?
The general recommendation is to use a load balancer to manage directing applications to a given MinIO deployment or node within that deployment. That guidance still applies for multi-site replication, though you have more interesting options.
For example, if you have multi-site replication between MinIO deployments in specific geographic regions, you could configure your load balancers to do lowest-latency routing to allow applications to perform read/write operations from the geographically "nearest" MinIO deployment.
If your goal is instead very high availability in the event of a major disaster (e.g. multi-DC hot failover), you can use MinIO Sidekick to load balance between each MinIO deployment. Applications will automatically get directed to the healthy MinIO deployment based on the order specified to Sidekick.
Can I do this outside of the MinIO Console?
The MinIO Console is wrapping the following commands:
- mc admin bucket remote - create and manage remote replication targets.
- mc replicate - create and manage replication rules
Our tutorial Enable Multi-Site Server-Side Bucket Replication includes end-to-end examples of using the MinIO `mc` command line interface for configuring multi-site replication.
What if I need help?
If you are planning to or are in the process of configuring multi-site replication, chances are you're dealing with enterprise-grade infrastructure and scale. That requires enterprise-grade support, and you can get that through MinIO SUBNET.
SUBNET includes direct-to-engineering guidance around planning and implementation that can significantly reduce the operational burdens of deploying and managing a multi-site configuration. SUBNET includes plans for both 24-hour and 1-hour SLAs depending on your organization's requirements.