Powering AI/ML workflows with GitOps Automation

As a developer deeply entrenched in the world of automation and AI, we've come to appreciate the remarkable synergy between cutting-edge tools and methodologies that push the boundaries of what's possible. In this exploration, we want to share a concept that has not only revolutionized our approach to software development and infrastructure management but has also opened the door to endless innovation: GitOps. This paradigm harnesses the power of Git as the cornerstone of operational excellence, has been a game-changer in our toolkit and sets the stage for limitless possibilities.
The convergence of MinIO's high-performance object storage, Weaviate's AI-enhanced metadata management, Python's dynamic scripting capabilities, and the systematic approach of GitOps forms a powerful foundation for any developer eager to delve into AI and machine learning. These tools not only simplify the complexities of data storage and management but also provide a flexible, robust environment for rapid development and deployment. By integrating these elements into our development practices, we set the stage for projects that are built on a scalable, efficient, and automated infrastructure. This article aims to guide you through these technologies, propelling your AI initiatives from concept to reality with ease.
This integration, consisting of MinIO for object storage, Weaviate as the metadata manager, Python as the dynamic engine, and GitHub/GitOps for streamlined infrastructure management, creates a potent foundation for developing homegrown AI solutions.
- MinIO—The Object Store Backbone: MinIO offers high-performance object storage, essential for managing vast datasets efficiently. It serves as the backbone, ensuring data availability, security and scalability.
- Weaviate—Metadata Management with AI: Weaviate acts as a sophisticated metadata manager, leveraging AI to provide semantic search capabilities, enhancing data discoverability and usability.
- Python—The Development Engine: Python, with its simplicity and vast AI/ML library ecosystem, serves as the development engine, enabling rapid prototyping and deployment of AI applications.
- GitHub/GitOps—Infrastructure Automation: GitHub Actions empowers GitOps by automating infrastructure management, ensuring smooth, error-free deployments. It streamlines CI/CD within GitHub, enhancing efficiency and reliability in DevOps workflows.
Unlocking AI Potential
With these components, we can set the framework not just for developing applications but for innovating at the edge of AI research and development. This integration empowers developers to spend more time exploring and less time building and testing. In particular the combination of services we are deploying makes for an excellent AI/ML starting point for anyone interested in developing AI environments with the confidence of a robust, scalable, and automated infrastructure backing them.
MinIO Weaviate Python GitOps and Workflows
To create a GitOps workflow for testing, use the provided docker-compose.yaml below which contains definitions for app, minio and weaviate services. We'll use a CI/CD pipeline approach, leveraging GitHub Actions for automation.
The goal is to automate the process of building, testing, and validating the Docker compose setup every time a change is pushed to the repository. A successful workflow will opt for you to generate a “Status Badge” which provides live updates when placed in a markdown document.

Directory Tree Structure
All files are available via the GitHub minio/blog-assets/minio-weaviate-python-gitops repository folder:
├── .github/workflows
│   └── docker-workflow.yml
├── README.md
├── app
│   ├── Dockerfile
│   ├── entrypoint.sh
│   └── python_initializer.py
├── docker-compose.yaml
└── minio
    ├── Dockerfile
    └── entrypoint.sh
Directory tree
Essentially, close this repo and add these files to a GitHub repository of your own as demonstrated in the above directory-tree. It will automatically run via GitHub under the specific repository’s “Actions” tab.
What is GitOps?
GitOps is a modern approach to software development and infrastructure management, rooted in four key principles that streamline and secure the deployment and management of infrastructure and applications:
- Declarative Configuration: Systems and their desired states are defined using code, making configurations easily maintainable and understandable.
- Version Control and Immutability: All changes and the desired state configurations are stored in Git, providing an immutable history for auditability and rollback capabilities, thereby ensuring consistency and reliability.
- Automated Deployment: Automated processes reconcile the live state with the desired state defined in Git, enhancing deployment consistency, reducing manual errors, and accelerating deployment cycles.
- Continuous Feedback and Monitoring: The system is continuously monitored against the desired state in Git, with discrepancies automatically corrected or flagged for manual intervention, ensuring system resilience and security.
By consolidating infrastructure and application management around these principles, GitOps offers a robust framework that promotes speed, reliability, security, and collaborative efficiency for modern DevOps teams.
The GitHub workflow, defined in .github/workflows/docker-workflow.yml, is designed to automate the entire process of building and pushing Docker images based on the provided docker-compose.yaml. This YAML file orchestrates the deployment of custom MinIO and Python environments, and deployed Weaviate using the latest public image; facilitating a streamlined development process.
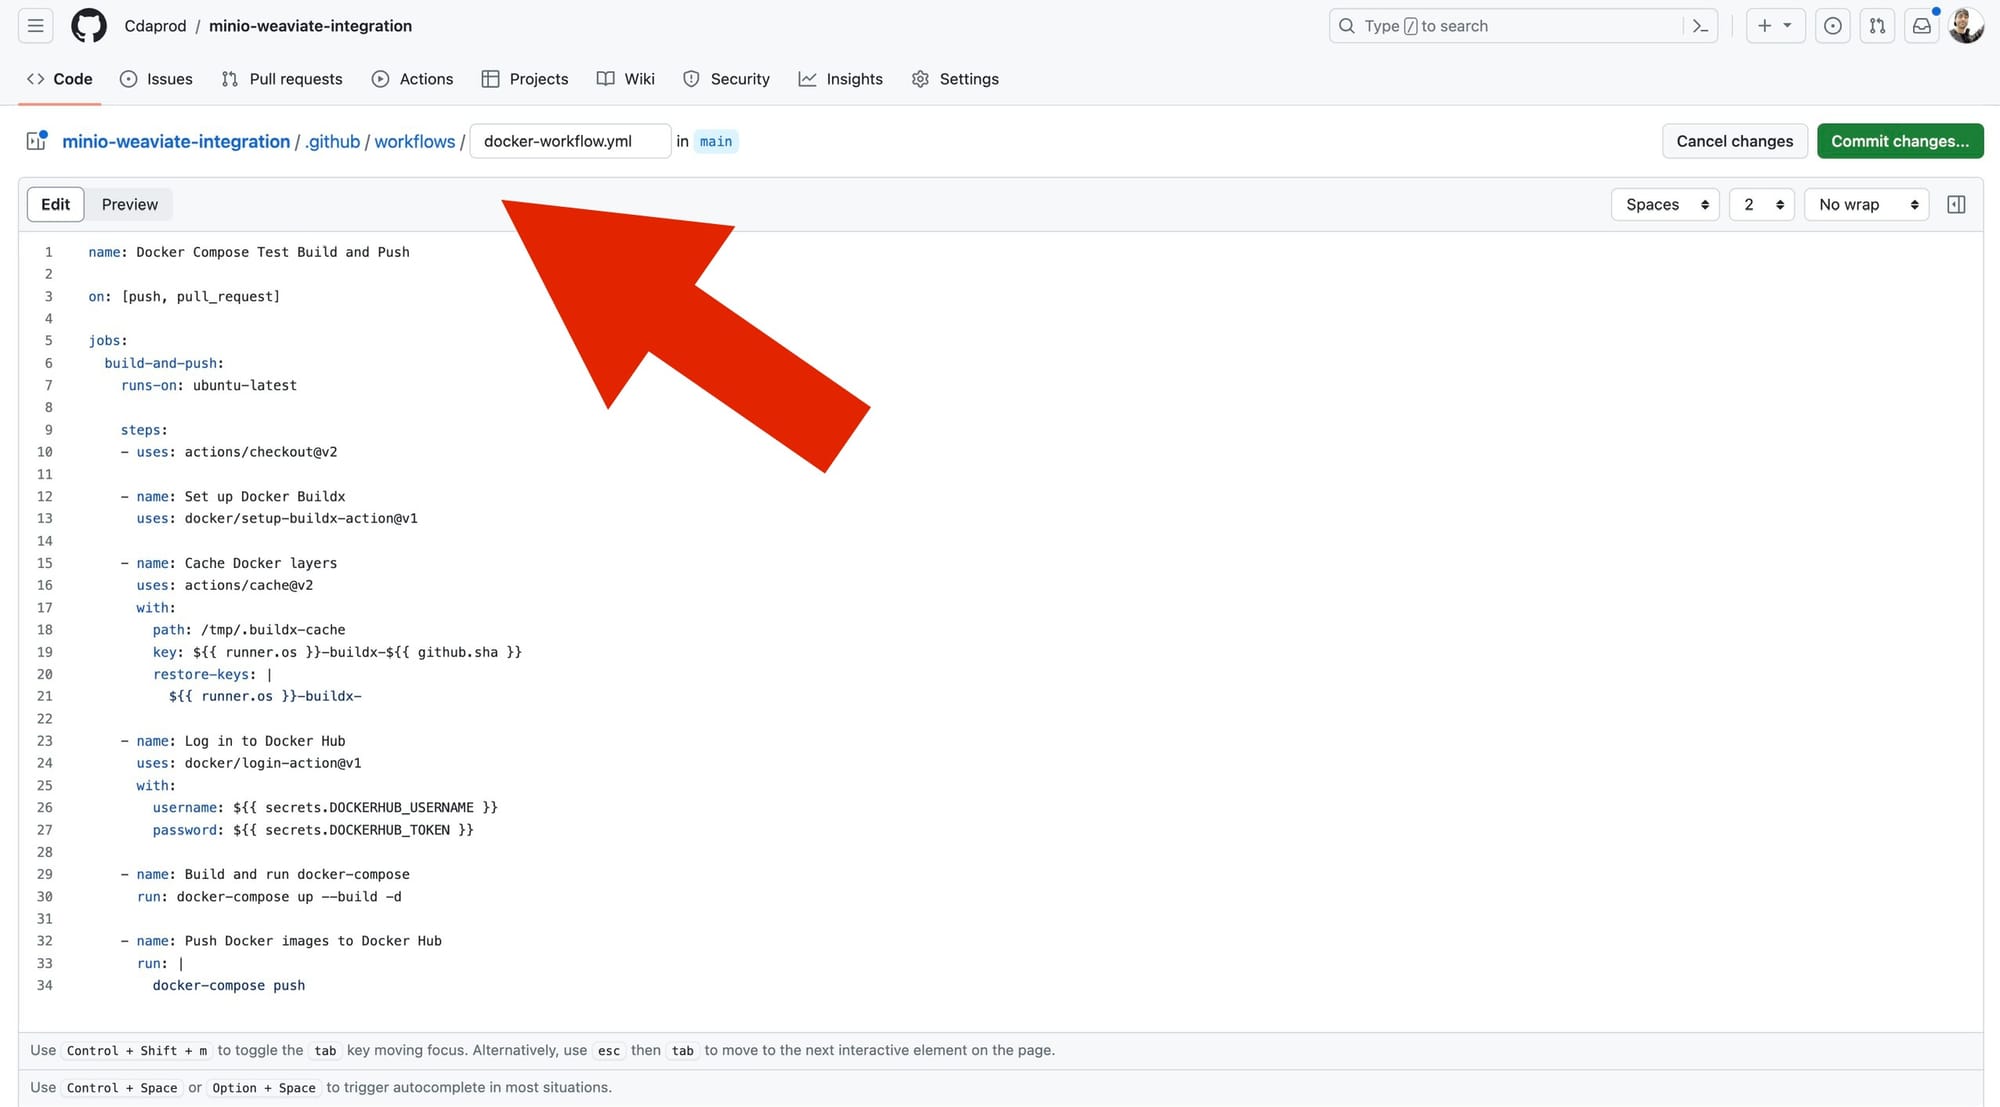
To create nested directories in GitHub via the WebUI, simply type the desired path before your filename when adding a new file. This method automatically organizes your file within the specified directories, streamlining file management without needing conventional folder creation steps.
By placing YAML in the /.github/workflows/ directory, will tell GitHub to run them as an Action Workflow.
Docker Compose Orchestration
As we transition to the specifics of the Docker Compose setup, all the groundwork is laid out by our directory structure and GitHub workflows. The docker-compose.yaml file serves as the blueprint, detailing how services like MinIO, Weaviate, and our custom Python application are containerized and interact within our environment.
This configuration enables you to move towards building scalable, self-hosted applications that challenge the need for traditional cloud services like AWS. This blueprint empowers developers to create complex, microservices-based architectures, leveraging containerization's efficiency and flexibility.
Using Docker Compose and a Python script for automated schema creation and data indexing, this setup aids in the development of scalable, self-hosted applications capable of operating in a hybrid cloud environment.
/docker-compose.yaml
|
version: '3.8' image: cdaprod/minio-server
image: cdaprod/python-app depends_on: |
Building on the foundation laid by the docker-compose.yaml configuration, the Python script you've developed can be used to automate the initialization and management of your Weaviate database. This script serves two functions in your self-hosted, containerized architecture:
1. Schema Creation: Your Python script automates the process of defining the schema in Weaviate. The schema acts as a blueprint for the data, specifying the types of information your database will hold and how different entities relate to one another.
2. Data Indexing: Once the schema is in place, your script proceeds to index data into Weaviate. This process involves ingesting data into the database in a way that aligns with the predefined schema, making it searchable and retrievable. Automating data indexing helps to maintain the fluidity of your application, as it allows for continuous, real-time updates to the database without downtime or manual data handling.
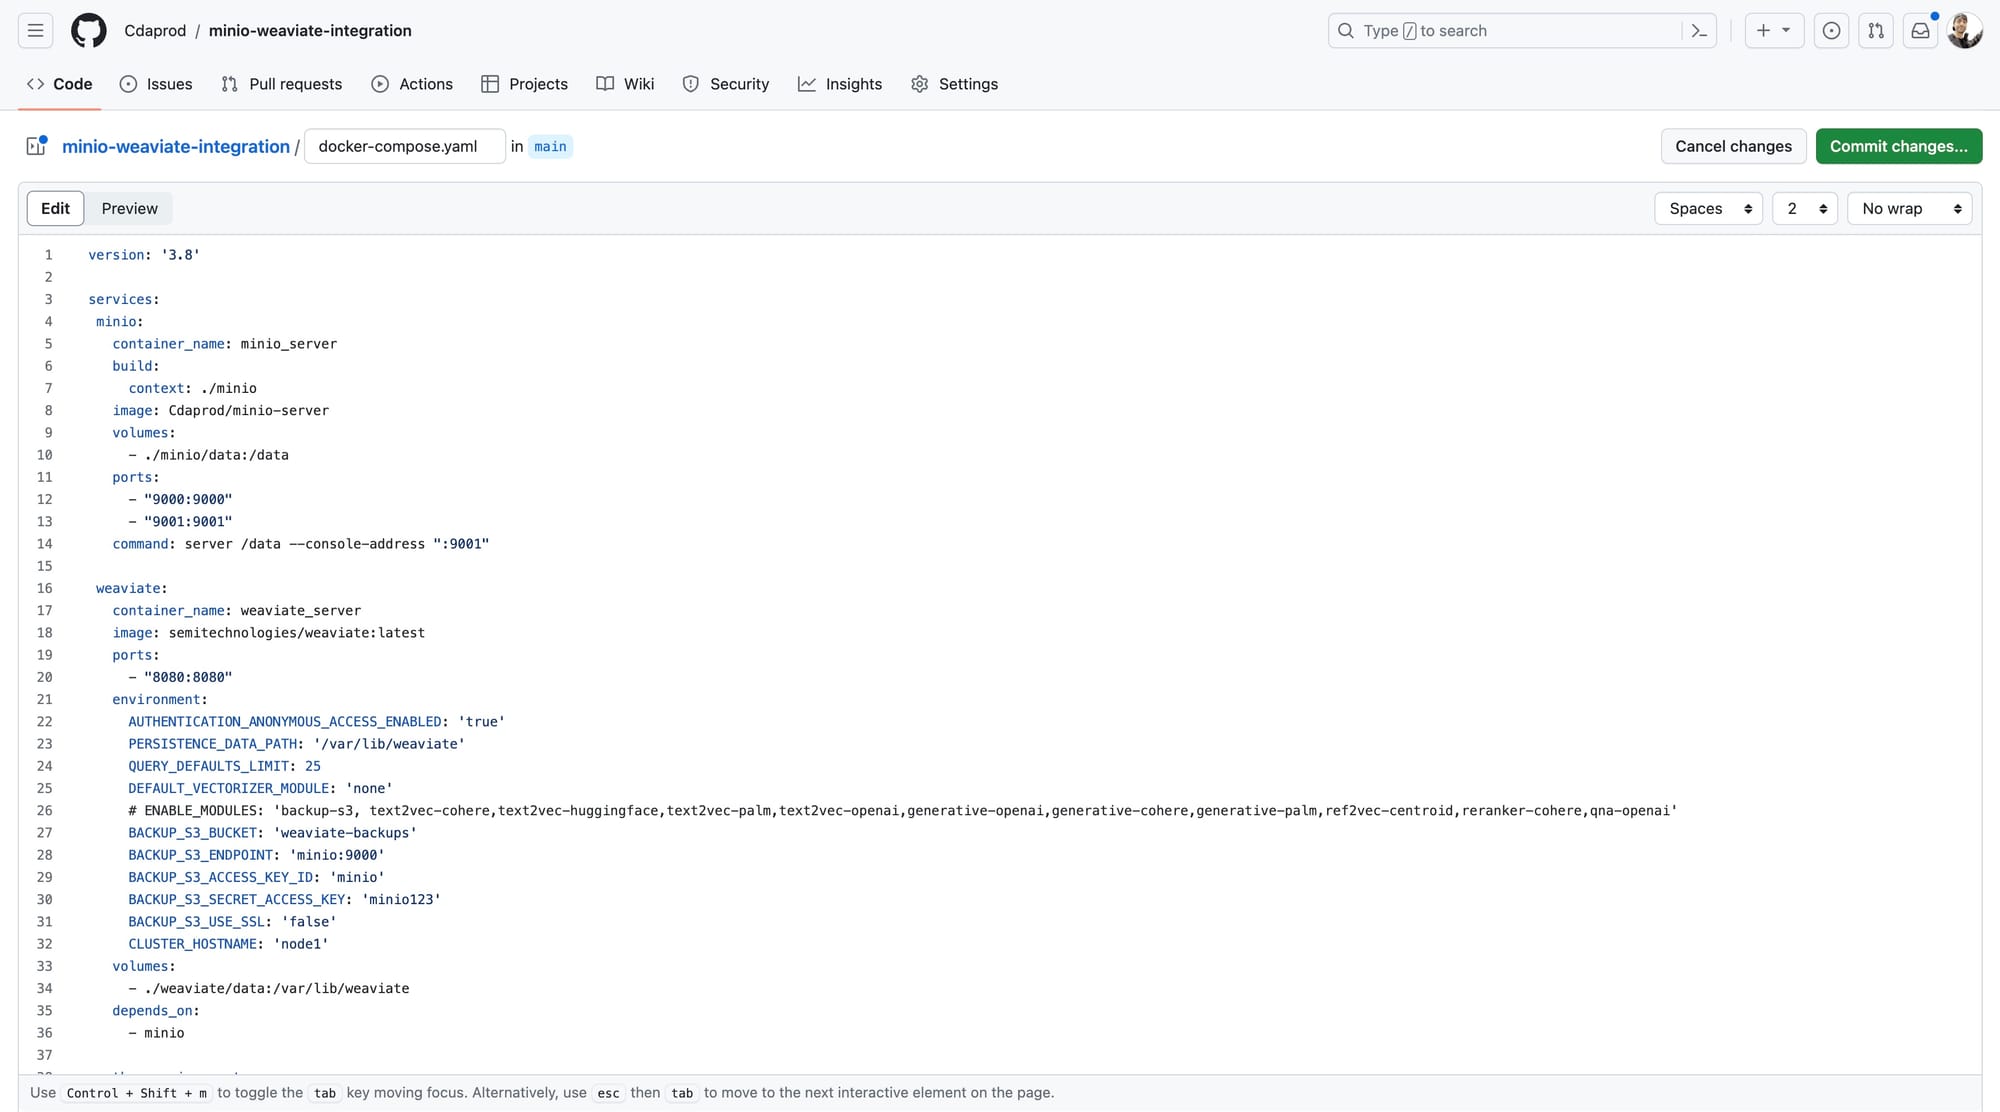
Below is a screenshot of the docker-compose.yaml and what it looks like being committed using the GitHub UI:
Dockerfiles and Entrypoint Scripts
Each service in the docker-compose.yaml has its custom Dockerfile and entrypoint script, ensuring the environment is correctly set up. The MinIO Dockerfile and Entrypoint Script customizes the MinIO server, including setting up necessary environment variables and preparing the server for operation.
Building a MinIO Container
This Dockerfile uses the upstream minio/minio image with a few additions which are implemented in entrypoint.sh
/minio/Dockerfile
|
FROM minio/minio |
This entrypoint.sh for the minio/Dockerfile does several things:
- Starts the minio server
- Waits 5 seconds
- Sets up the alias
- Makes the bucket for weaviate-backups
/minio/entrypoint.sh
|
#!/bin/sh |
MinIO Dockerfile and entrypoint.sh files should be created as displayed in the screenshot below (in the /minio/ directory):

Building a Python Container
This app/Dockerfile for our Python app does several things:
- Uses the
python:3.9-slimcontainer image - Sets
/app/as the working directory - Installs the
weaviate-clientlibrary for python - Copies files located in the same directory as
Dockerfileto the container - Sets permissions for the
entrypoint.shscript
Sets up the Python environment, installs dependencies, and defines actions to initialize the Weaviate schema and data, followed by backing up to MinIO.
/app/Dockerfile
|
FROM python:3.9-slim WORKDIR /app RUN pip install weaviate-client COPY . /app/ RUN chmod +x /app/entrypoint.sh ENTRYPOINT ["/app/entrypoint.sh"] |
This entrypoint.sh is for our Python Dockerfile:
- Exits on error
- Runs the
python_initializer.pyscript
/app/entrypoint.sh
|
#!/bin/bash # Exit script on error set -e echo "Initialize Weaviate..." python python_initializer.py # Keep the container running after scripts execution # This line is useful if you want to prevent the container from exiting after the scripts complete. # If your container should close after execution, you can comment or remove this line. tail -f /dev/null |
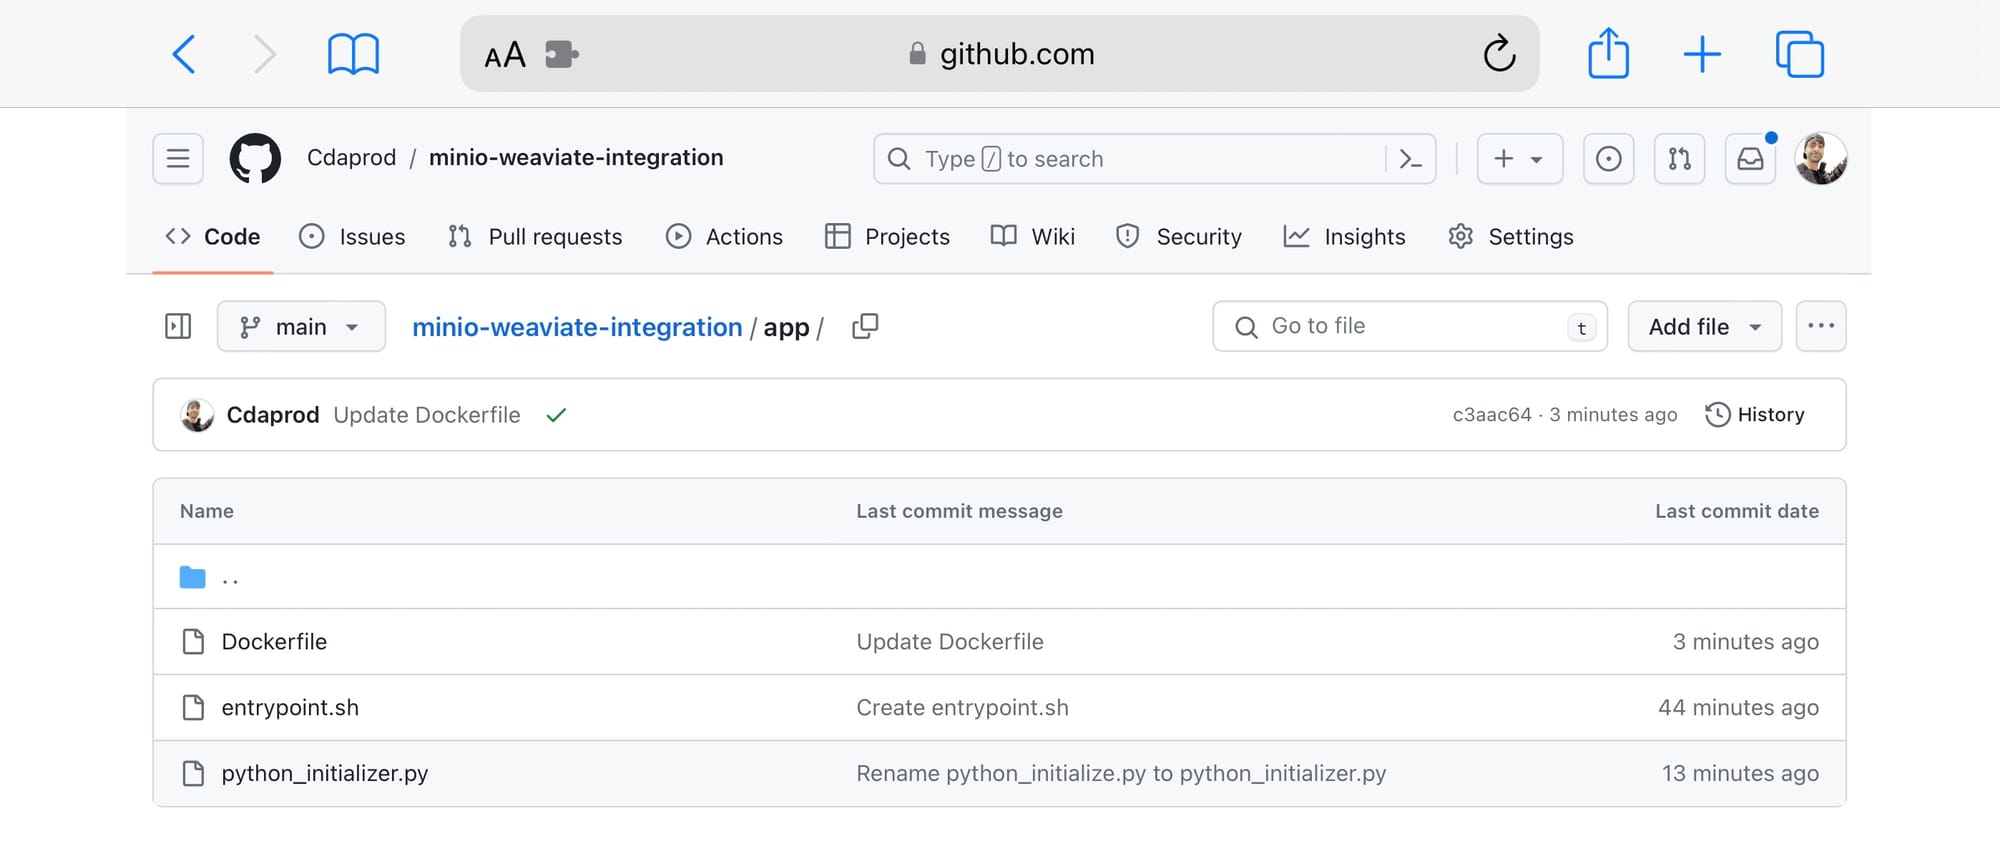
Python Environment Dockerfile, entrypoint.sh, and python_initializer.py files should be created as displayed in the screenshot below (in the /app/ directory):
Python Script for Weaviate Initialization
The python_initializer.py script can be found in the /app/ directory of the blog-assets repository; it programmatically interacts with Weaviate to:
- Define a schema for storing data.
- Index sample data into Weaviate.
- Query the indexed data and export the results.
- Perform a backup of Weaviate data into MinIO using the
backup-s3module.
/app/python_initializer.py
|
import weaviate import json # Configuration WEAVIATE_ENDPOINT = "http://weaviate:8080" OUTPUT_FILE = "data.json" # Initialize the client client = weaviate.Client(WEAVIATE_ENDPOINT) schema = { "classes": [ { "class": "Article", "description": "A class to store articles", "properties": [ {"name": "title", "dataType": ["string"], "description": "The title of the article"}, {"name": "content", "dataType": ["text"], "description": "The content of the article"}, {"name": "datePublished", "dataType": ["date"], "description": "The date the article was published"}, {"name": "url", "dataType": ["string"], "description": "The URL of the article"} ] }, { "class": "Author", "description": "A class to store authors", "properties": [ {"name": "name", "dataType": ["string"], "description": "The name of the author"}, {"name": "articles", "dataType": ["Article"], "description": "The articles written by the author"} ] } ] } # Fresh delete classes try: client.schema.delete_class('Article') client.schema.delete_class('Author') except Exception as e: print(f"Error deleting classes: {str(e)}") # Create new schema try: client.schema.create(schema) except Exception as e: print(f"Error creating schema: {str(e)}") data = [ { "class": "Article", "properties": { "title": "LangChain: OpenAI + S3 Loader", "content": "This article discusses the integration of LangChain with OpenAI and S3 Loader...", "url": "https://blog.min.io/langchain-openai-s3-loader/" } }, { "class": "Article", "properties": { "title": "MinIO Webhook Event Notifications", "content": "Exploring the webhook event notification system in MinIO...", "url": "https://blog.min.io/minio-webhook-event-notifications/" } }, { "class": "Article", "properties": { "title": "MinIO Postgres Event Notifications", "content": "An in-depth look at Postgres event notifications in MinIO...", "url": "https://blog.min.io/minio-postgres-event-notifications/" } }, { "class": "Article", "properties": { "title": "From Docker to Localhost", "content": "A guide on transitioning from Docker to localhost environments...", "url": "https://blog.min.io/from-docker-to-localhost/" } } ] for item in data: try: client.data_object.create( data_object=item["properties"], class_name=item["class"] ) except Exception as e: print(f"Error indexing data: {str(e)}") # Fetch and export objects try: query = '{ Get { Article { title content datePublished url } } }' result = client.query.raw(query) articles = result['data']['Get']['Article'] with open(OUTPUT_FILE, 'w', encoding='utf-8') as f: json.dump(articles, f, ensure_ascii=False, indent=4) print(f"Exported {len(articles)} articles to {OUTPUT_FILE}") except Exception as e: print(f"An error occurred: {str(e)}") # Create backup try: result = client.backup.create( backup_id="backup-id-2", backend="s3", include_classes=["Article", "Author"], wait_for_completion=True, ) print("Backup created successfully.") except Exception as e: print(f"Error creating backup: {str(e)}") |
Pushing Container Images to Docker Hub - Artifact Registry
The GitHub Actions workflow automates the process of:
- Checking out the repository code.
- Setting up Docker Buildx for building multi-architecture images.
- Caching Docker layers to speed up builds.
- Logging into Docker Hub to push images.
- Building the Docker images defined in the
docker-compose.yaml. - Deploying the services using
docker-compose up. - Optionally, pushing the built images to Docker Hub.
- Tearing down the deployment with
docker-compose down.
To obtain a Docker Hub username and generate a personal access token (PAT) for Docker CLI authentication or for integrating Docker Hub with other tools, follow these steps:
- Create a Docker Hub Account: If you don’t already have one, sign up at Docker Hub’s website to get a username.
- Generate a Personal Access Token (PAT):
- Log into your Docker Hub account and navigate to your account settings.
- Locate the “
Security” section in the menu on the left side of the screen. - Click on the “
New Access Token” button to create a new token. - Assign a name to your token, which will help you identify its purpose or the service it’s intended for.
- Once created, make sure to copy the token and store it securely, as it will be displayed only once.
Personal Access Tokens provide a safer alternative to using your password, particularly for CLI operations or integrations. Tokens can be managed (created and revoked) via the Docker Hub user interface, offering a secure and flexible way to authenticate across services.
How to use GitHub Secrets
The following is general process of adding secrets to a GitHub repository, which you can apply to adding your Docker Hub credentials:
- Navigate to Your GitHub Repository: Go to the GitHub repository where you want to add the secrets.
- Access Repository Settings: Click on the “Settings” tab at the top of the repository page.
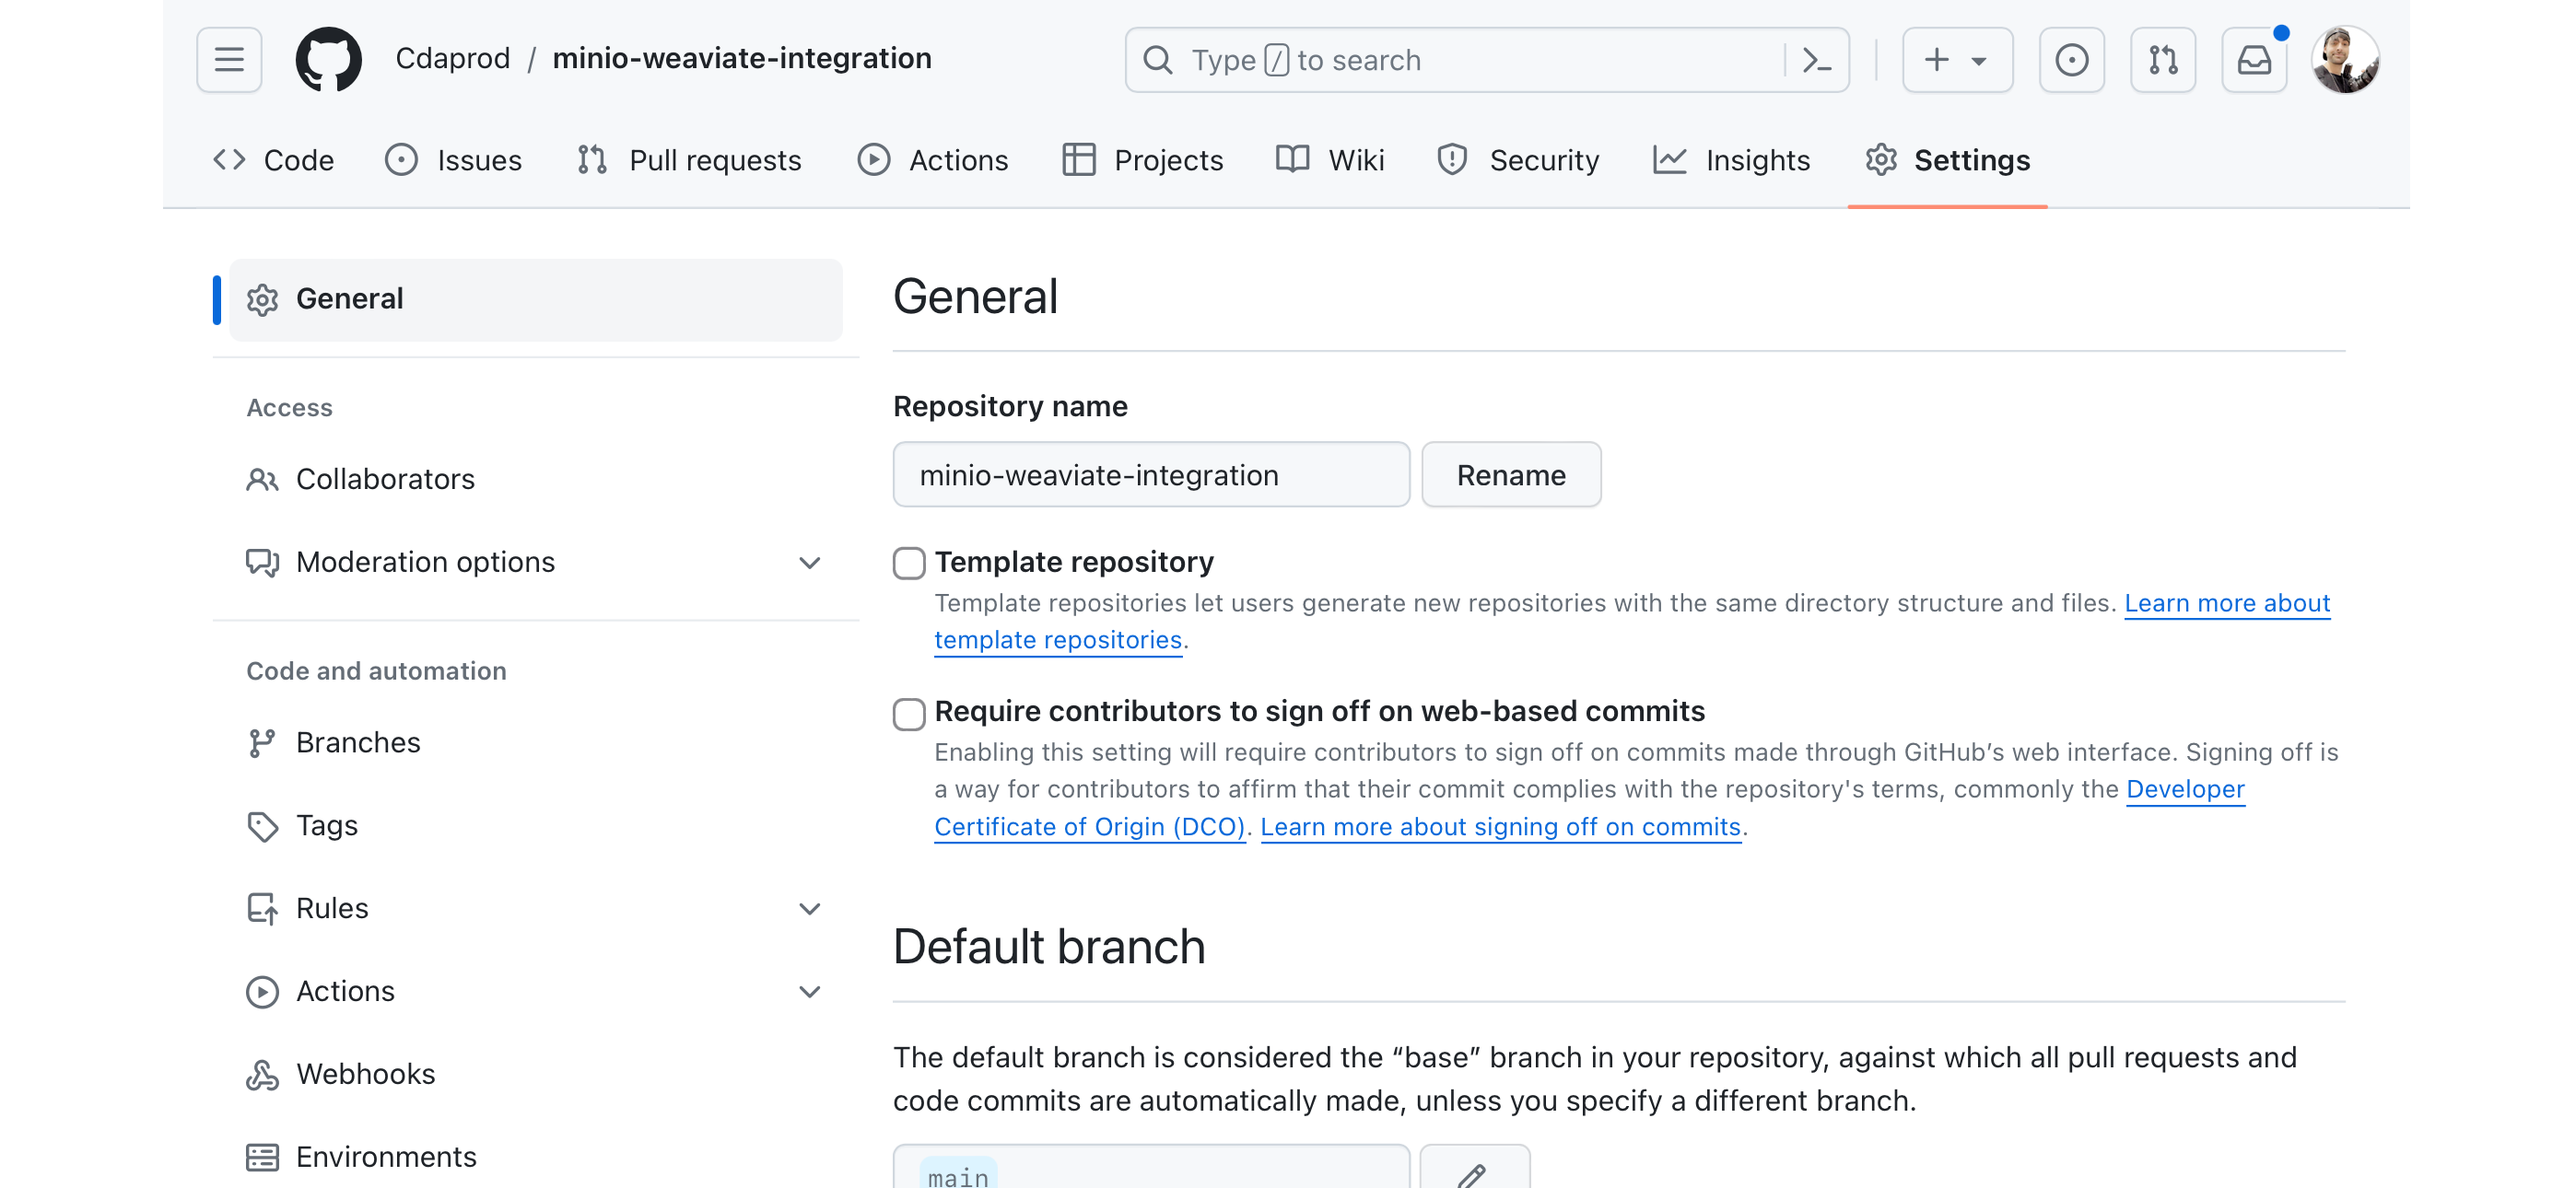
- Go to Secrets: On the left sidebar, click on “Secrets & Variables” to expand the section, then select “Actions” to view the secrets page for GitHub Actions.
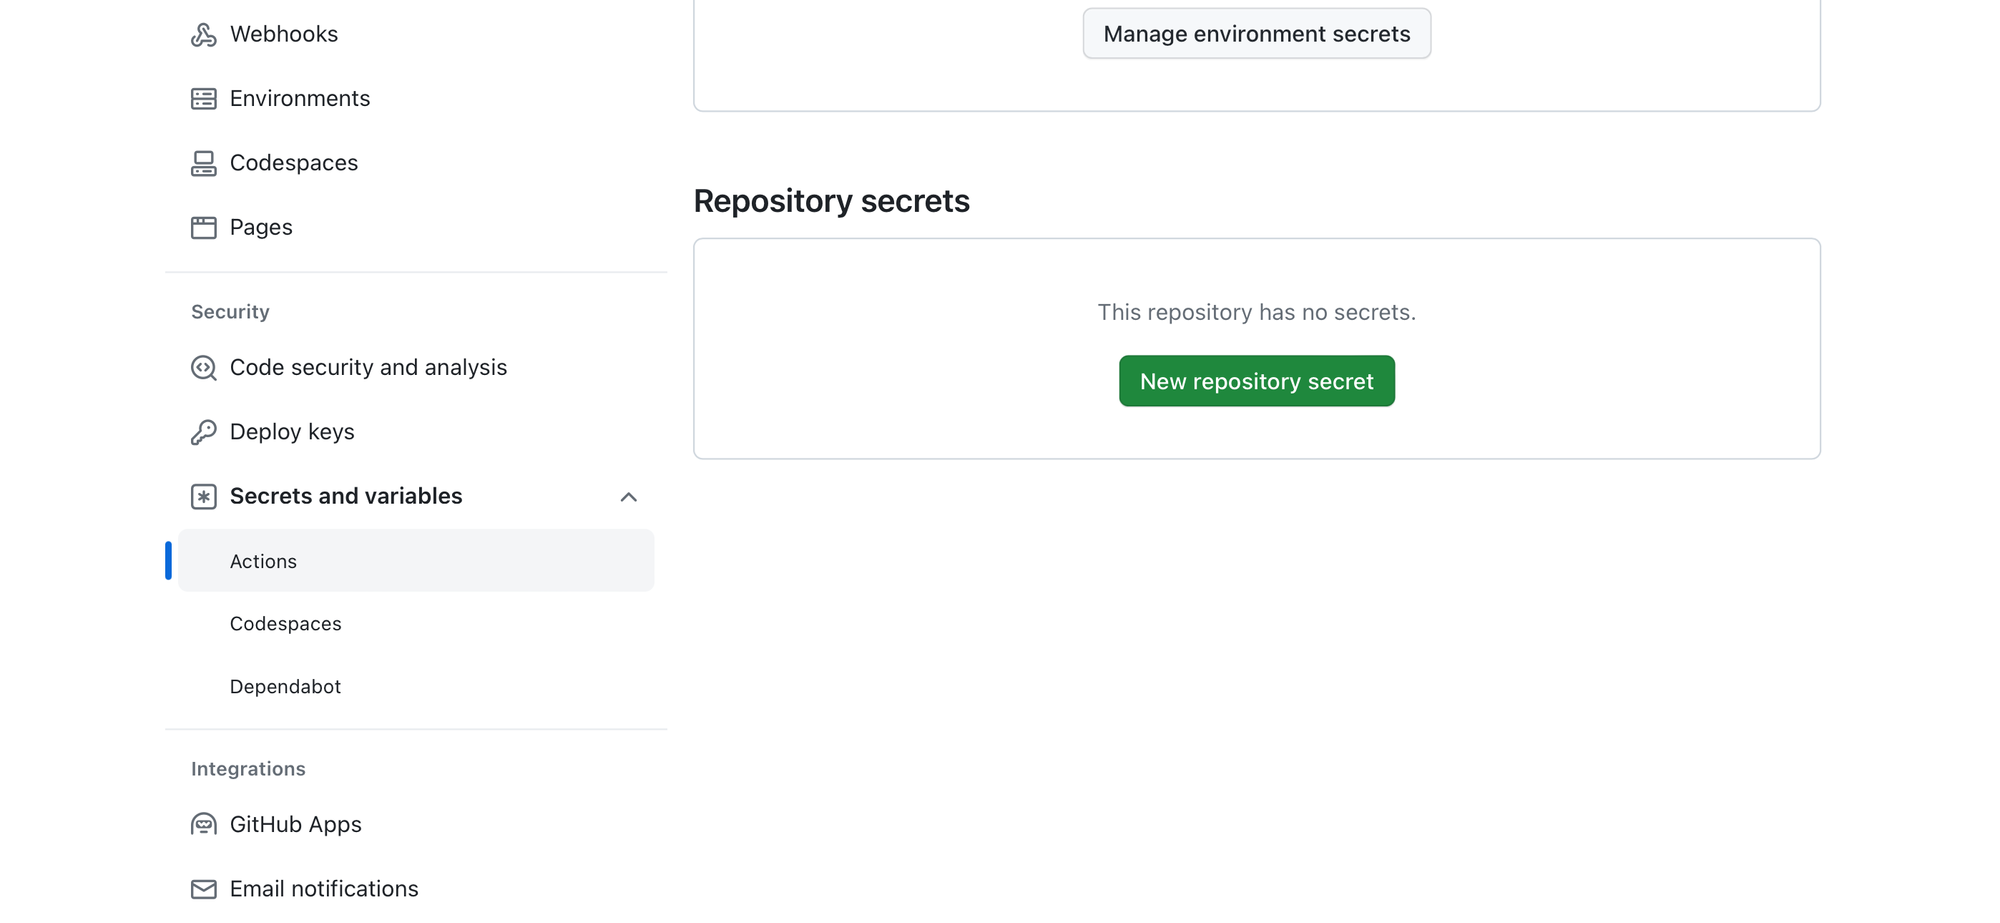
- Add a New Secret: Click on the “New repository secret” button.
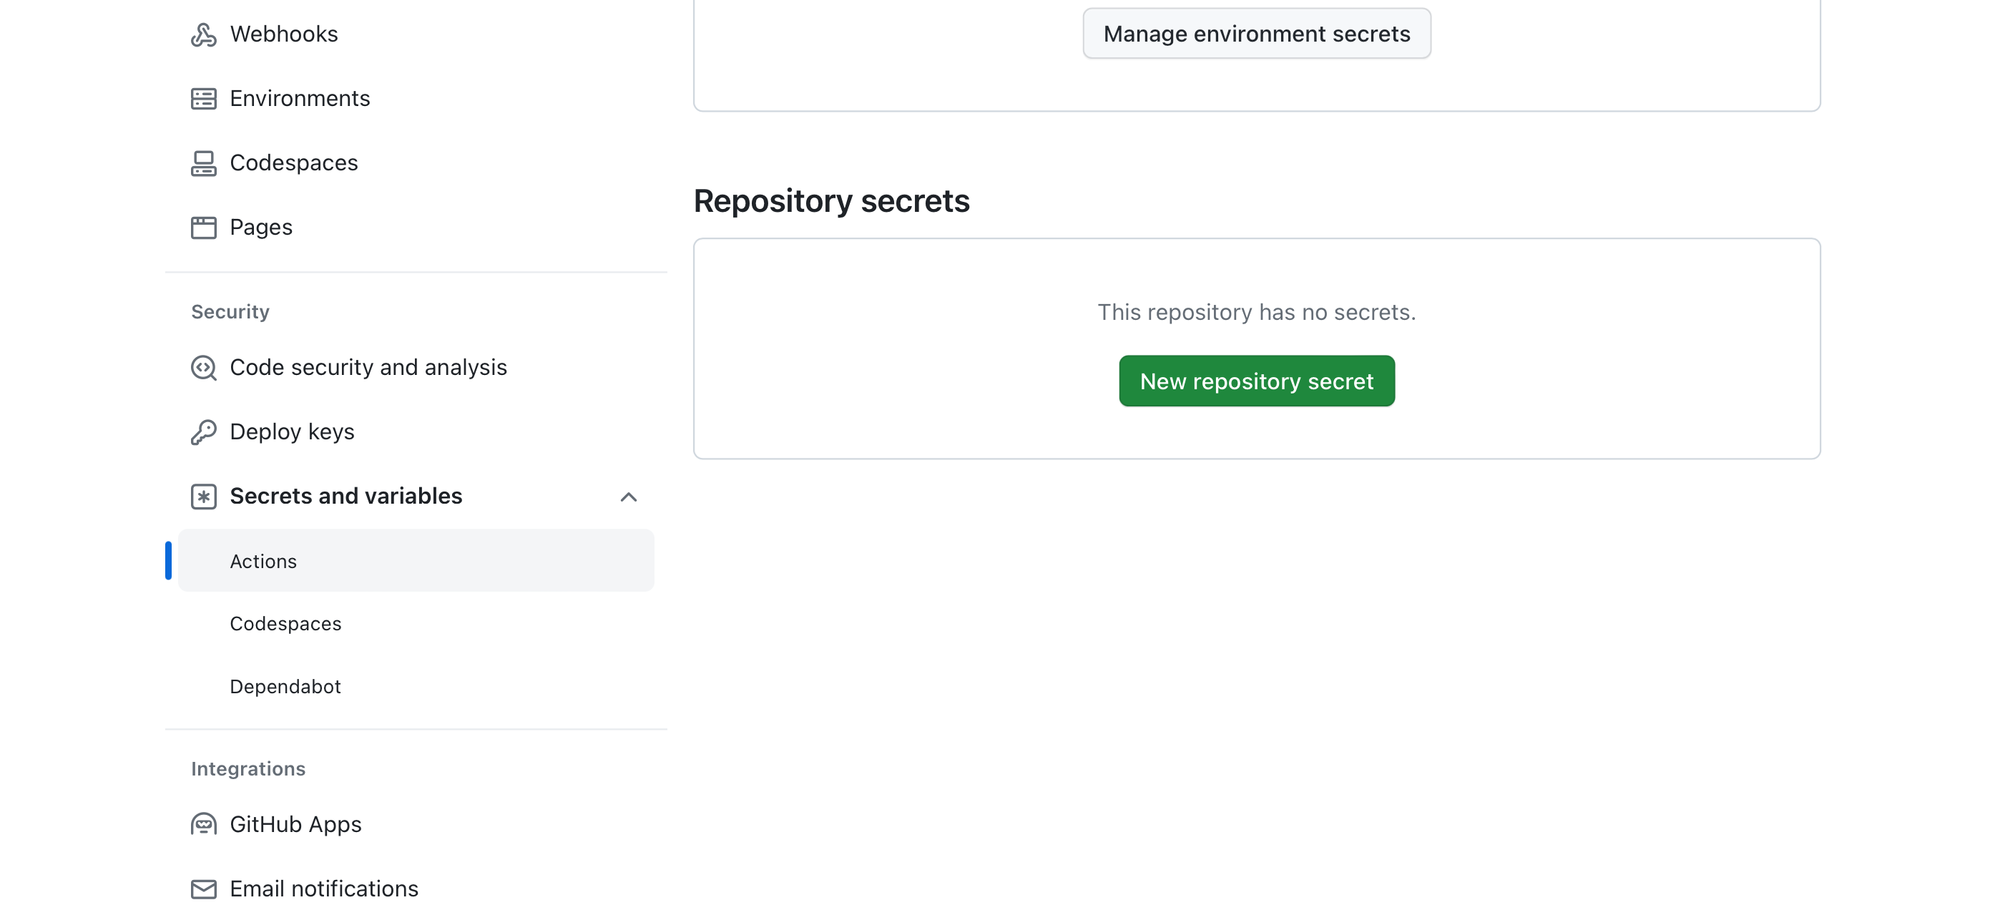
- Enter Secret Name and Value:
- For
DOCKERHUB_USERNAME, enterDOCKERHUB_USERNAMEas the Name and your Docker Hub username as the Value. - For
DOCKERHUB_TOKEN, enterDOCKERHUB_TOKENas the Name and your Docker Hub token as the Value.
- Save Each Secret: After entering the name and value for each secret, click the “
Add secret” button to save them to your repository.
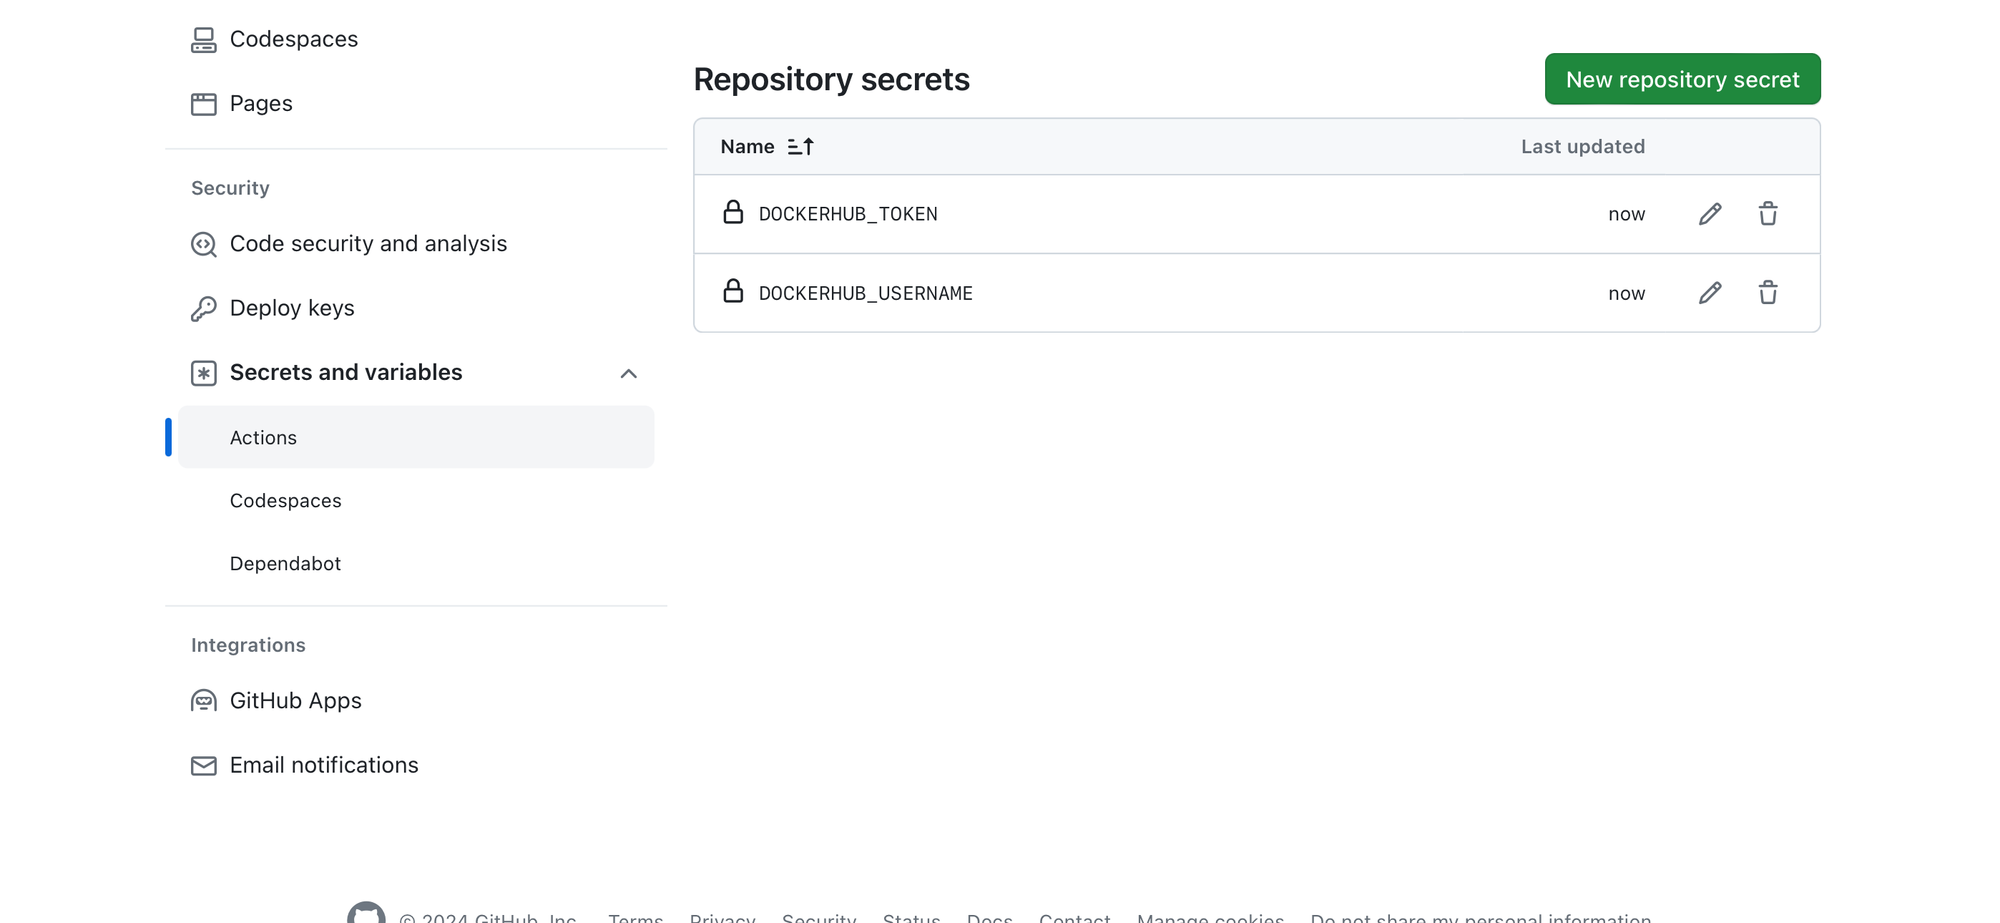
These secrets will now be available for use in your GitHub Actions workflows. They can be referenced using the syntax ${{ secrets.DOCKERHUB_USERNAME }} and ${{ secrets.DOCKERHUB_TOKEN }} in your workflow files.
This method ensures that your Docker Hub credentials are securely stored and not exposed in your repository’s code or logs.
Building and Testing with GitHub Actions
Integrating GitHub Actions into the development and deployment workflow represents a paradigm shift towards automation and efficiency. GitHub Actions is a CI/CD platform that automates your software build, test, and deployment pipeline, making it possible to automate all your software workflows, now with world-class CI/CD.
Setting Up GitHub Actions for Docker Compose
To leverage GitHub Actions for automating Docker Compose workflows, you start by creating a workflow file within your repository. This file, typically named docker-workflow.yml, resides in the .github/workflows/ directory and specifies the steps GitHub Actions should execute.
1. Workflow Definition
The docker-workflow.yml file begins with the definition of the name of the workflow and the events that trigger it. For instance, you might want it to run on every push and pull_request to the main branch:
|
name: Docker Compose Test Build and Push on: push: branches: - main pull_request: branches: - main |
2. Jobs and Steps
Within the workflow, you define jobs that specify the tasks to be executed. Each job runs in an environment specified by runs-on, and contains steps that execute commands, set up tools, or use actions created by the GitHub community.
/.github/workflows/docker-workflow.yml
|
name: Docker Compose Test Build and Push on: [push, pull_request] jobs: build-and-push: runs-on: ubuntu-latest steps: - uses: actions/checkout@v2 - name: Set up Docker Buildx uses: docker/setup-buildx-action@v1 - name: Cache Docker layers uses: actions/cache@v2 with: path: /tmp/.buildx-cache key: ${{ runner.os }}-buildx-${{ github.sha }} restore-keys: | ${{ runner.os }}-buildx- - name: Log in to Docker Hub uses: docker/login-action@v1 with: username: ${{ secrets.DOCKERHUB_USERNAME }} password: ${{ secrets.DOCKERHUB_TOKEN }} - name: Docker Compose Build run: docker-compose -f docker-compose.yaml build - name: Docker Compose Up run: docker-compose -f docker-compose.yaml up -d - name: Push Docker images to Docker Hub run: docker-compose -f docker-compose.yaml push - name: Docker Compose Down run: docker-compose -f docker-compose.yaml down |
3. Environment and Secrets
The workflow utilizes GitHub secrets (DOCKERHUB_USERNAME and DOCKERHUB_TOKEN) to securely log into Docker Hub. This approach ensures that sensitive information is not exposed in the workflow file.
4. Building and Pushing Docker Images
The steps within the job automate the process of building Docker images using Docker Compose, pushing them to Docker Hub, and managing the lifecycle of the deployment with docker-compose up and docker-compose down commands.
5. Testing
After deployment, automated tests can be run to ensure the application operates as expected.
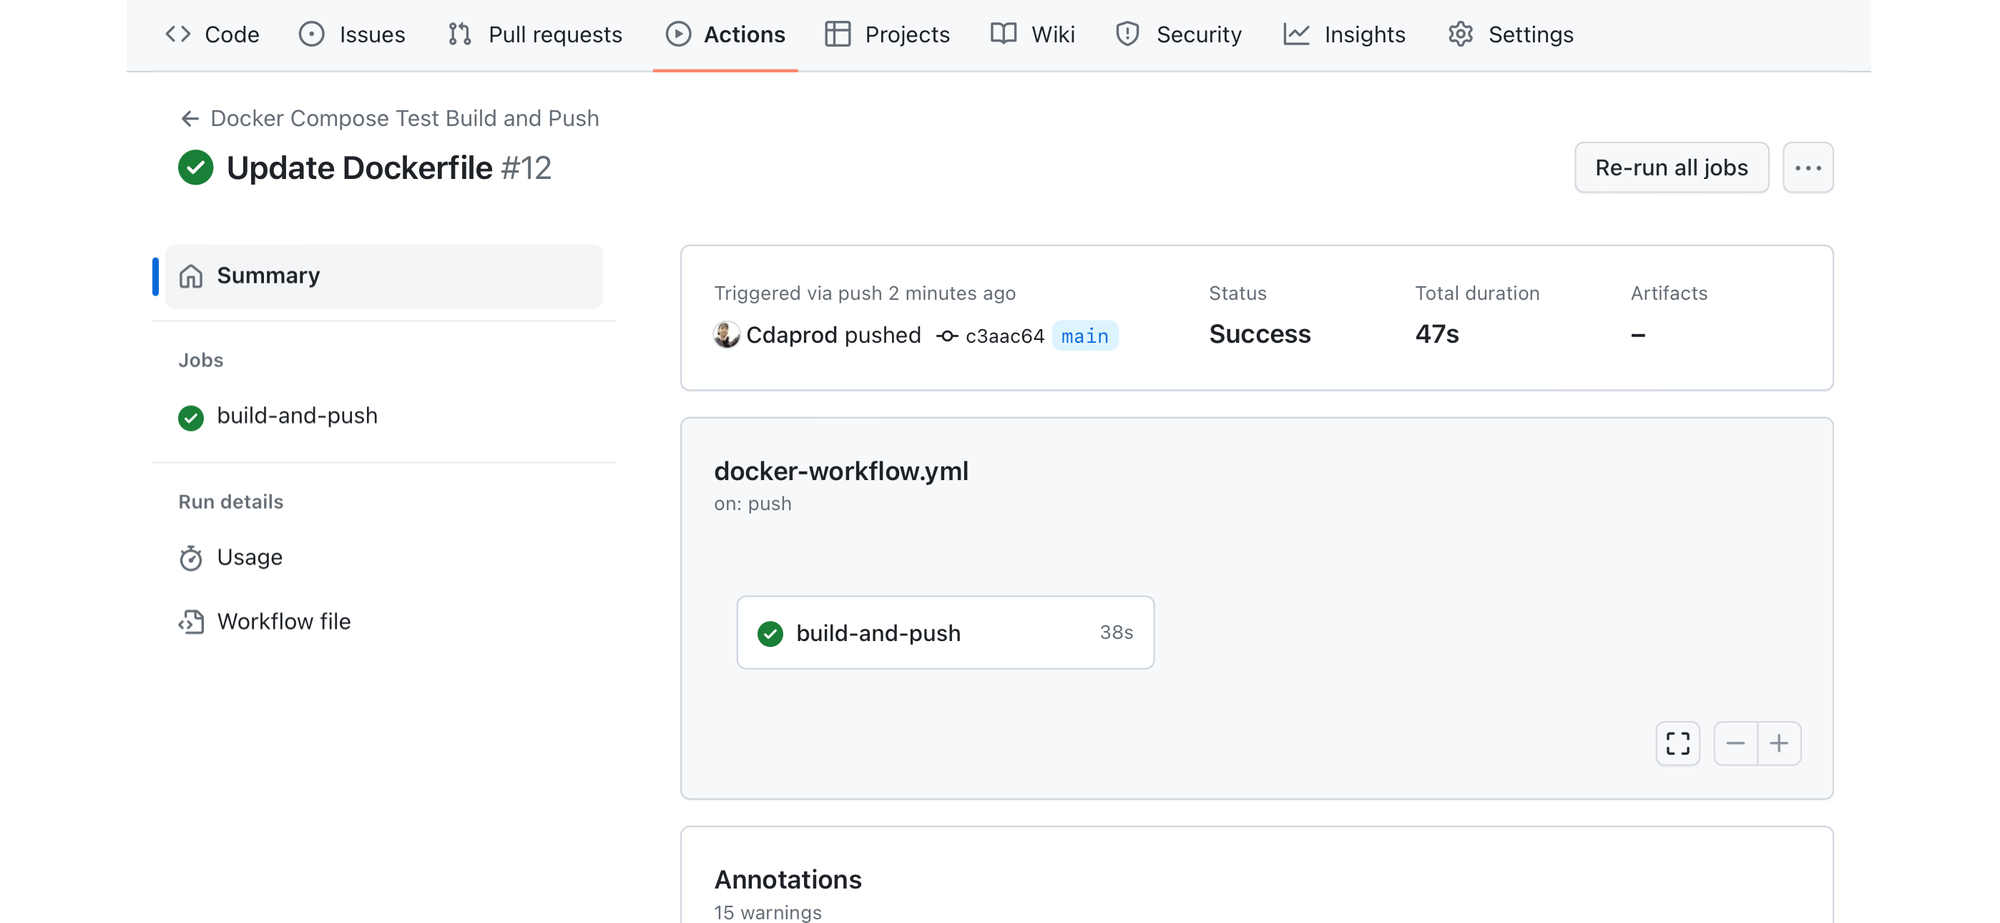
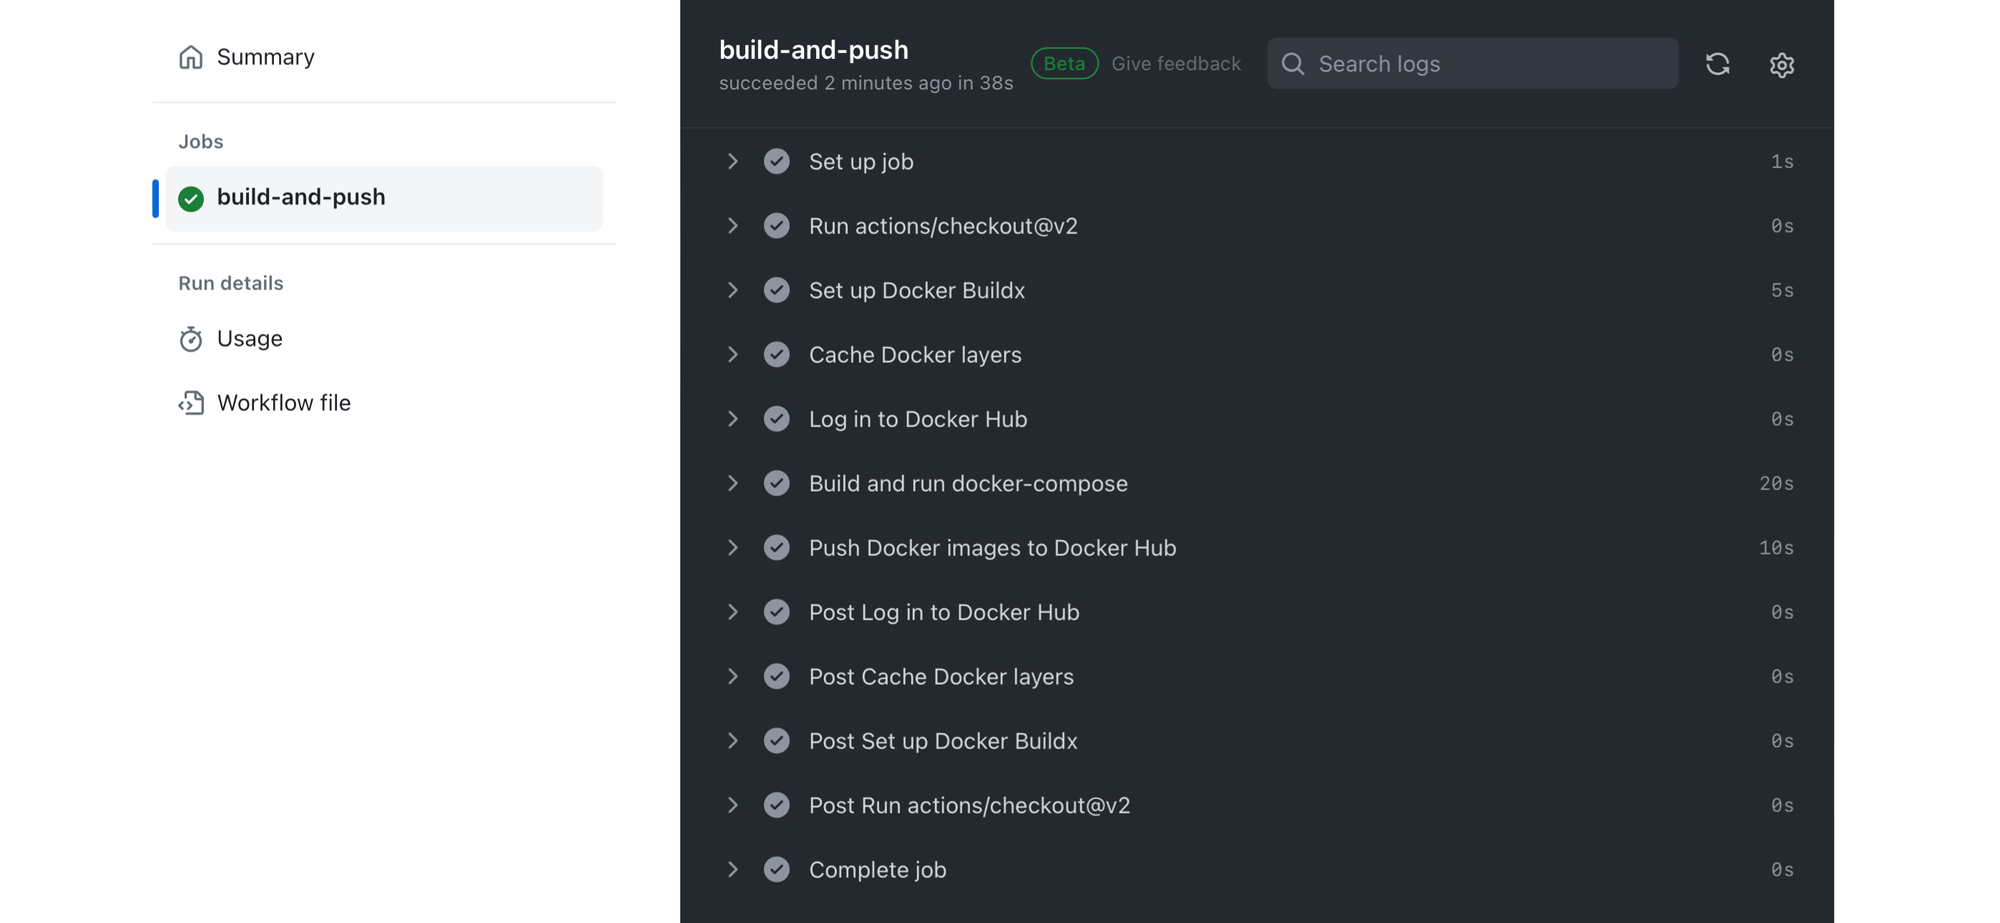
These tests are crucial for maintaining code quality and functionality throughout the development lifecycle.
Creating a Status Badge in GitHub Actions
- Go to Your Repository: Open the GitHub repository where your project is hosted.
- Access the Actions Tab: Click on the “Actions” tab at the top of your repository page. This tab shows the workflow runs associated with your repository.
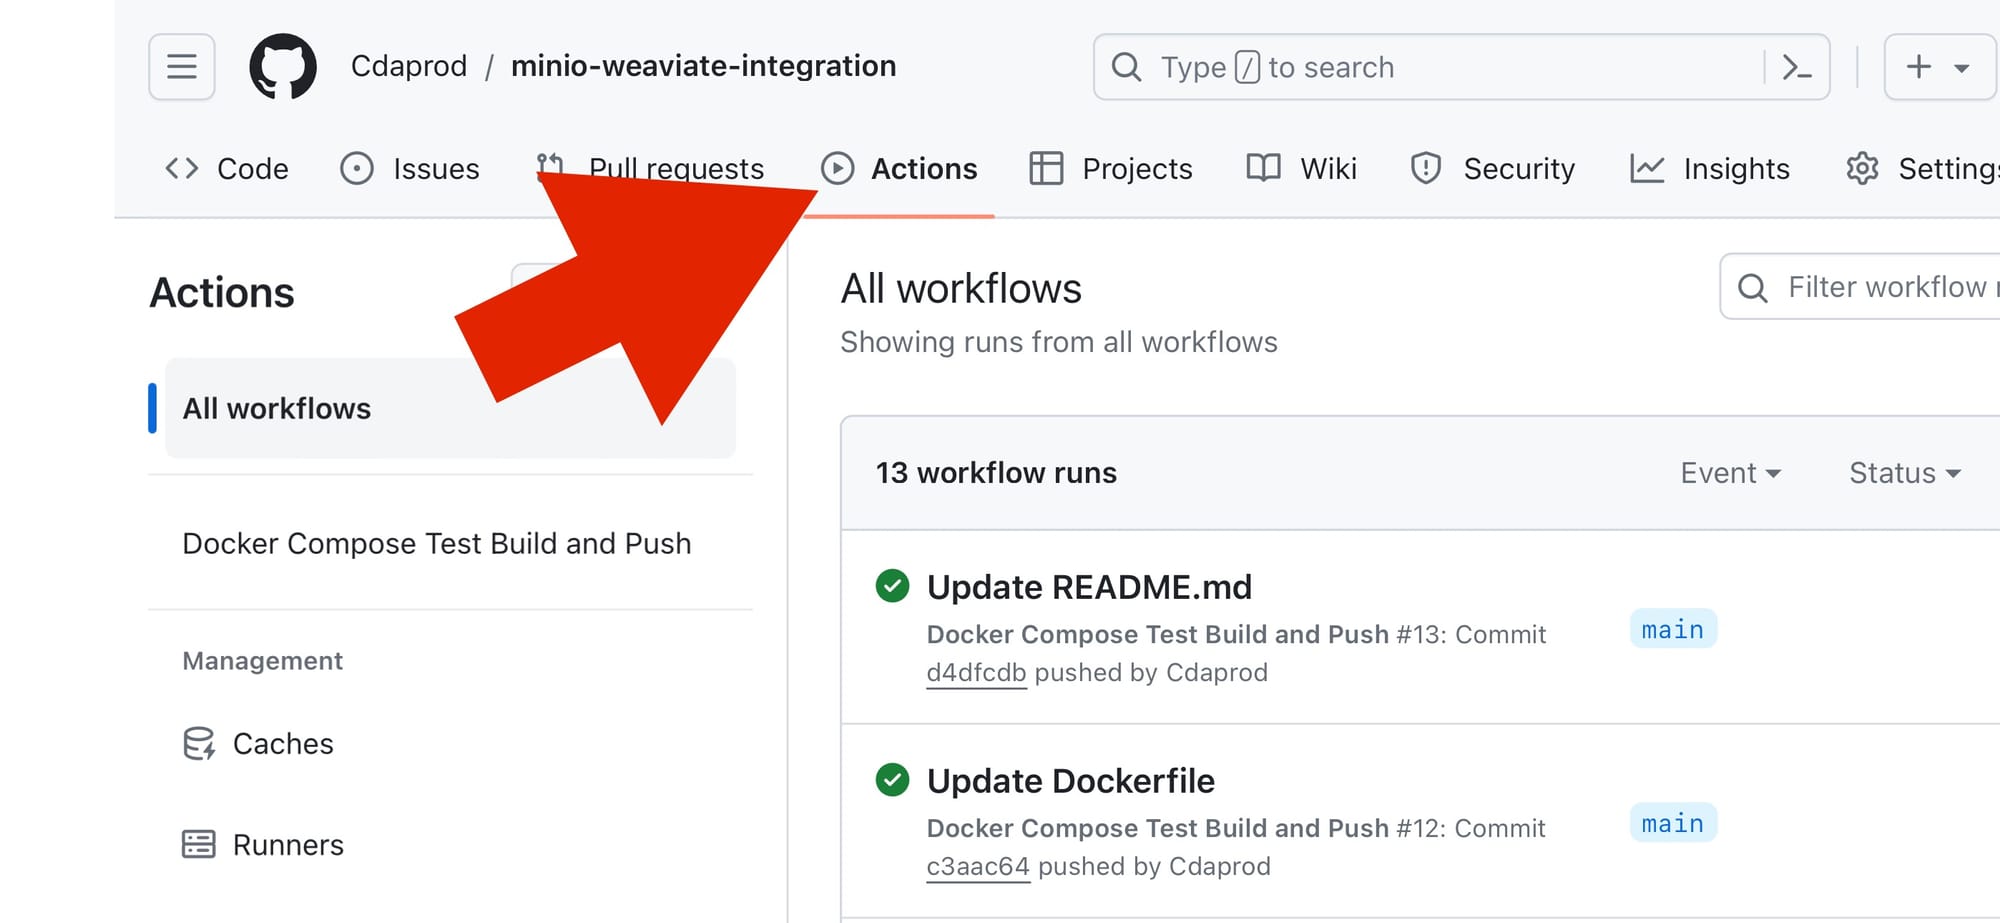
- Select a Workflow: Find the workflow for which you want to create a status badge. You can select it by clicking on the workflow name from the list on the left.
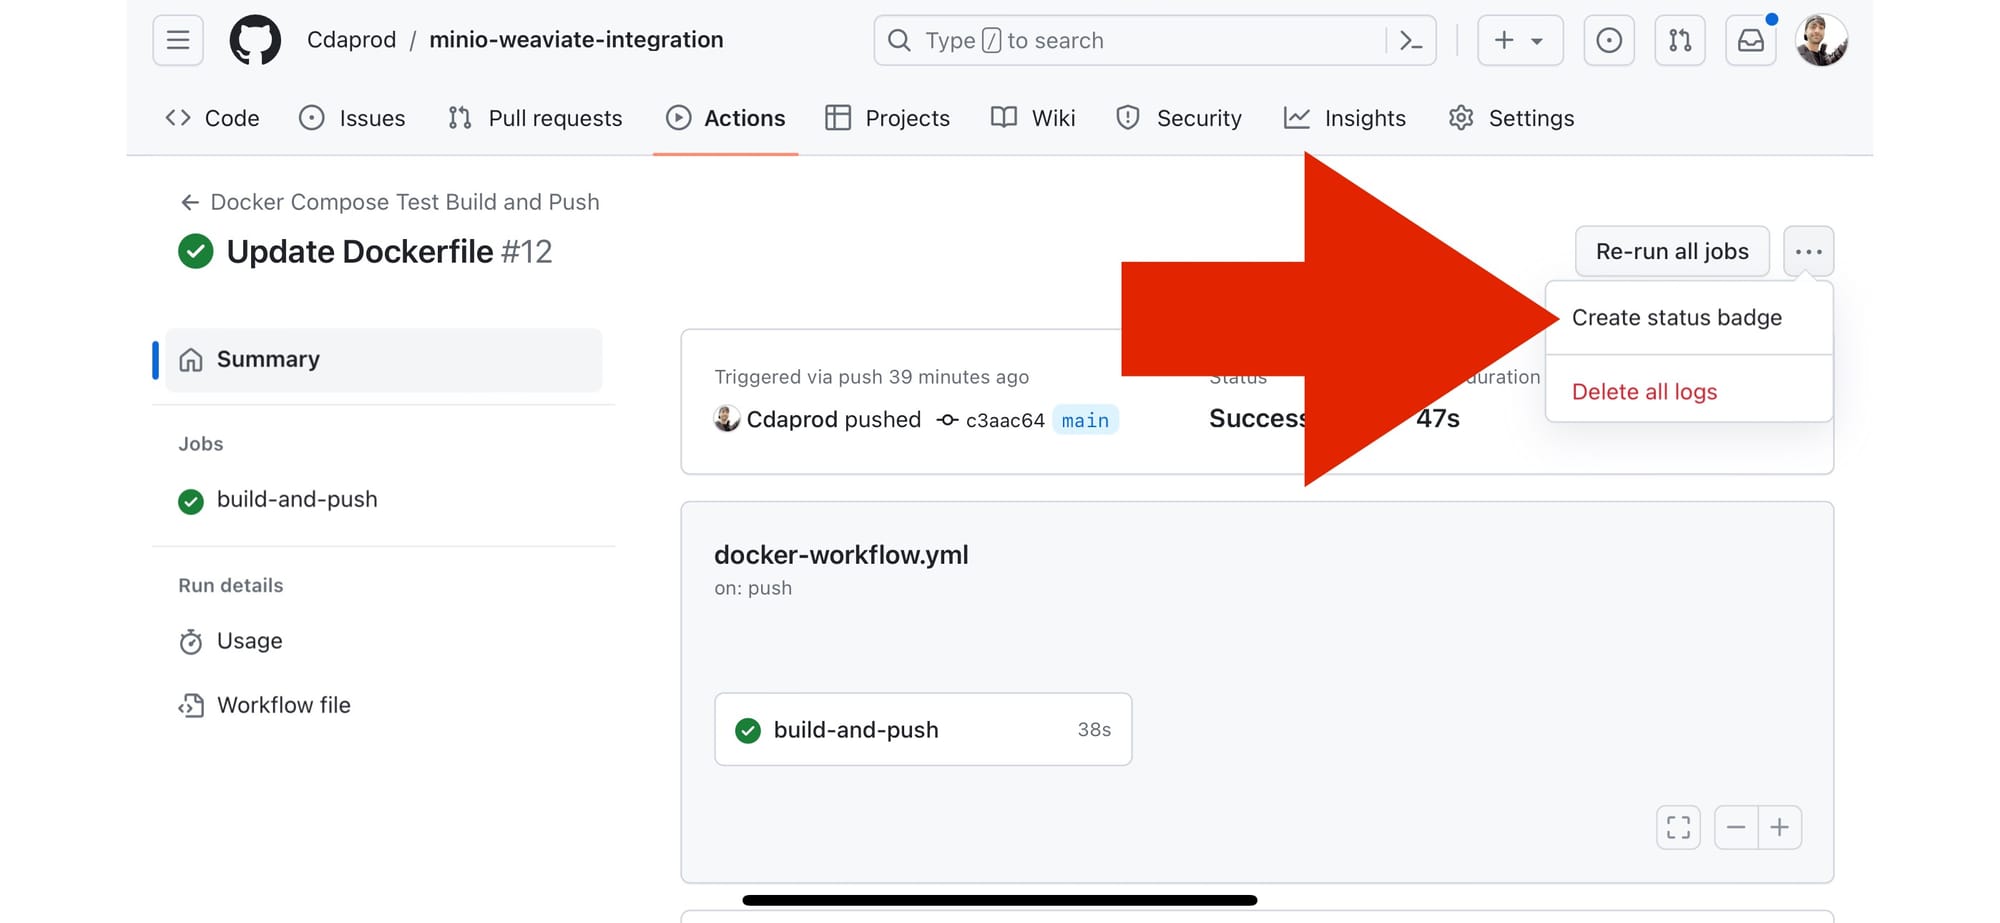
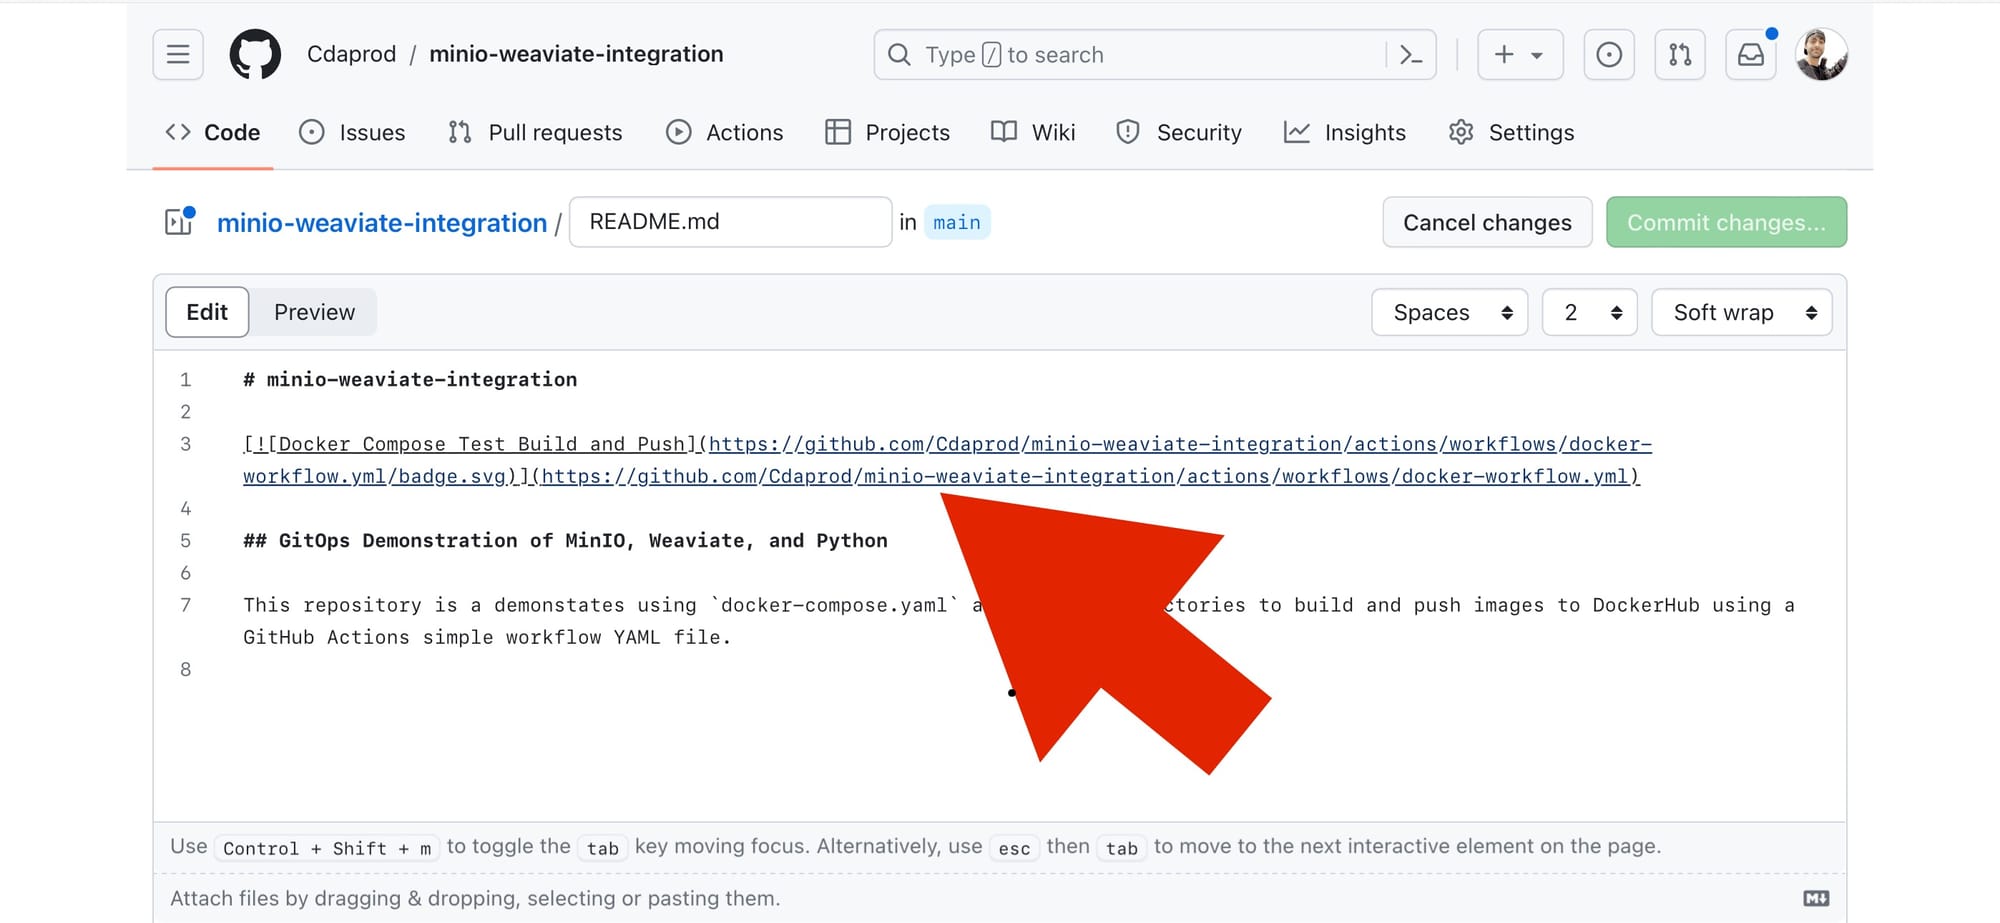
- Find the Badge Markdown: Once you’ve selected a workflow, look for a section or link that says something like “
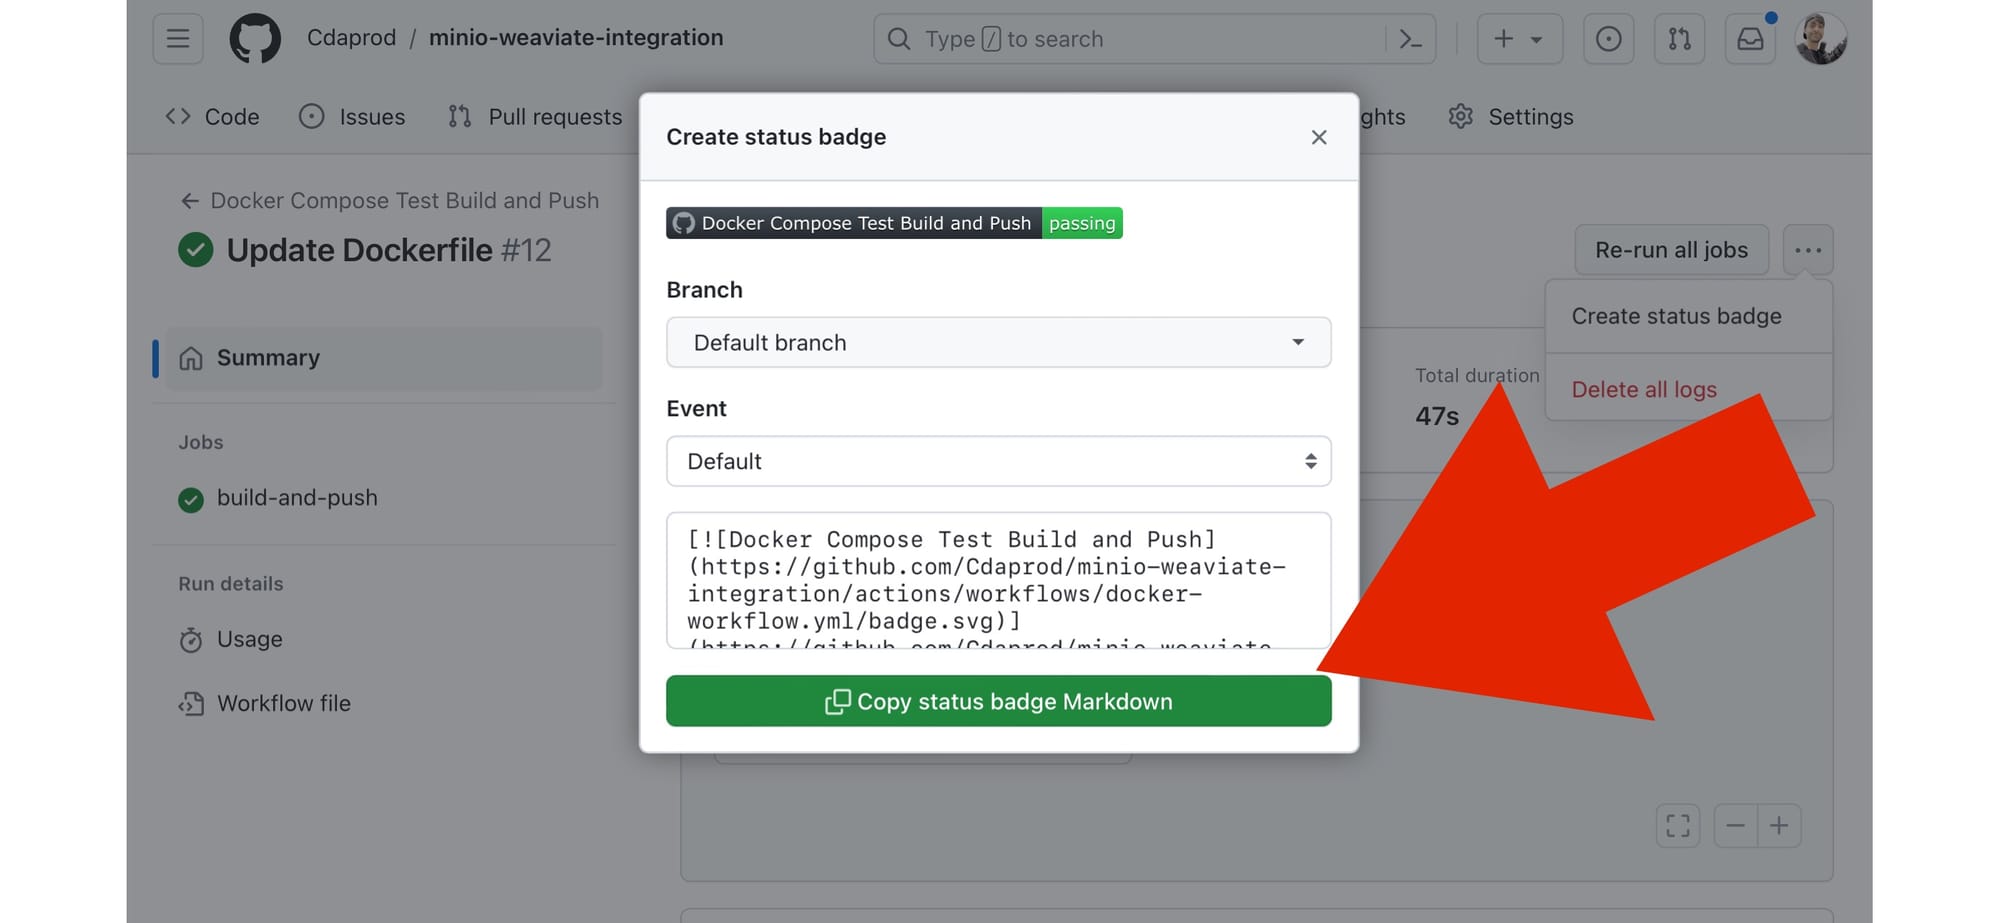
Copy status badge Markdown” . Clicking on this opens a modal displaying the markdown code for the badge.
- Copy the Markdown Code: Copy the markdown code provided. This code is what you’ll embed in your README.md file or any other markdown file where you want the badge to appear.
- Embed the Badge: Paste the copied markdown code into your README.md file at the position where you want the badge to display.
The code usually looks something like this for GitHub Actions:
Replace user, repository, and workflow file name with your GitHub username, repository name, and workflow file name, respectively.
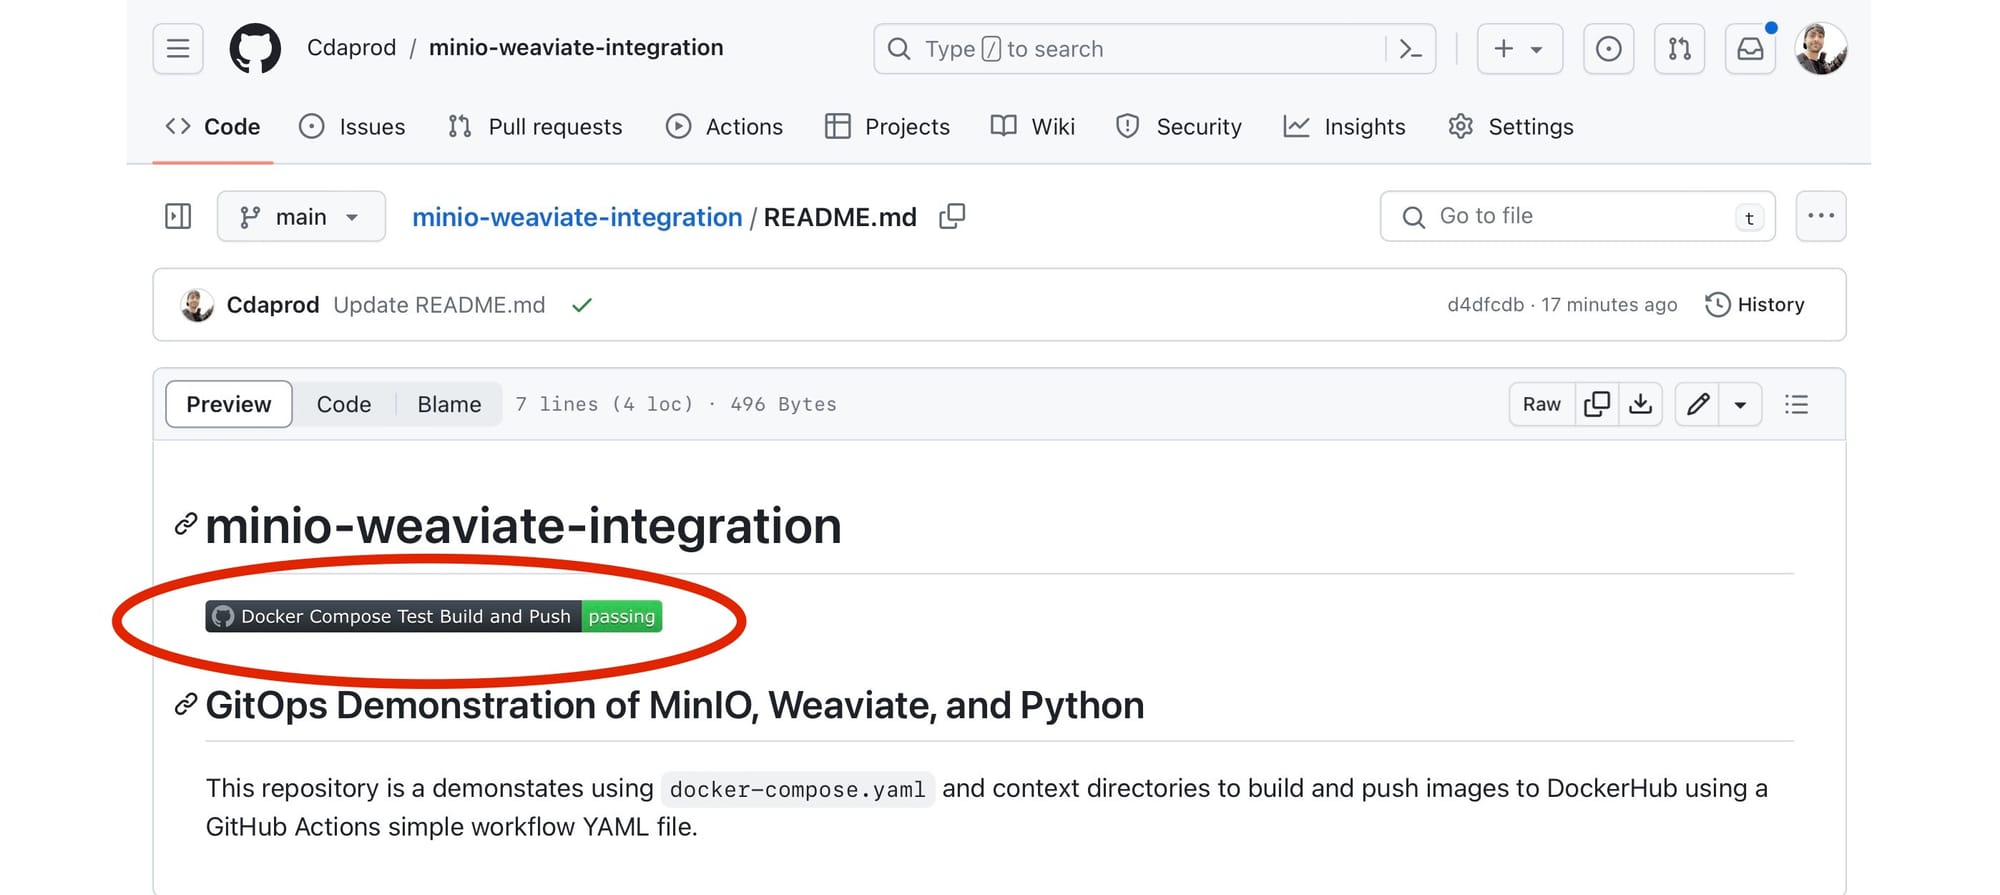
- Commit Your Changes: Commit the updated
README.mdfile to your repository. The status badge will now appear wherever you placed the markdown code, showing the current status of the workflow (e.g., passing, failing).
If you’re using a different platform (like GitLab, Bitbucket, etc.), the process should be somewhat similar: look for the CI/CD settings or pipeline configurations where you can find options to create a status badge.
If you’ve been following along with us, then congratulations! Using this status badge we can now look to see the build progress and the status of GitOps. By now, you should have a solid foundation in leveraging Git as the single source of truth for your infrastructure and application deployment.
Benefits of Using GitHub Actions
- Automation: Streamlines the build, test, and deployment processes, reducing manual errors and saving time.
- Flexibility: Supports a wide range of programming languages and frameworks.
- Integration: Seamlessly integrates with GitHub repositories, enhancing collaboration and feedback.
- Scalability: Easily adapts to projects of any size, from small startups to large enterprises.
By incorporating GitHub Actions into the workflow for Docker Compose projects, teams can achieve higher efficiency, better reliability, and faster deployment cycles. This integration exemplifies the power of automation in modern software development, enabling developers to focus more on innovation and less on the mechanics of deployment.
This tutorial demonstrates how GitOps principles can be applied to automate any deployment and testing of a complex application setup involving MinIO and its services. By leveraging GitHub Actions, changes to the repository automatically trigger workflows that ensure the application’s components are always in a deployable and tested state.
Embracing the Future with GitOps and AI
As we've demonstrated together through this deep integration of MinIO with GitOps and AI development tools—Weaviate, and Python—we've set a blueprint to redefine the landscape of technology and AI research. This fusion not only streamlines our development processes but also empowers us to tackle the complexities of AI with newfound agility and precision.
The storage resilience of MinIO, coupled with the intelligent metadata management of Weaviate and the dynamic capabilities of Python, all orchestrated under the principles of GitOps, provides a comprehensive environment for developing, deploying, and managing AI applications. This robust foundation encourages us to think bigger and push further, exploring the vast potential of AI with the support of an efficient, scalable, and automated infrastructure.
As homegrown developers, hobbyists, or industry veterans, the time is ripe for us to leverage these advancements, driving innovation from the ground up. Whether you're embarking on your first AI project or looking to enhance existing workflows, the tools and methodologies discussed offer a pathway to success, minimizing barriers and maximizing potential. I encourage you to take these insights and apply them to your own development endeavors. Experiment with these technologies, integrate them into your projects, and share your experiences with the community. By doing so, we not only contribute to the evolution of AI but also ensure that we remain at the forefront of this exciting field, ready to capitalize on the opportunities that lie ahead.
We look forward to being a part of your journey in exploring these advanced solutions and achieving new heights in your data-driven endeavors. Be sure to reach out to us on Slack if you have any questions or just to say hello.
Here's to building the future, one line of code at a time!


