Object Detection Made Simple with MinIO and YOLO

Tl;dr:
In this post, we will create a custom image dataset and then train a You-Only-Look-Once (YOLO) model for the ubiquitous task of object detection. We will then implement a system using MinIO Bucket Notifications that can automatically perform inference on a new image.
Introduction:
Computer vision remains an extremely compelling application of artificial intelligence. Whether it’s recognizing elements on a battlefield or predicting crop yields, computer vision is arguably one of the most commercially valuable (and societally important) realms of AI.
However, a rate-limiter to the adoption of the best computer vision capabilities is oftentimes the complexities associated with constructing a dataset and designing a simple end-to-end system that will perform your computer vision task on a new image.
In this blog post, we will take a step-by-step look at how to tackle these issues with best-in-class tools like CVAT and MinIO Bucket Notifications. By the end of this post, you will be able to train an object detection model on a custom dataset and use it to make predictions whenever a new image appears.
The Premise
Let’s say we want to be able to recognize types of aircraft present in satellite imagery. Let’s also assume we are starting from scratch: no pre-built datasets, no pre-trained models. Here are two sample aircraft that we want to detect and recognize in our satellite imagery:
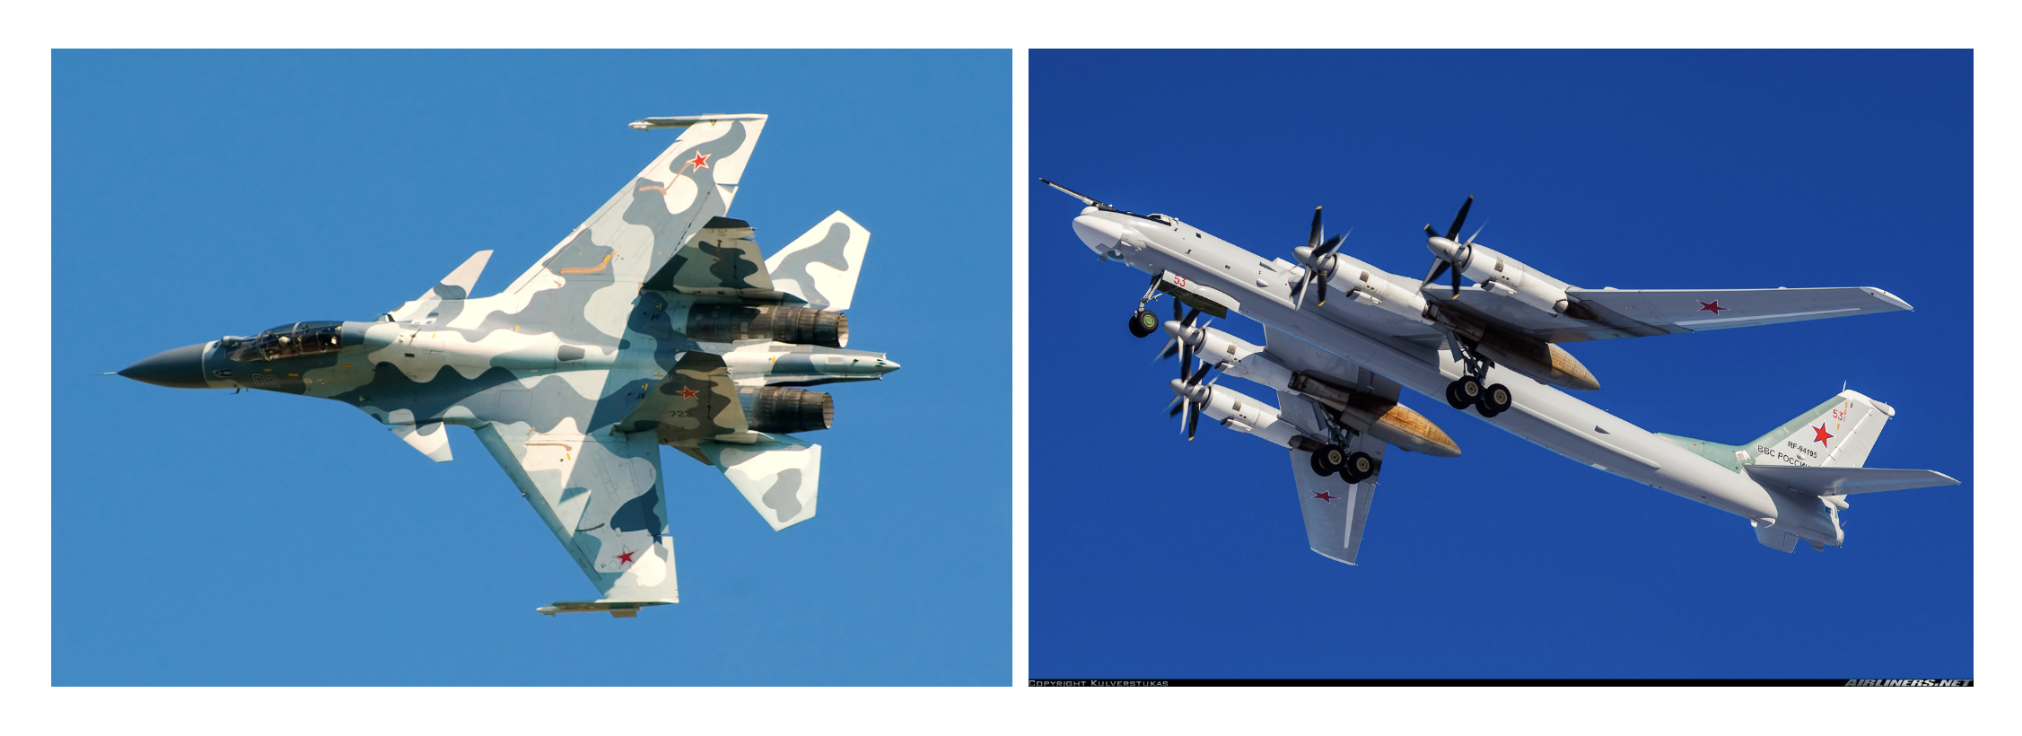
Note: The steps outlined in this post can be generalized to just about any domain. Instead of detecting aircraft types, we could be classifying land use or performing regression to predict crop yields. Beyond traditional images, we could also be training and performing inference on other types of multi-dimensional data like LiDAR point clouds or 3D Seismic Images; it becomes just a question of how the training data looks (and potentially a different deep learning model instead of YOLO). If you have more questions about what this would look like for a specific use case, feel free to make an issue on the GitHub repo!
Step 1: Acquiring and Managing Training Samples
For this project, due in large part to not owning an on-demand imaging satellite, I visited airfields on Google Earth and took multiple screenshots of areas that had some of these planes visible. Assembling this set of images took quite some time, so I stored them all in a bucket on my MinIO server titled “object-detection.” In a production setting, the benefits of storing your collected samples on MinIO become even more prescient. Active-active replication, the highest levels of encryption, and super fast GET/PUTs (to name a few) mean that your diligently-collected samples will be highly available, safe and secure.
Step 2: Creating the Dataset
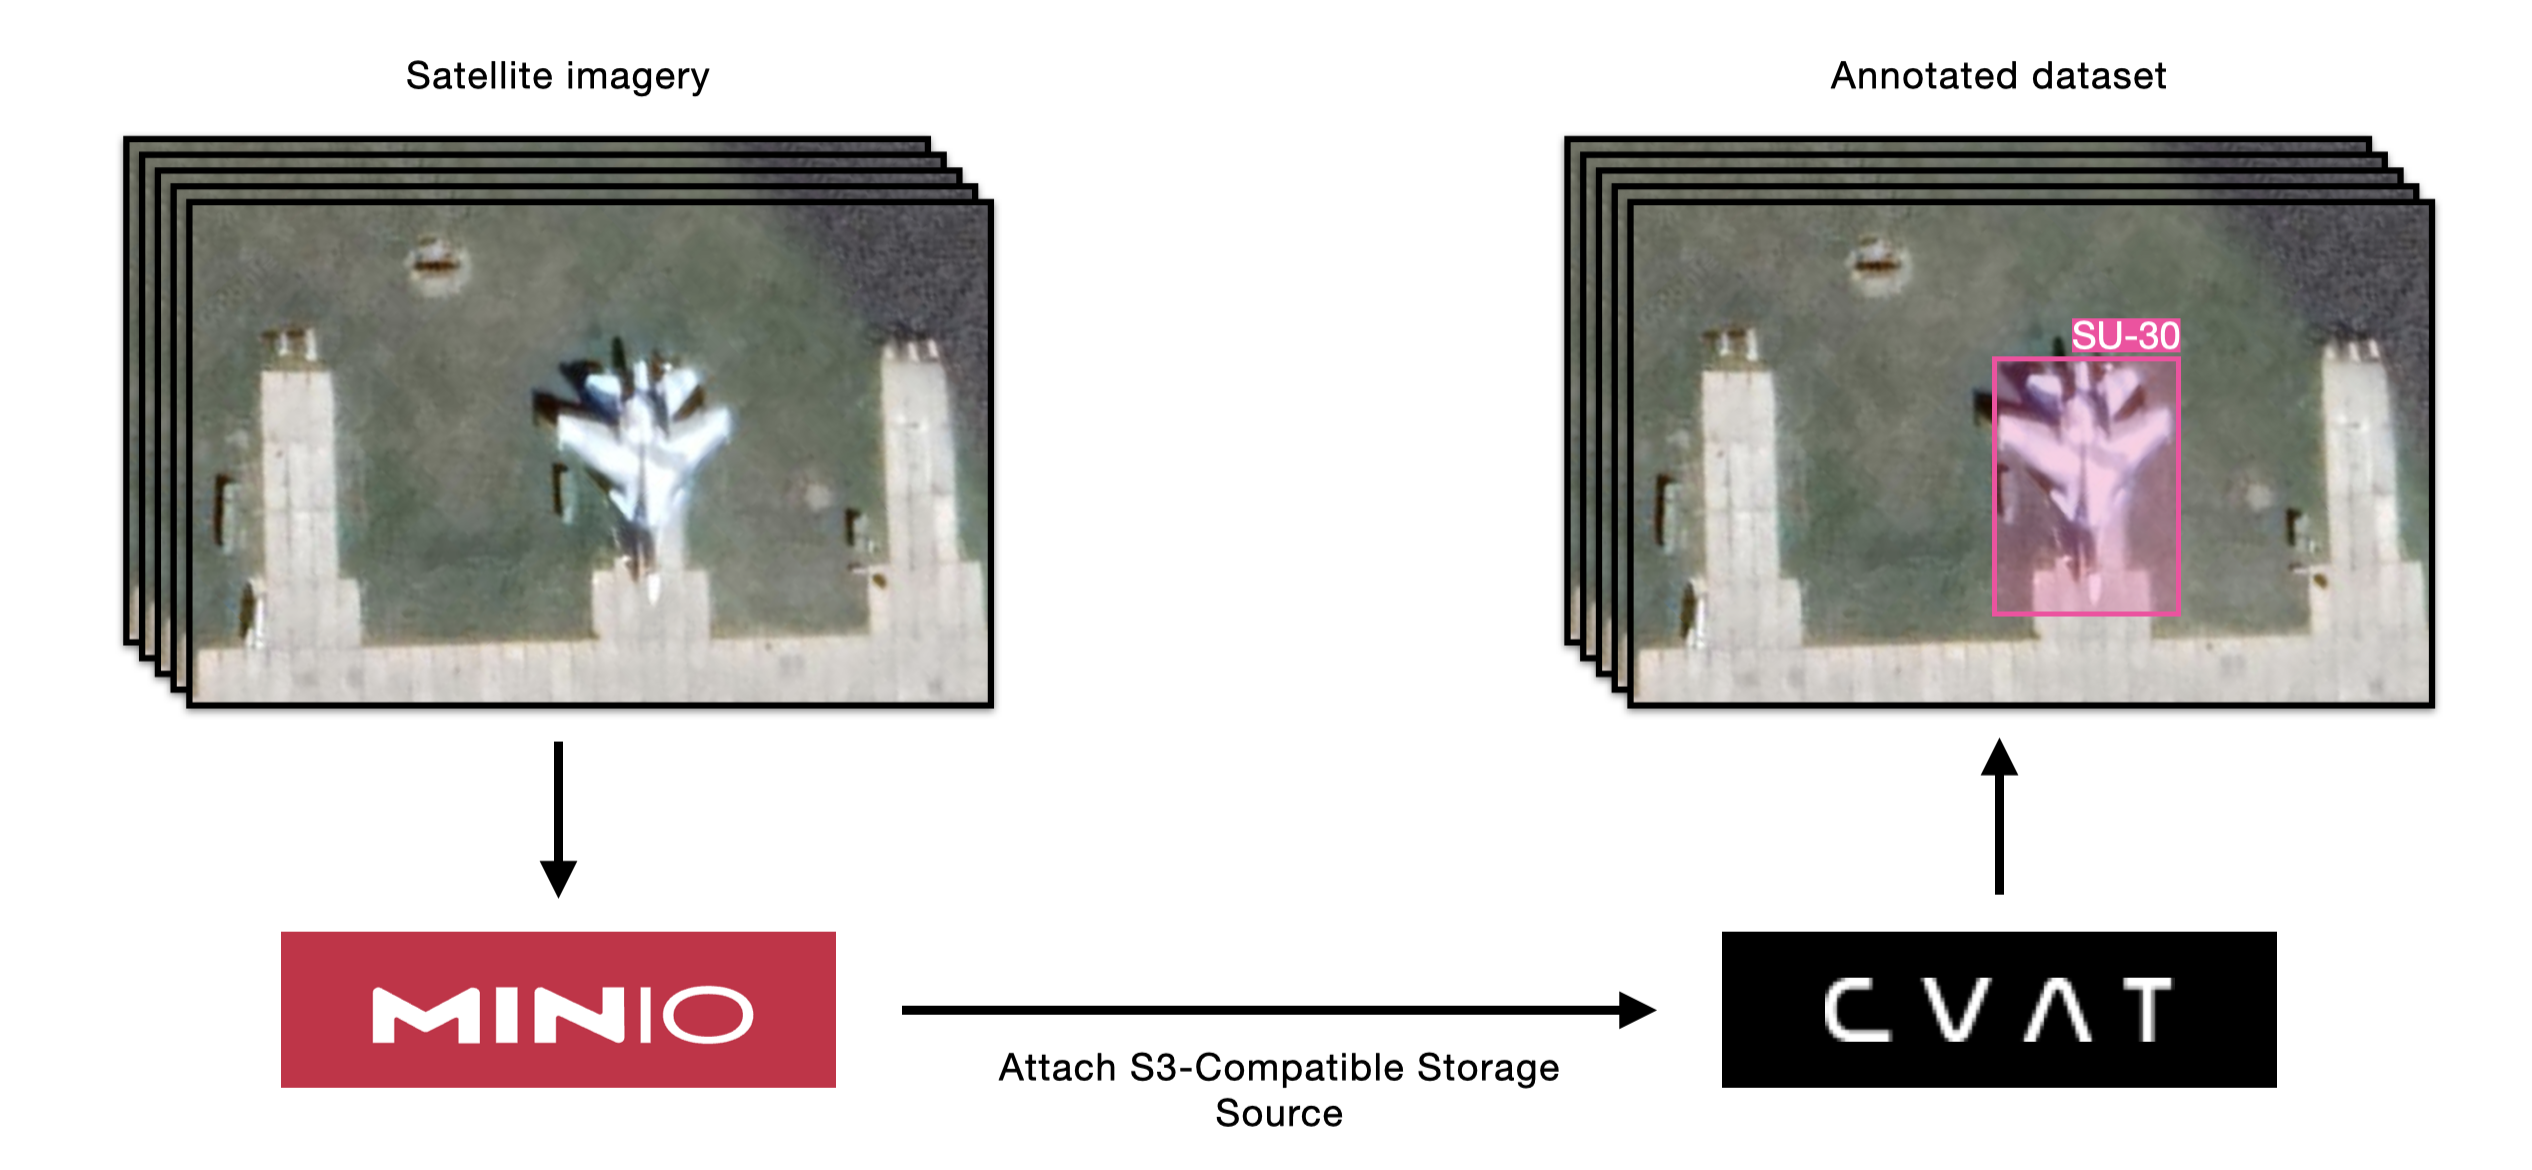
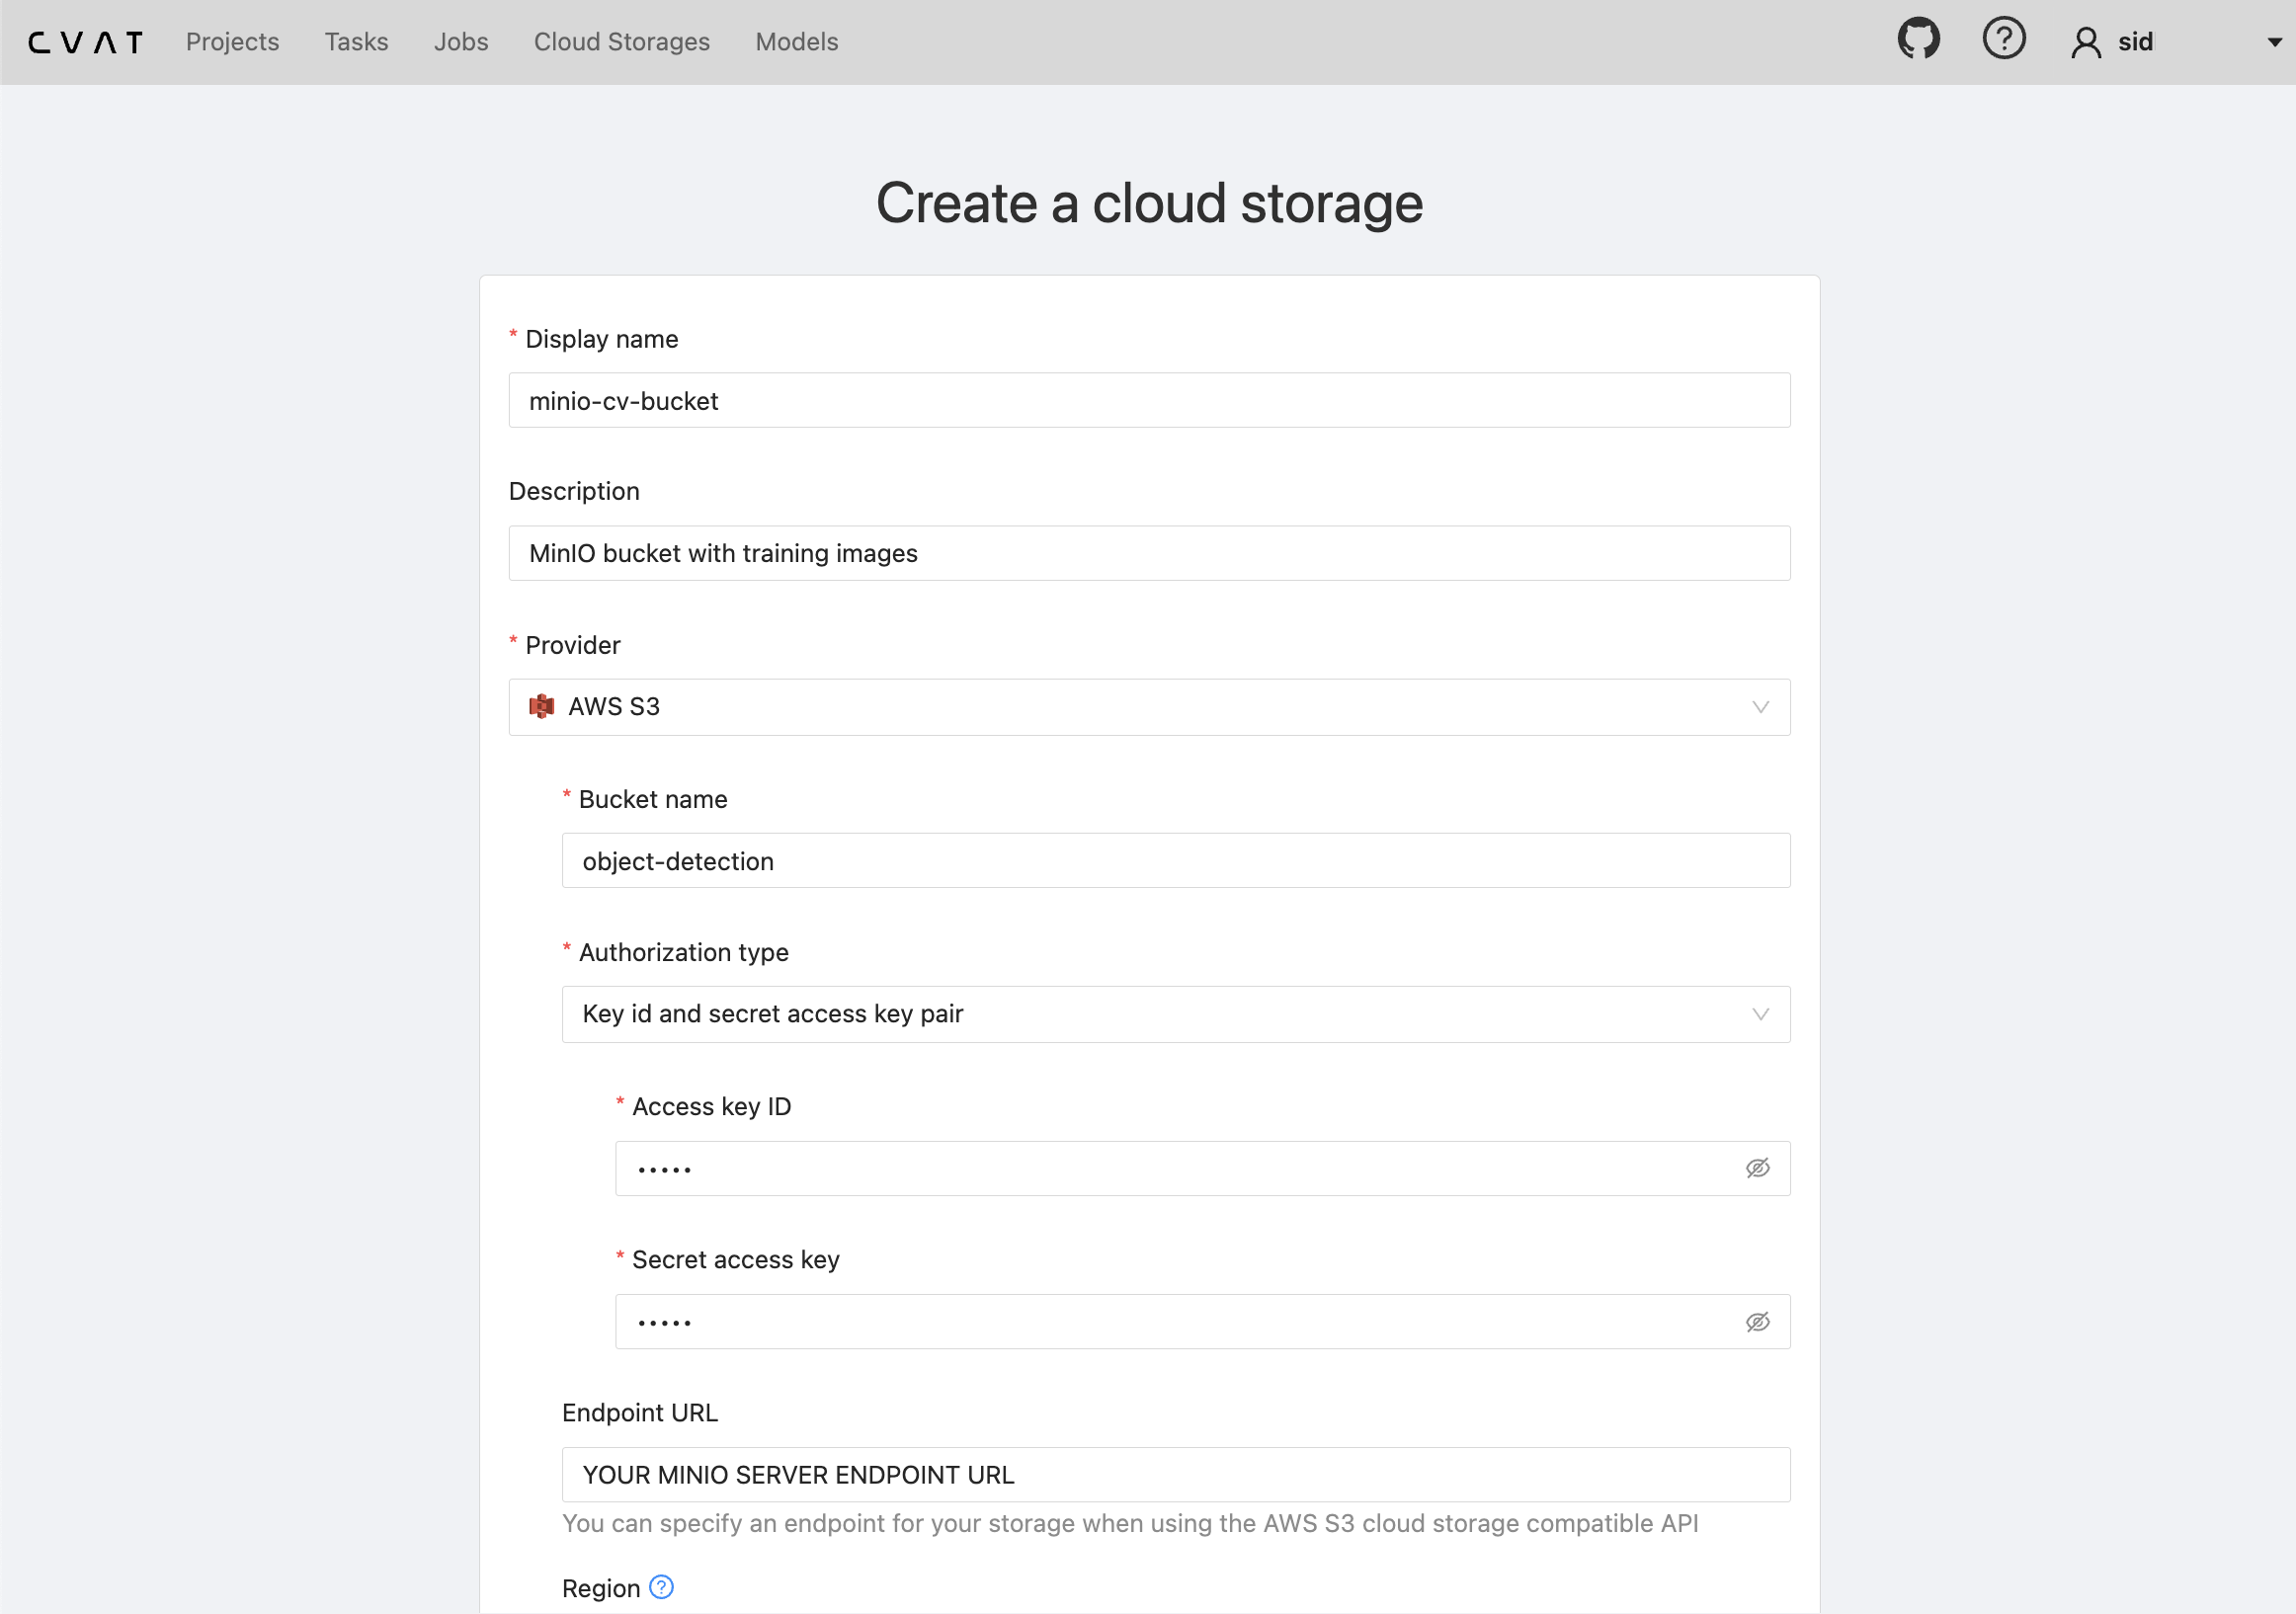
In order to train an object detection model for your use case, a labeled (or ‘annotated’) dataset is needed. A great tool for this is CVAT by OpenCV. A cool feature is that CVAT provides a utility to connect your MinIO bucket as a “cloud storage” in order to feed your bucket’s images directly to the dataset annotation tool. To do this, make sure that your MinIO Server’s host is accessible to the CVAT server, especially if you’re running MinIO Server on-premise or locally on your laptop. Also, as a note, there are two ways to use CVAT: (1) using their provided web app at app.cvat.ai or (2) running it locally. In either case, once you have CVAT open, click on “Cloud Storages” in the menu bar. From there, you can fill out a form to attach your (S3-Compatible) MinIO bucket:
Let’s now create our new labeling task under “Tasks”:
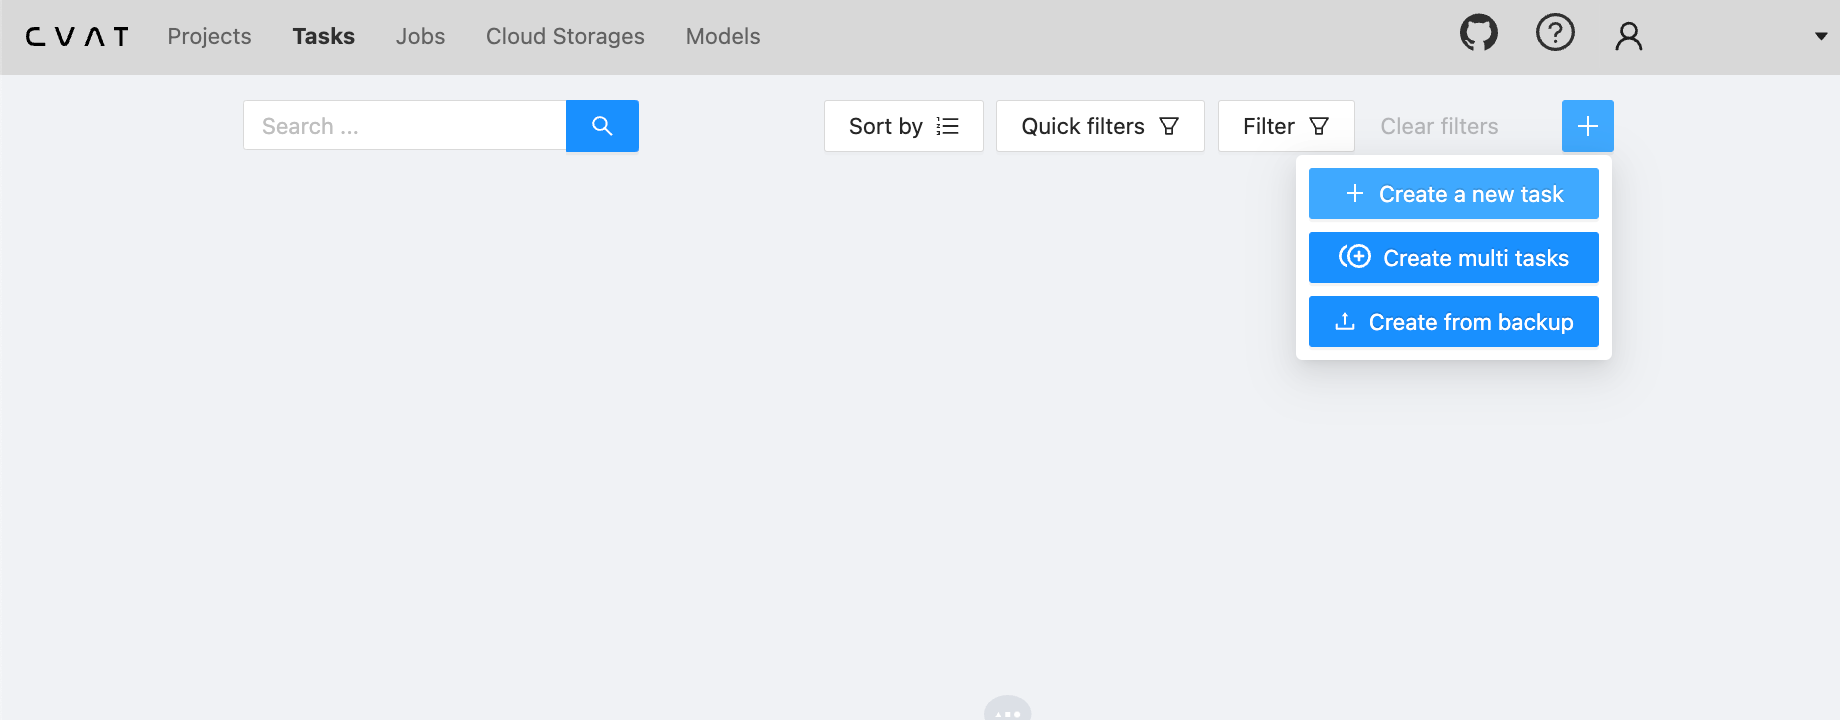
You should be prompted with a form to fill out:
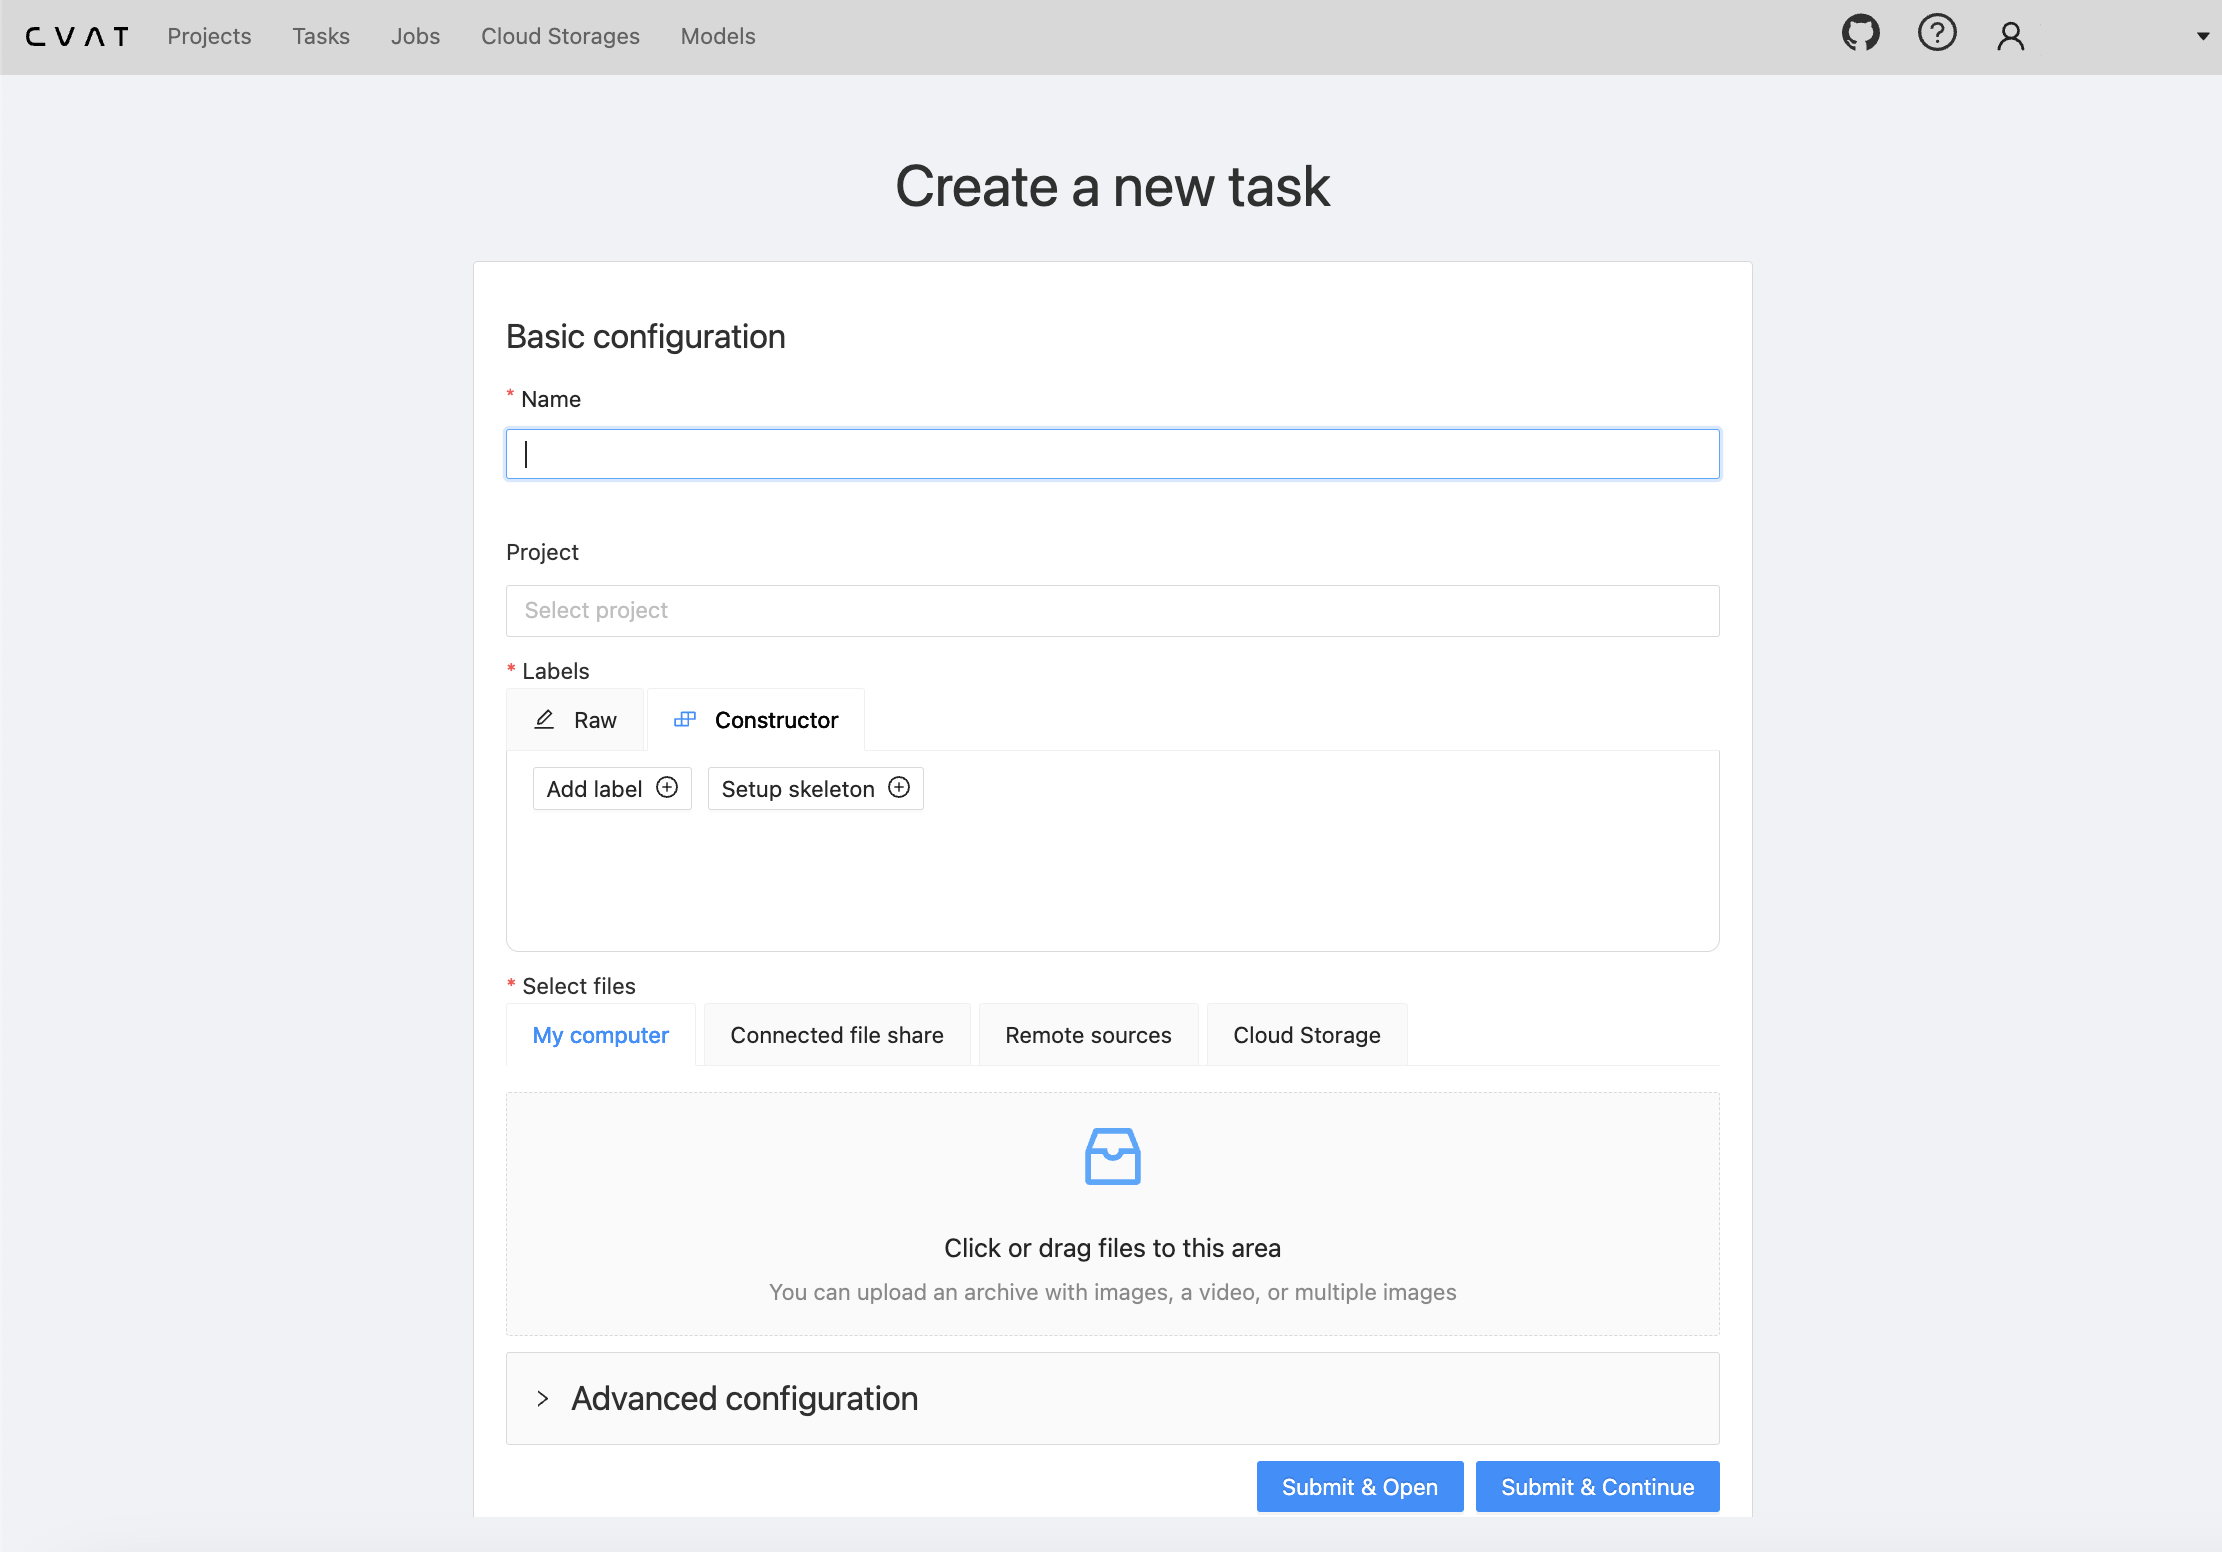
When creating the task, it’s important to define the class labels correctly (I defined two Rectangle labels titled “SU30” and “TU95,” corresponding to the two planes I wanted to detect):

Now the remaining step is to attach our previously added MinIO bucket as a data source. Under “Select Files,” click “Cloud Storage” and fill in the name you provided for that source earlier. I used the name “minio-cv-bucket” above.
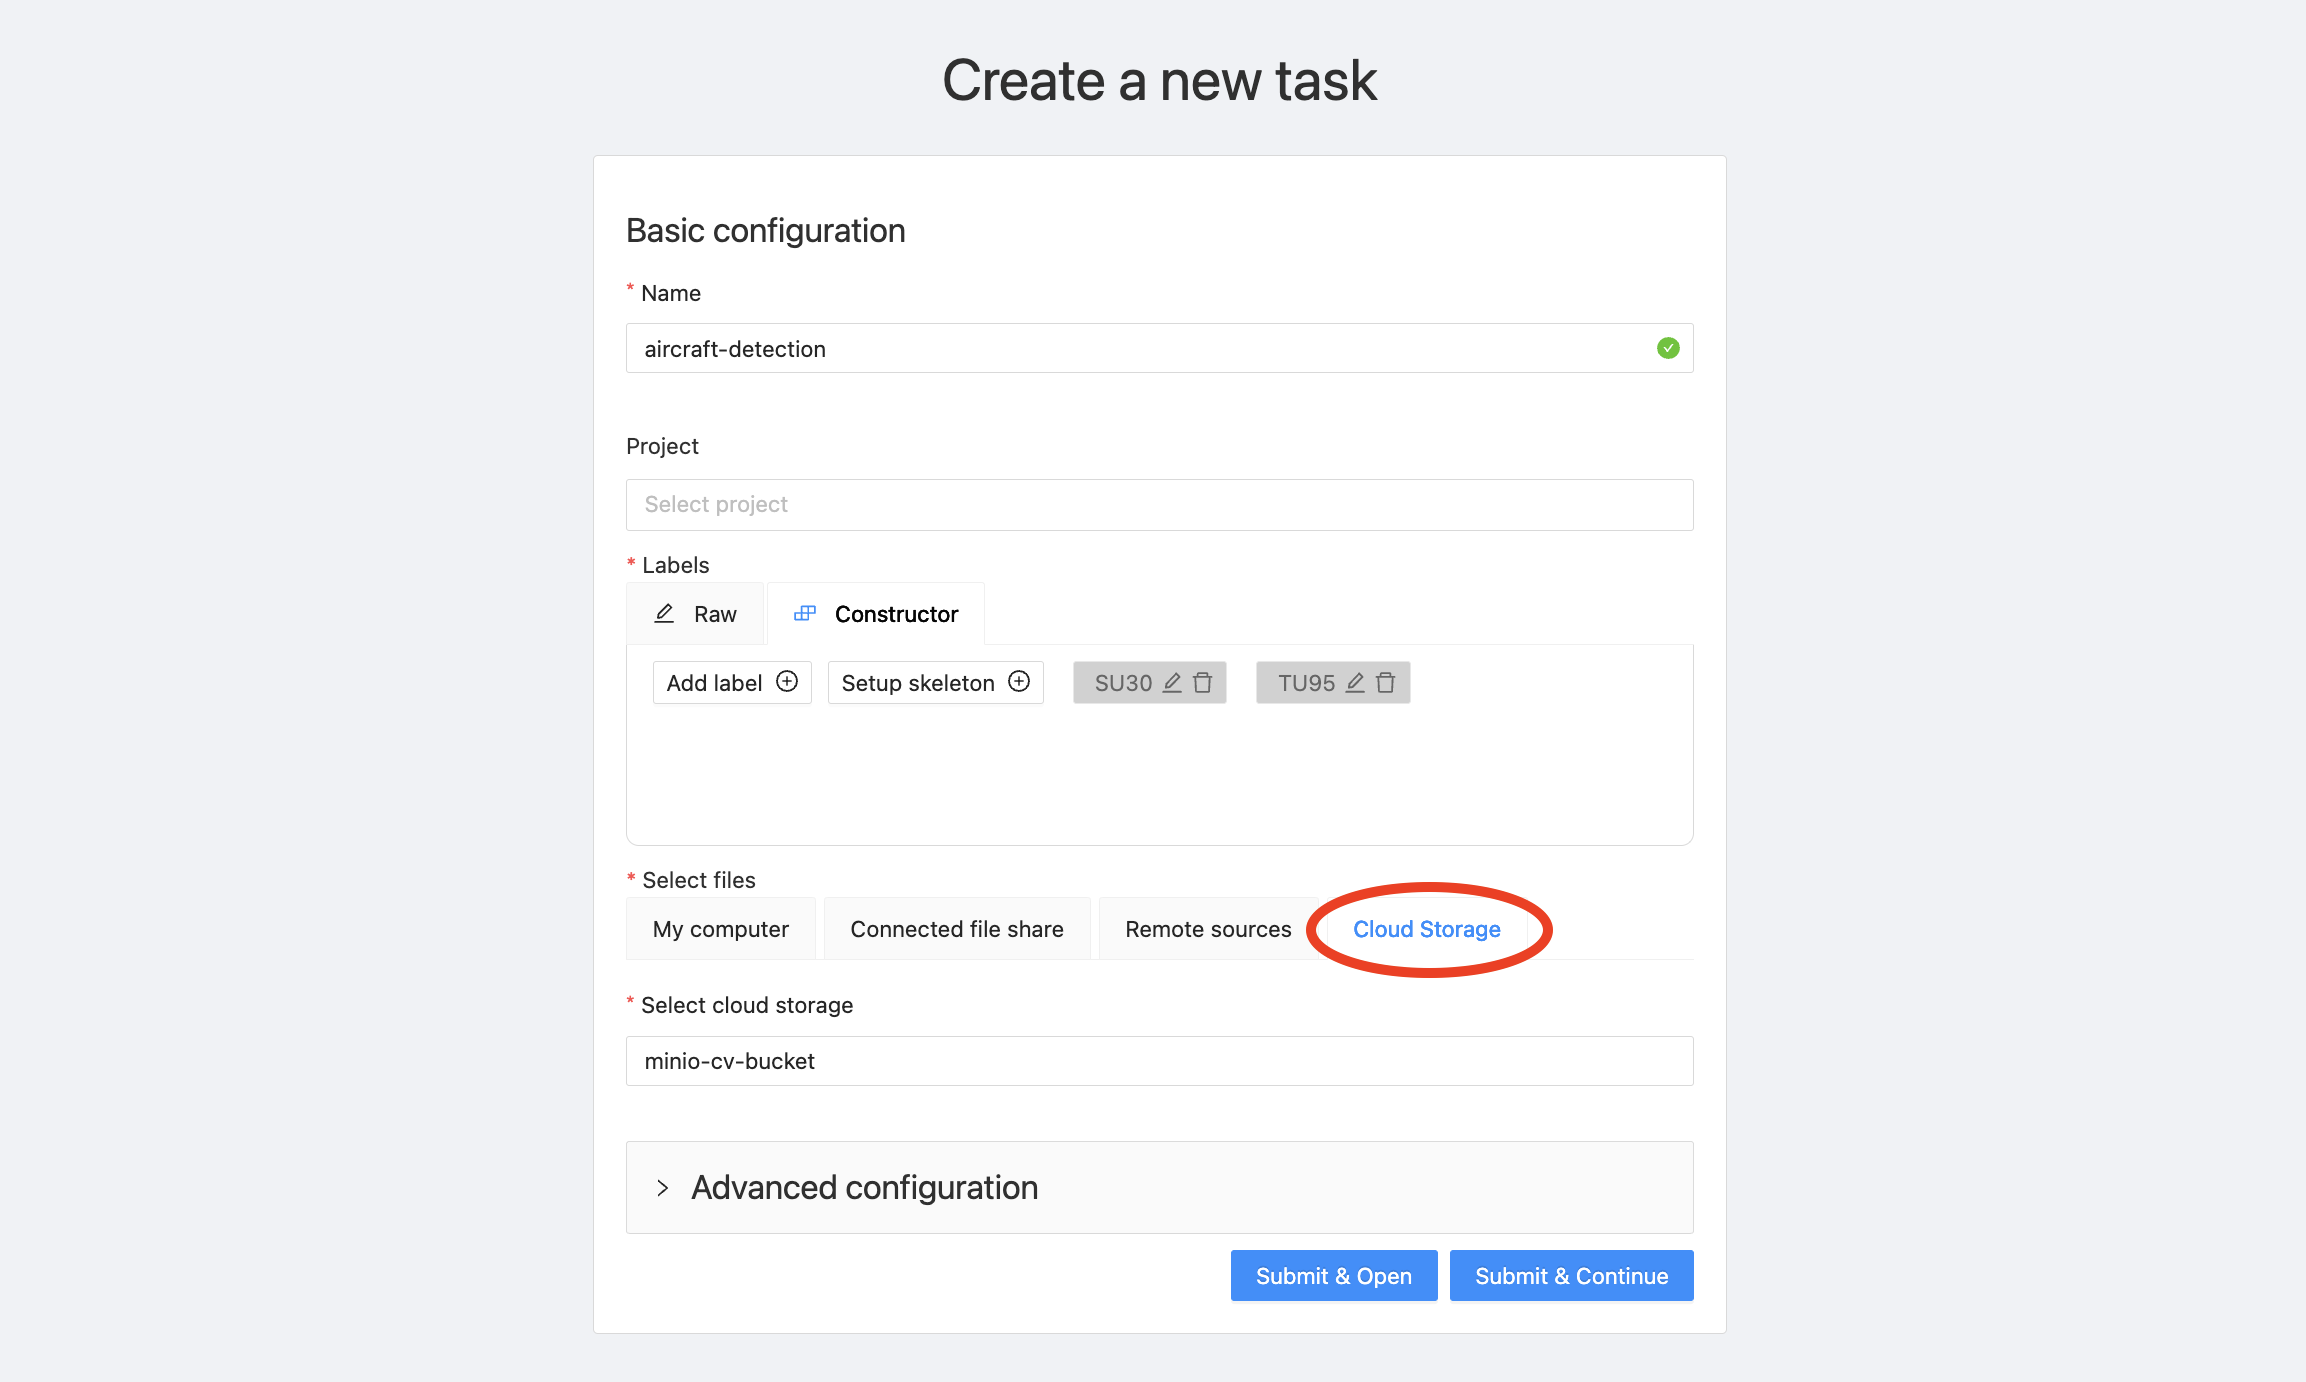
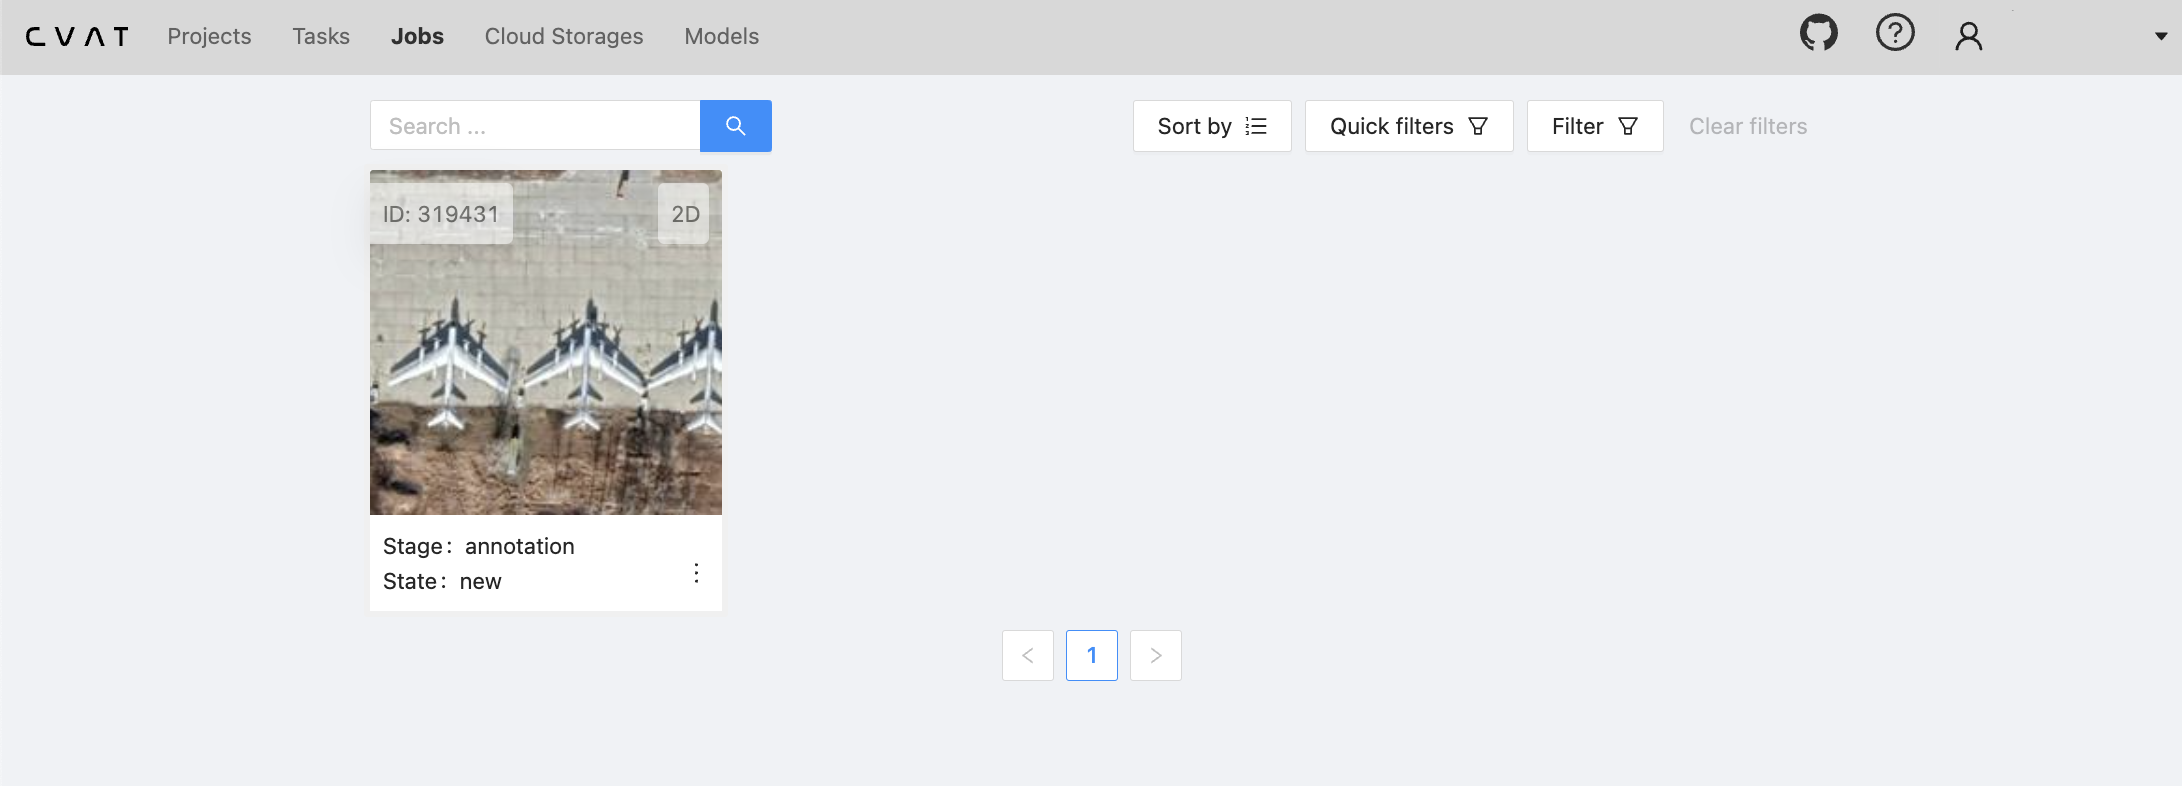
The uploading process will take a few minutes. Once it’s completed, you should be able to see your annotation job available under “Jobs.”
Now, by clicking on the job, you can start annotating each of your images. Warning: this can be a disproportionately time-consuming process. Generally, in a production environment with large annotation needs, it may be best to offload this task to a dedicated internal team or a third-party data labeling company.
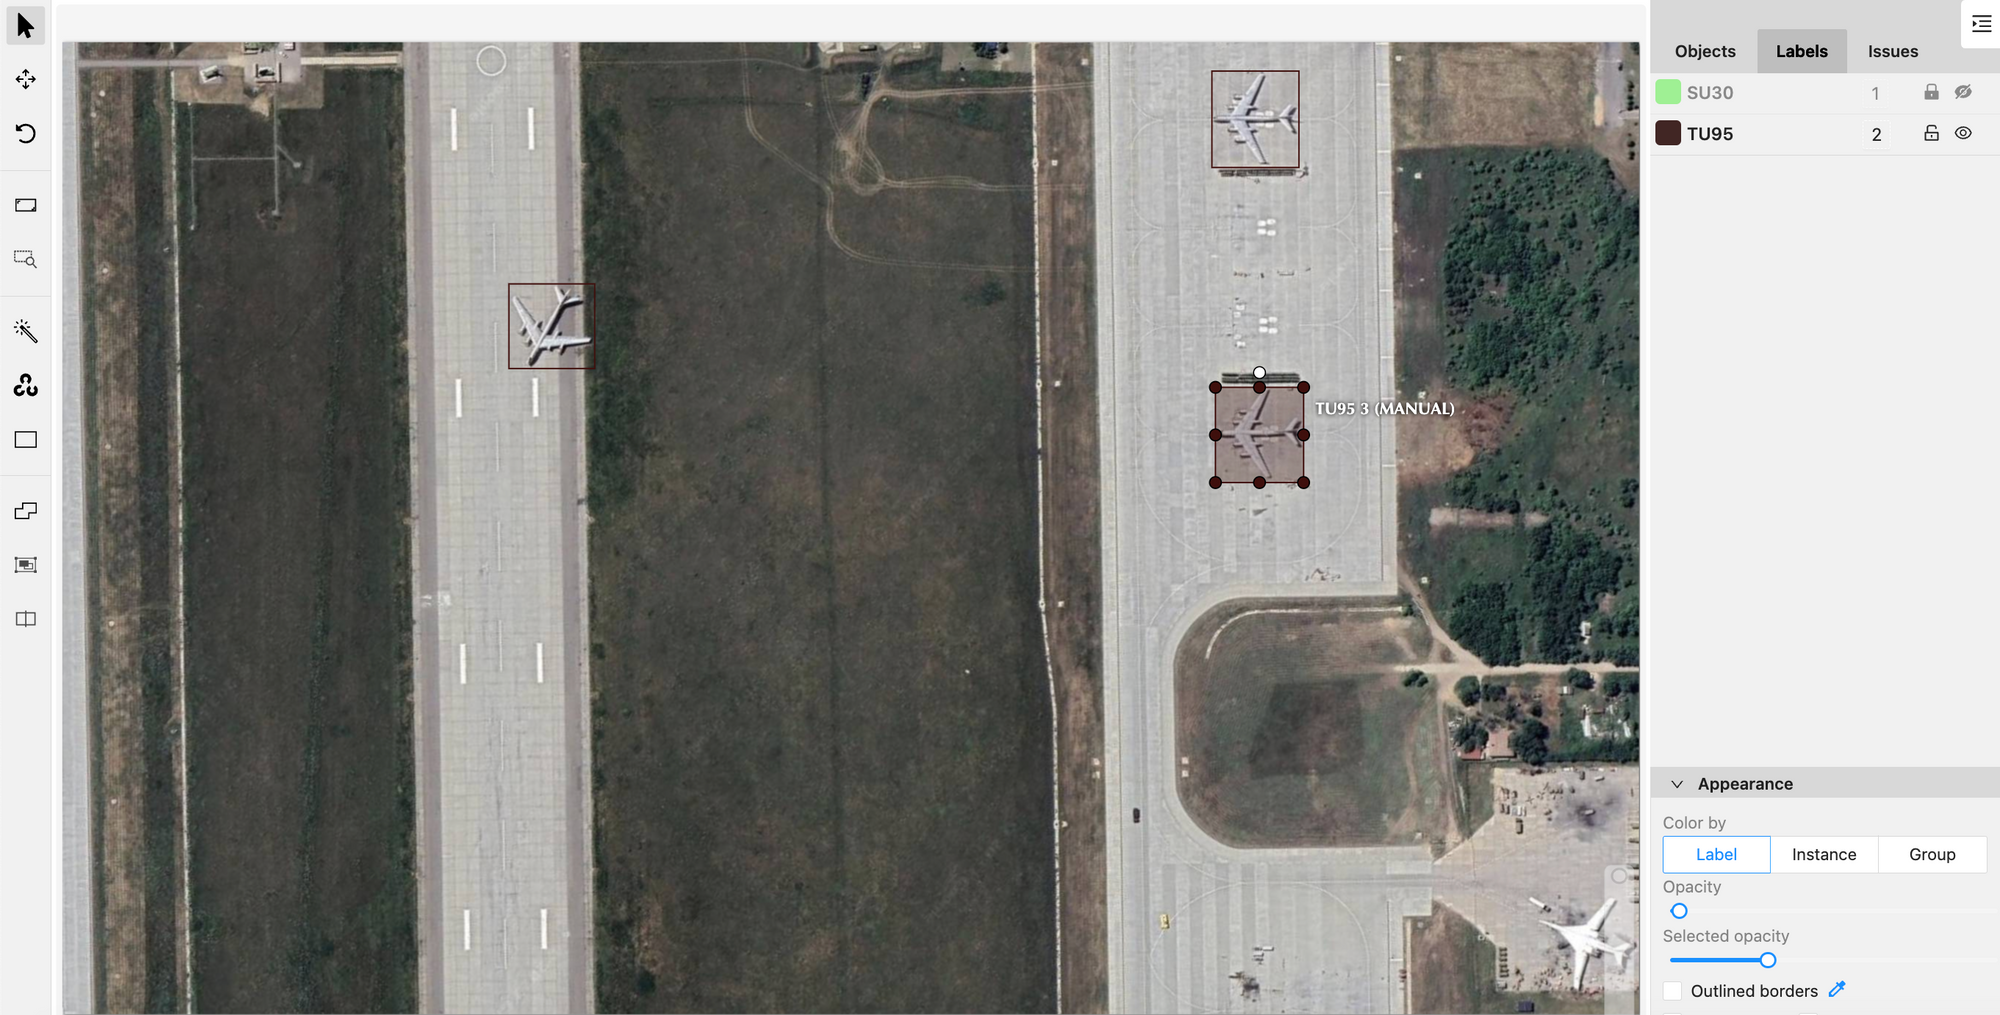
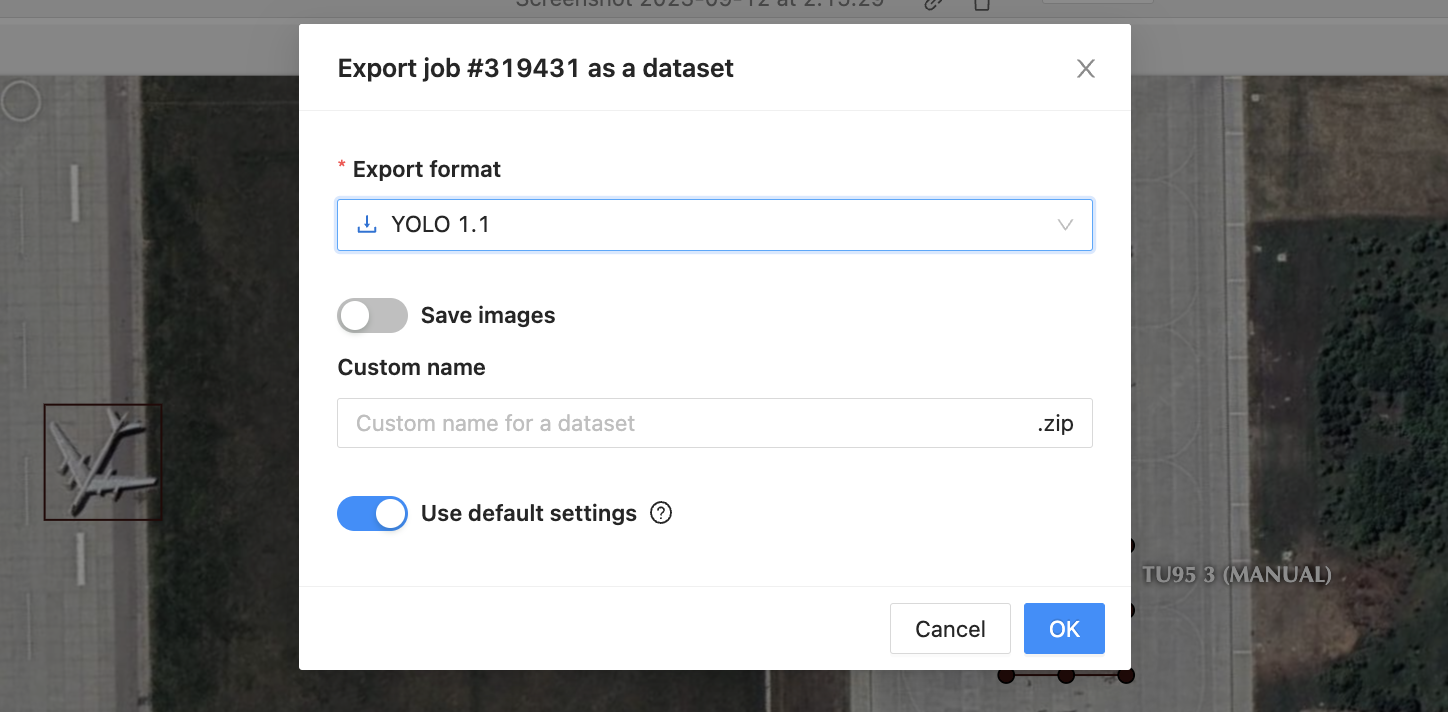
Once you’re done annotating, export the dataset in the YOLO format.
Step 3: Organizing the Training Data
Your exported dataset will be in the form of a zip file. Once you unzip it, the YOLO-formatted annotation text files will be within an enclosed folder. Feel free to take a look at them. In the YOLO format, each image’s annotations are in a text file where each line contains two corners of a bounding box and the class. The class number corresponds to the order in which you defined the labels when creating the task. So, in this example, 0 would correspond to Su-30, and 1 would correspond to Tu-95.
At this point, create a new working directory (or enter one that you have already created). Within this directory, create a subdirectory called 'dataset.' Within ‘dataset’, create directories such that your working directory looks like this:
You will now have to populate the train, val, and test subdirectories for both images and their corresponding annotations (the text files). It’s up to you how you want to retrieve and split up your samples. A good practice is to break up your total amount of training samples into 80% training, 10% validation, and 10% test. Make sure to randomly shuffle your images before partitioning them.
Personally, I used MinIO Client’s mc cp in the command line to quickly retrieve all the images from my ‘object-detection’ bucket. Alternatively, if you have all your sample images in one place on your local computer already, you can directly work with that. Once I had all my samples in one place, I used a Python script to shuffle, split, and move my images and annotations to the train, val, and test directories. Here is the script provided for convenience. If you have any questions about how to use it, feel free to make an issue in the repo!
Ultimately, make sure that for each image that you have placed in either images/train, images/val, or images/test, the matching annotation .txt file is also in the corresponding subdirectory within the annotations/ directory. For example:
Now, our data is in place. It’s time to take a look at our object detection model and start training.
Step 4: The Object Detection Model
The current gold standard (in terms of performance and ease of use) for object recognition is the YOLO (You Only Look Once) class of models. At the time of writing, YOLOv8 is the latest version and is maintained as open-source by Ultralytics. YOLOv8 provides a simple API that we can leverage to train the model on our newly created annotations (and eventually run inference as well).
Let’s download YOLOv8:
We can now use the YOLOv8 CLI tool or Python SDK to train, validate, and predict. Refer to the YOLOv8 docs for further information.
Step 5: Training
In your working directory, define a YAML file that specifies the locations of the dataset and the details about the classes. Notice how the paths are the same as the ones I created earlier in the working directory. I called my file ‘objdetect.yaml.’ Also, note the two aircraft class labels have to be defined in the same order as they were in CVAT.
Start training the YOLOv8 model on our dataset with the following command (using the YOLO CLI tool). Refer to the YOLO docs to learn more about all the different options you can configure for training. Here, I am initiating training for 100 epochs and setting an image size of 640 pixels (all our training images will be scaled accordingly during training):
Training will take a while, especially if you’re working on a laptop (like I am), so now is a good time to take a break (or read ahead 😀)!
At the end of the training loop, your trained model, along with other interesting graphs and charts, will be stored in an auto-generated directory called ‘runs.’ The terminal output (like below) will indicate the specific location of the results of the latest run. Every time you train a model, a similar directory will be generated within ‘runs/detect/’.
Note: runs/detect/train/weights/ will contain the PT files with the exact trained weights. Remember this location for later.
Step 5B: Model Validation and Test
You can run validation with the following command:
The results will be automatically stored in a folder in your working directory with a path of the form ‘runs/detect/val.’
To perform inference on the test set, you can use the following command:
The results will be stored in ‘runs/detect/predict.’ Here are some prediction results on the test set:

Step 6: New Image Inference using MinIO Bucket Notifications
Now that we have a trained model that can recognize some aircraft types present in a satellite image, how can we make use of it for new images in a simple way?
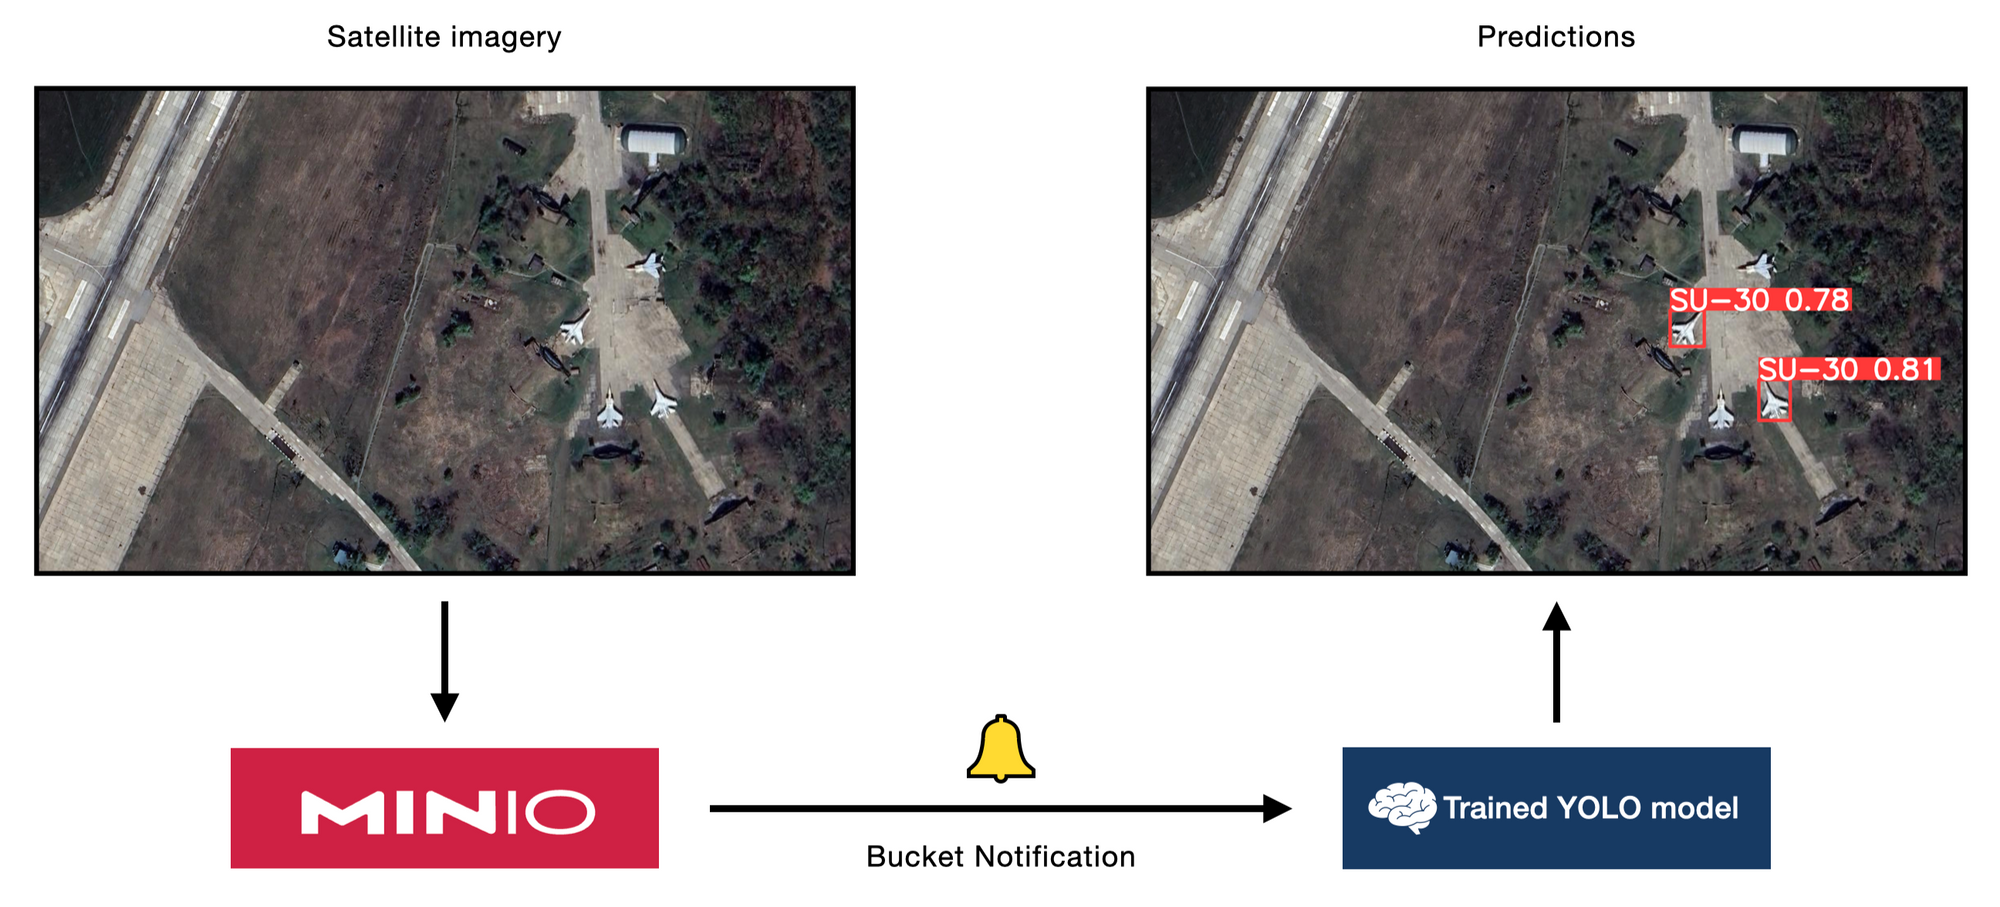
MinIO Bucket Notifications is a perfect tool for this. We can build a system that can automatically perform object detection inference upon a new image dropped in our bucket with the help of a webhook.
At a high level, we have 3 steps. First, we need to define an endpoint that can serve as a webhook to perform object detection on a new image with our trained model. Second, we need to configure some environment variables for our MinIO Server deployment that instruct it to hit our webhook endpoint upon some event happening. Third, we need to configure what types of bucket events (i.e. PUT) we want to act on. Let's walk through it step-by-step.
Here’s the code for a simple Flask-based server (detection_server.py) that runs inference on a new image added to the MinIO bucket:
Let’s start the inference server:
Make note of the hostname and port that the Flask application is running on.
Next, let’s start working on configuring the webhooks on the MinIO side. First, set the following environment variables. Replace <YOURFUNCTIONNAME> with a function name of your choosing. For simplicity, I went with ‘inference.’ Also, make sure that the endpoint environment variable is set to the correct host and port for your inference server. In this case, http://localhost:5000 is where our Flask application is running.
Now, restart the MinIO Server using the command mc admin service restart ALIAS or if you’re starting the server for the first time you can also just use the minio server command. For more information about re/starting the MinIO Server, check out the MinIO docs. Note: ALIAS should be replaced with the alias for your MinIO server deployment. For more information about how to set an alias or view existing aliases, check out the docs.
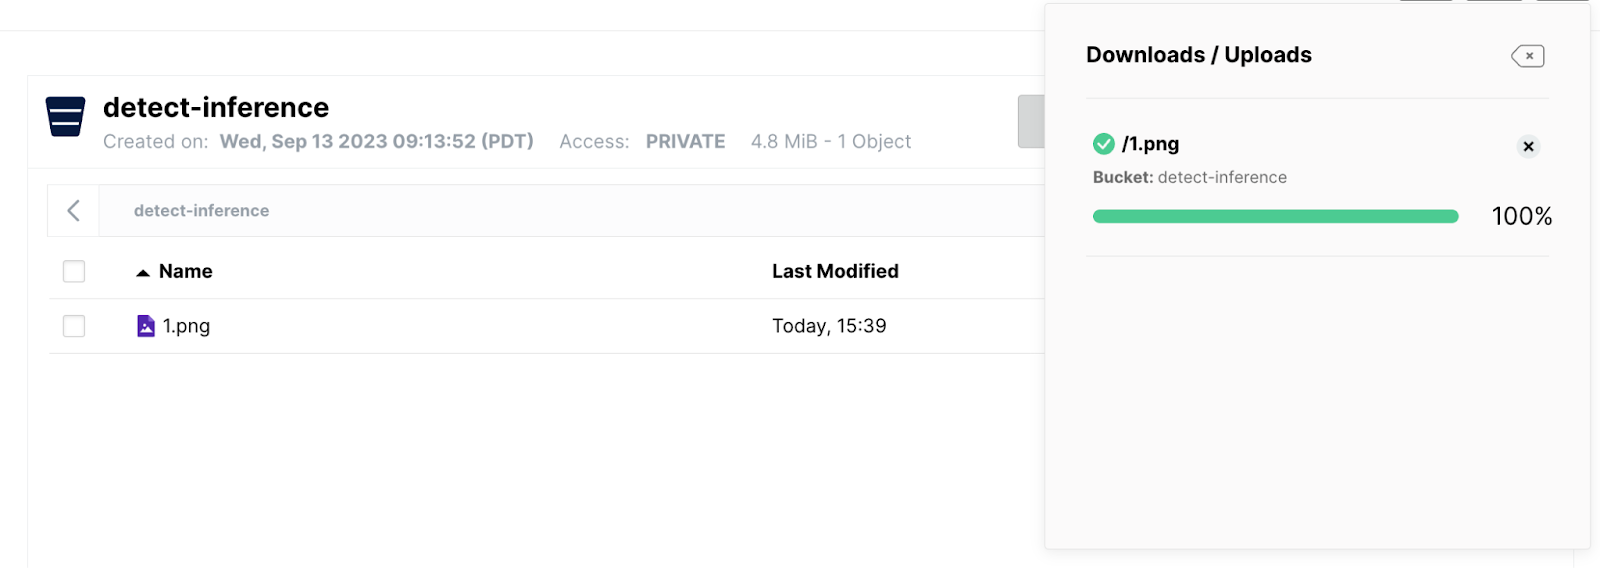
Finally, let’s add the bucket and event we want to be notified about. In our case, we want to be notified about `put` events (creation of new objects) in our bucket. I made a brand new, empty bucket for this purpose titled “detect-inference,” so I will substitute that for ‘BUCKET.’
You can check that you have configured the correct event type for the bucket notifications by verifying whether "s3:ObjectCreated:*" is outputted when you run this command:
For a more detailed explanation of publishing bucket events to a webhook, check out the docs. We are now ready to try object detection on a brand new image!
Trying out our Inference System
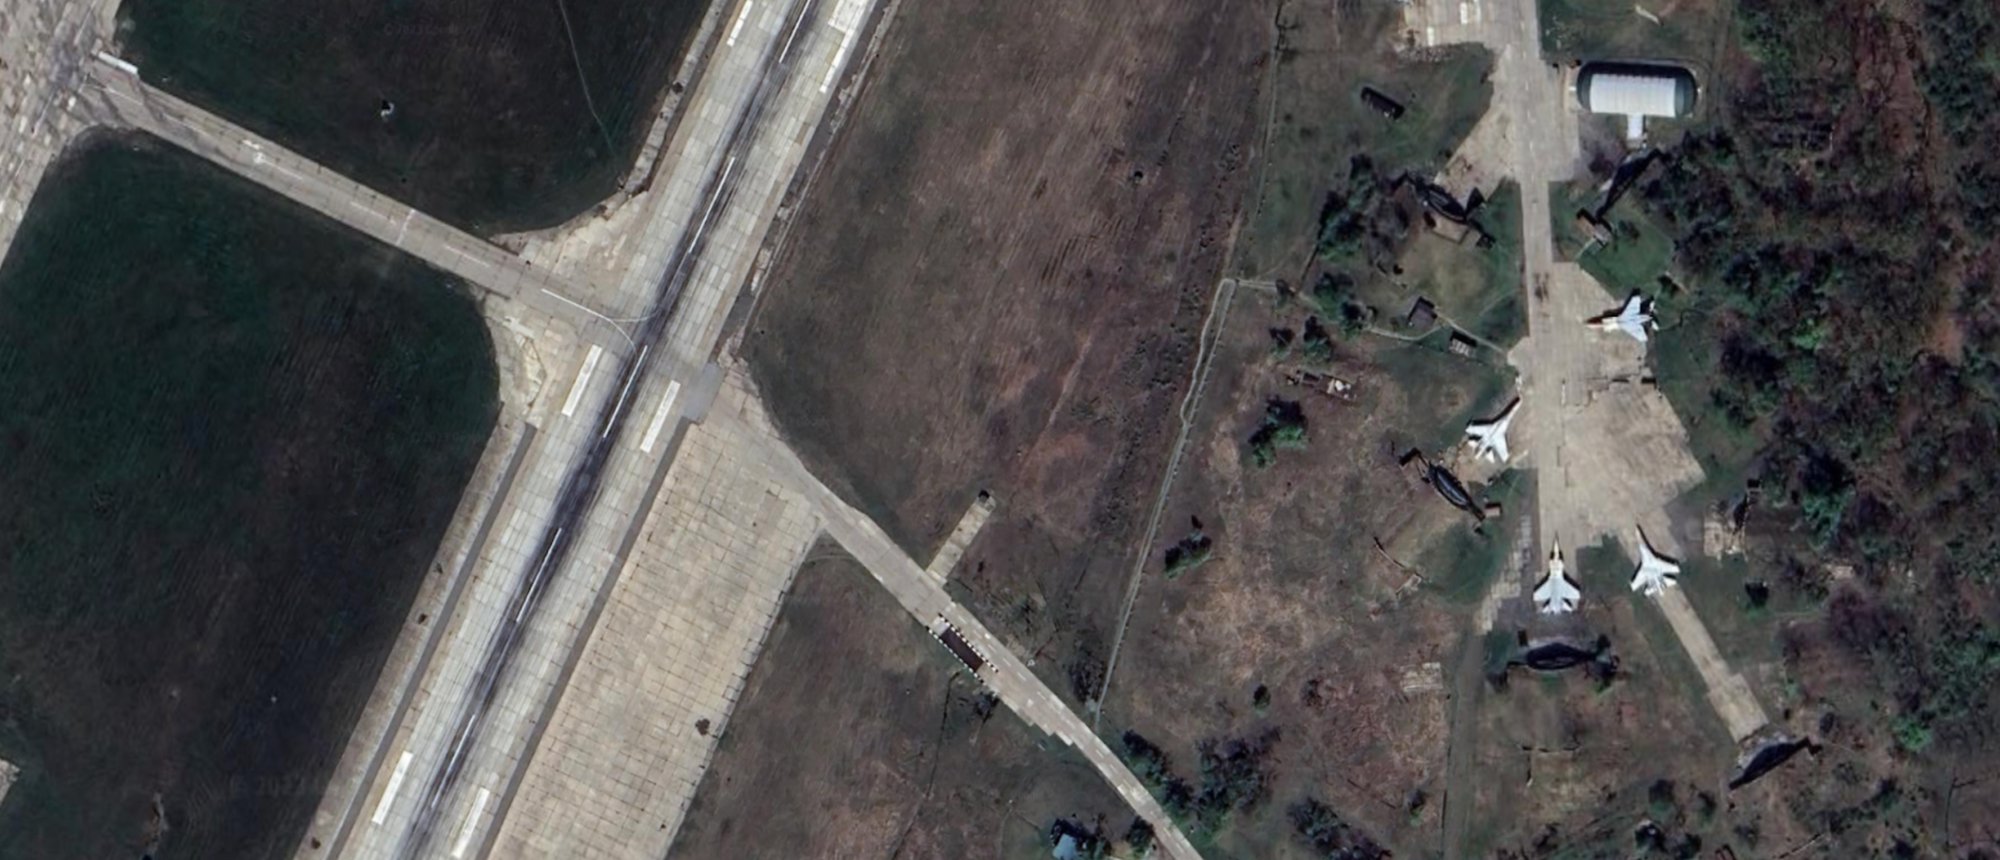
Here’s the new image (titled ‘1.png’) I want to conduct inference on:
I drop the new image in my ‘detect-inference’ bucket:
Almost instantly, I’m able to see the following results on my Flask server:
Note that each detected bounding box in the results list is in the YOLO format [x1, y1, x2, y2, probability, class]. Here are the bounding boxes and predicted classes superimposed on the original image:
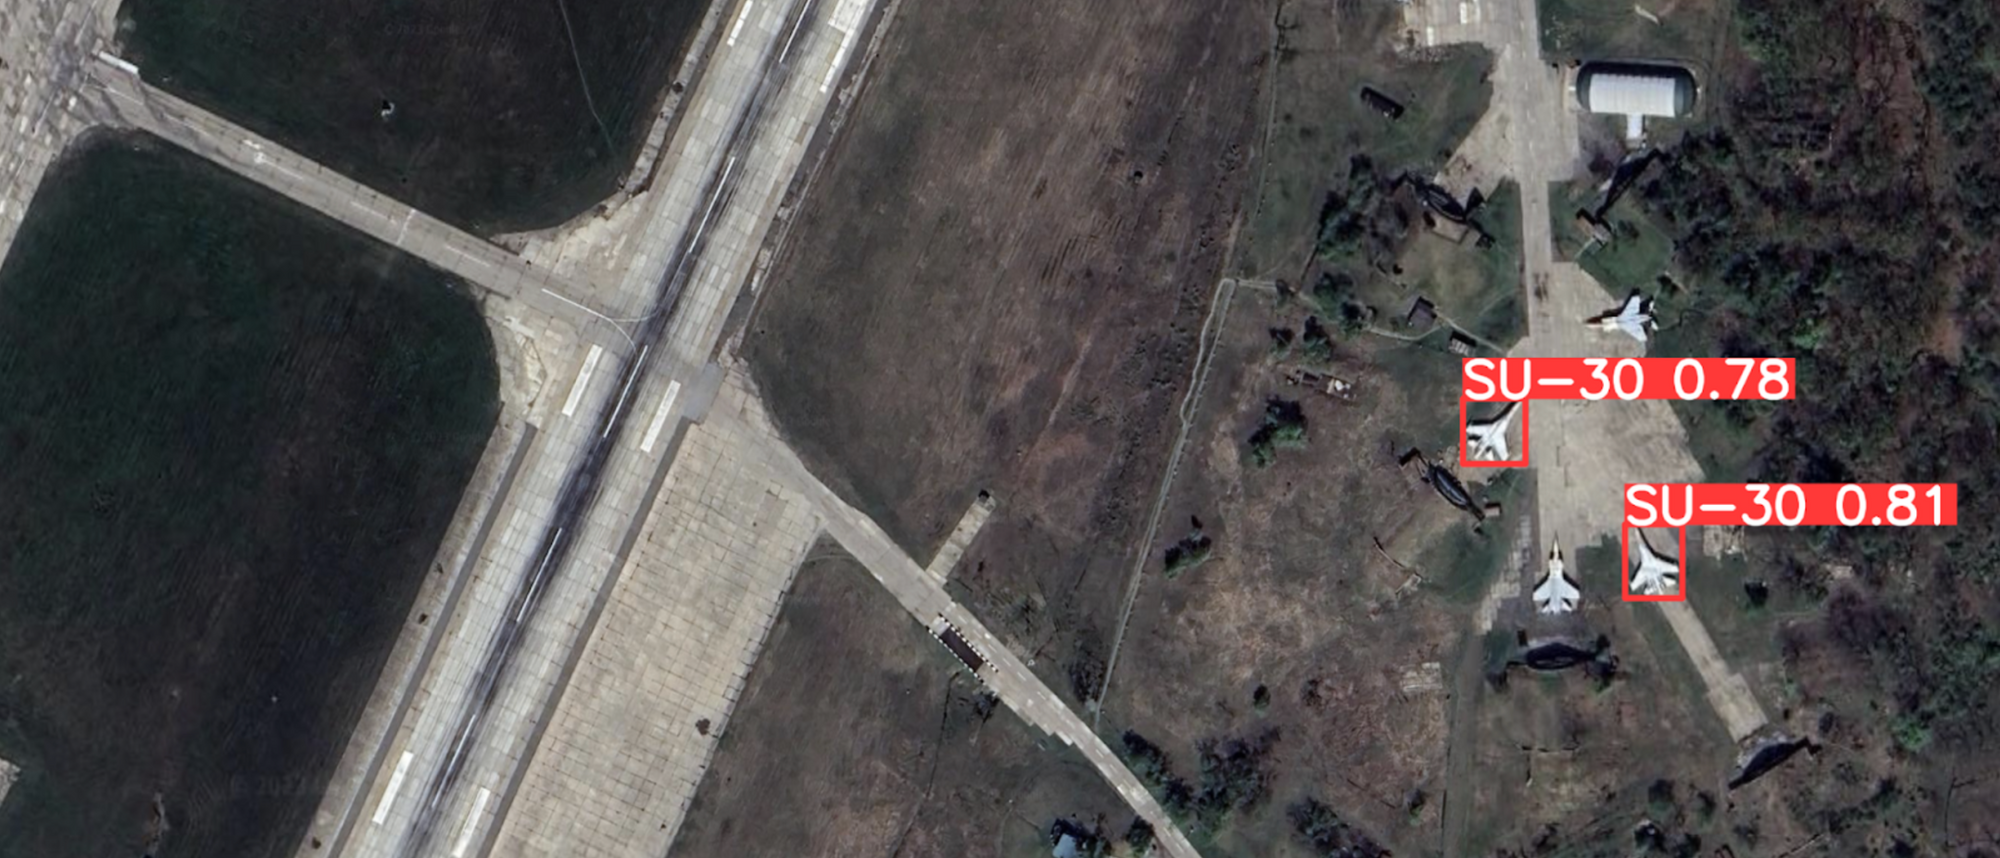
Note: For production environments and/or large machine learning models, it’s a good idea to use an established model serving framework like PyTorch Serve or Triton Server to make inference more robust and reliable. If you’re interested in that, check out the previous post on Optimizing AI Model Serving with MinIO and PyTorch Serve.
Concluding Thoughts
We did it! We walked through how MinIO and CVAT came together to keep our collected image samples safe and available, as well as how to create our custom object detection dataset. Then, we trained our own custom YOLO model for our custom task. Lastly, with just over 50 lines of code, we put together an inference server using MinIO Bucket Notifications that could run a new image past our custom trained object detection model.
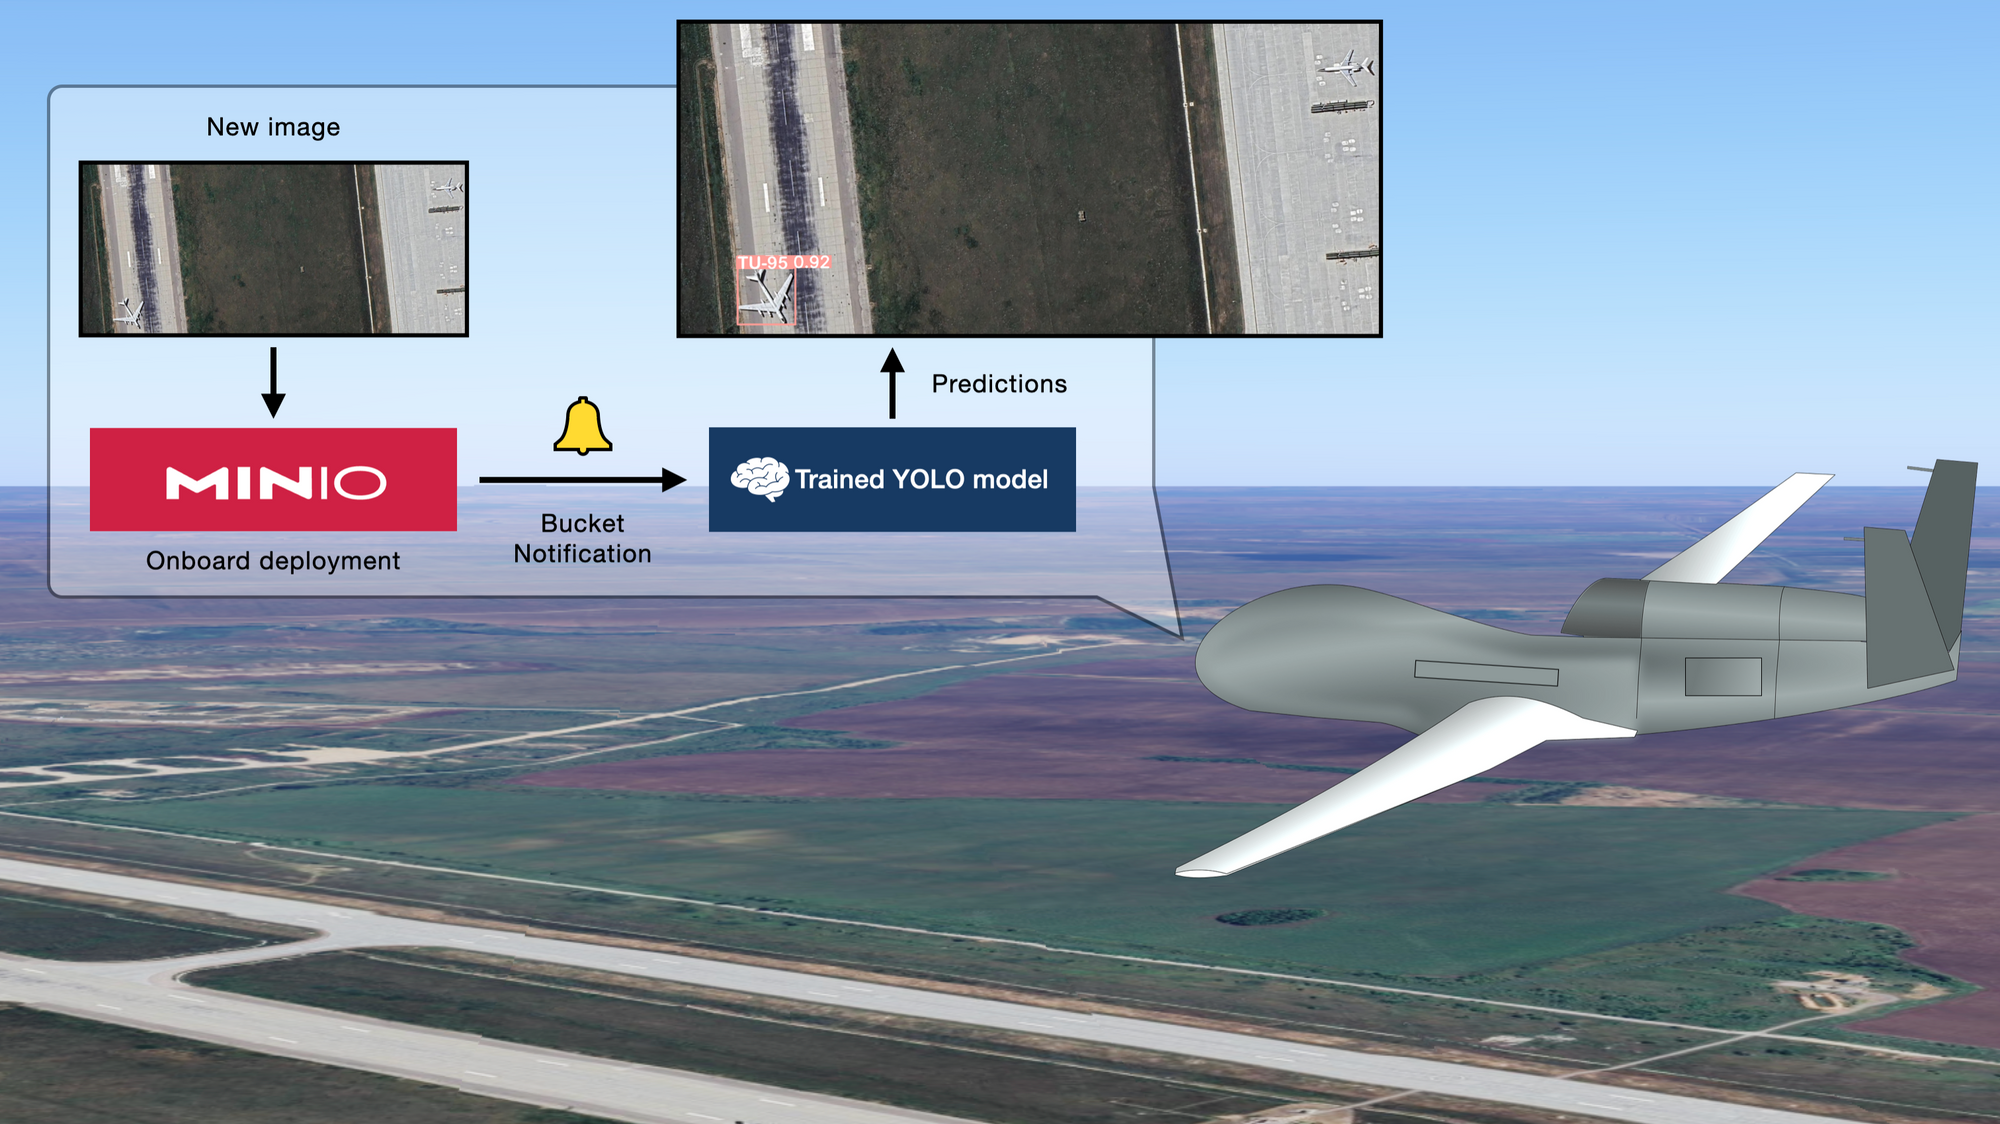
Furthermore, for most mission critical applications of computer vision, it is best to conduct inference on the edge. Otherwise, said applications are vulnerable to the latency associated with uploading new data to the public cloud and waiting for an inference server in the cloud to get back with an answer– not to mention the risks of a faulty network connection. For this reason, a computer vision pipeline centered around MinIO as the data layer makes much more sense. Imagine a drone flying over an airfield, being able to capture, store, and use our trained model on new imagery with completely-on-board hardware and software. With a local deployment of MinIO server, the Bucket Notification-based inference system we built at the end of the post works perfectly for this scenario and countless others like it.
If you have any questions join our Slack Channel or drop us a note at hello@min.io. We are here to help you.


