Network configurations to make the most of AIStor

AIStor can be deployed in a distributed manner that makes efficient use of the resources of more than one physical or virtual machine’s compute and storage resources. This can be AIStor running in a private or public cloud environment, such as with Amazon Web Services, the Google Cloud Platform, Microsoft’s Azure platform, and many others. AIStor can deploy to several types of topologies – in production we recommend Multi-Node Multi-Drive (MNMD) deployment. AIStor recommends site replication to provide BC/DR grade failover and recovery support for your single site deployment, which you can design and optimize for your use case.
In a previous blog post, we’ve already discussed some of the best practices to use when selecting hardware for your AIStor deployment. We touched on various aspects of hardware from choosing the best region, the right drive, CPU and memory configurations, and even some of the recommended network configurations. While we touched on a breadth of different best practices for system design, we can always go deeper, and today we’ll dig into some of the fine points around designing AIStor to get the best performance out of drives and networks.
In this blog post, we’ll go deep into the network configurations with which you can configure AIStor to the different replication strategies and network topologies that can be used to ensure your data is stored and accessed efficiently across multiple AIStor deployments. You do not need to do any complex configuration such as setting up Bonded/Dual NICs (which adds additional overhead).
Simple Networking Strategies
AIStor is an S3-compatible storage backend for cloud-native services. In general, we think of network traffic as either between apps and the cluster or between nodes in the cluster. Because of the internode traffic, it is paramount that networking between the nodes is as fast as possible. Each pool consists of an independent group of nodes with their own erasure sets. AIStor must query each pool to determine the correct erasure set to which it directs read and write operations, such that each additional pool adds minimal, but increased internode traffic per call. The pool which contains the correct erasure set then responds to the operation, remaining entirely transparent to the application.
Gone are the days when the enterprise could get by with 1 GbE or 10 GbE NICs. The modern enterprise workload ideally utilizes 100 GbE NICs. Given the limitations of physics and overhead for the TCP protocol, these NICs would be expected to deliver 80-90% of the available bandwidth, generally around 10GB/s for 100 Gbps NICs, up to 12GB/s on really well-provisioned networks. AIStor doesn’t need any additional networking configuration out of the box to take advantage of all the bandwidth as it listens on all interfaces. AIStor out of the box supports listening on multiple network interfaces (NICs).
You don't need any other special configuration for AIStor networking, but optionally using some of the networking basics we discussed earlier, you can route AIStor traffic through a specific interface.
In this example, we’ll use a Linux operating system to demonstrate, but networking basics are the same no matter which OS you use. The implementation might slightly vary depending on the network configuration but this should give you an idea.
We’ll first start by listing the route table
```
$ ip route
10.56.98.0/24 dev eth0 proto kernel scope link src 10.56.98.18
```
If you have configured your AIStor servers to be within the 10.56.98.16/28 CIDR range, let's say one of the AIStor node’s IP addresses is 10.56.98.21 that will get routed through the eth0 interface because /28 matches the route table entry for 10.56.98.0/24.
But if you want to route AIStor traffic through eth1 rather than eth0 we need to add a specific route for the AIStor CIDR so that any traffic which matches that subnet gets routed through that specific network interface
```
$ ip route add 10.56.98.16/28 dev eth1
```
Once the route is added, let's list the routing table again to see how it looks like
```
$ ip route
10.56.98.0/24 dev eth0 proto kernel scope link src 10.56.98.33.18
10.56.98.16/28 dev eth1 scope link
```
Now we see a route for the /28 CIDR. If you ping the AIStor node 10.56.98.21 it will now be routed via the eth1 interface. This is because when there are two routes where /24 overlaps with /28, generally the route with the longest prefix is given preference (in this case /28) and will take precedence over any other shorter prefix route when routing traffic. This is called the longest-matching prefix rule.
You can verify the traffic from 10.56.98.16/28 is being routed appropriately if you ping 10.56.98.21 and then check the tcpdump like below. You will notice that traffic from the source 10.56.98.18 is being routed via eth1 to 10.56.98.21.
```
$ tcpdump -n -i eth1 icmp
…
15:55:44.410450 IP 10.56.98.18 > 10.56.98.21: ICMP echo request, id 8416, seq 123, length 64
15:55:44.410471 IP 10.56.98.21 > 10.56.98.18: ICMP echo reply, id 8416, seq 123, length 64
15:55:45.434489 IP 10.56.98.18 > 10.56.98.21: ICMP echo request, id 8416, seq 124, length 64
15:55:45.434518 IP 10.56.98.21 > 10.56.98.18: ICMP echo reply, id 8416, seq 124, length 64
15:55:46.458490 IP 10.56.98.18 > 10.56.98.21: ICMP echo request, id 8416, seq 125, length 64
15:55:46.458520 IP 10.56.98.21 > 10.56.98.18: ICMP echo reply, id 8416, seq 125, length 64
```
As you can see with AIStor there are no additional special ports or services needed to achieve traffic separation. AIStor is designed with simplicity in mind and we are always thinking about build vs. buy in this case rather than architecting something complex like a gateway service, AIStor leverages networking basics already available at the OS layer to achieve the same result with as little overhead as possible.
We can take this idea one step further. These days servers have at least 2 interfaces with the option to add more. So rather than having application traffic go through the same interfaces as AIStor, you can have your application also running on a separate CIDR block (pick a block that is appropriate for your application size). This separation ensures that AIStor traffic for replication and rebalancing does not affect the performance of the application and vice-versa. It also gives you the ability to monitor and track traffic to ensure AIStor always has the capacity and bandwidth it needs to perform its operations without affecting its performance.
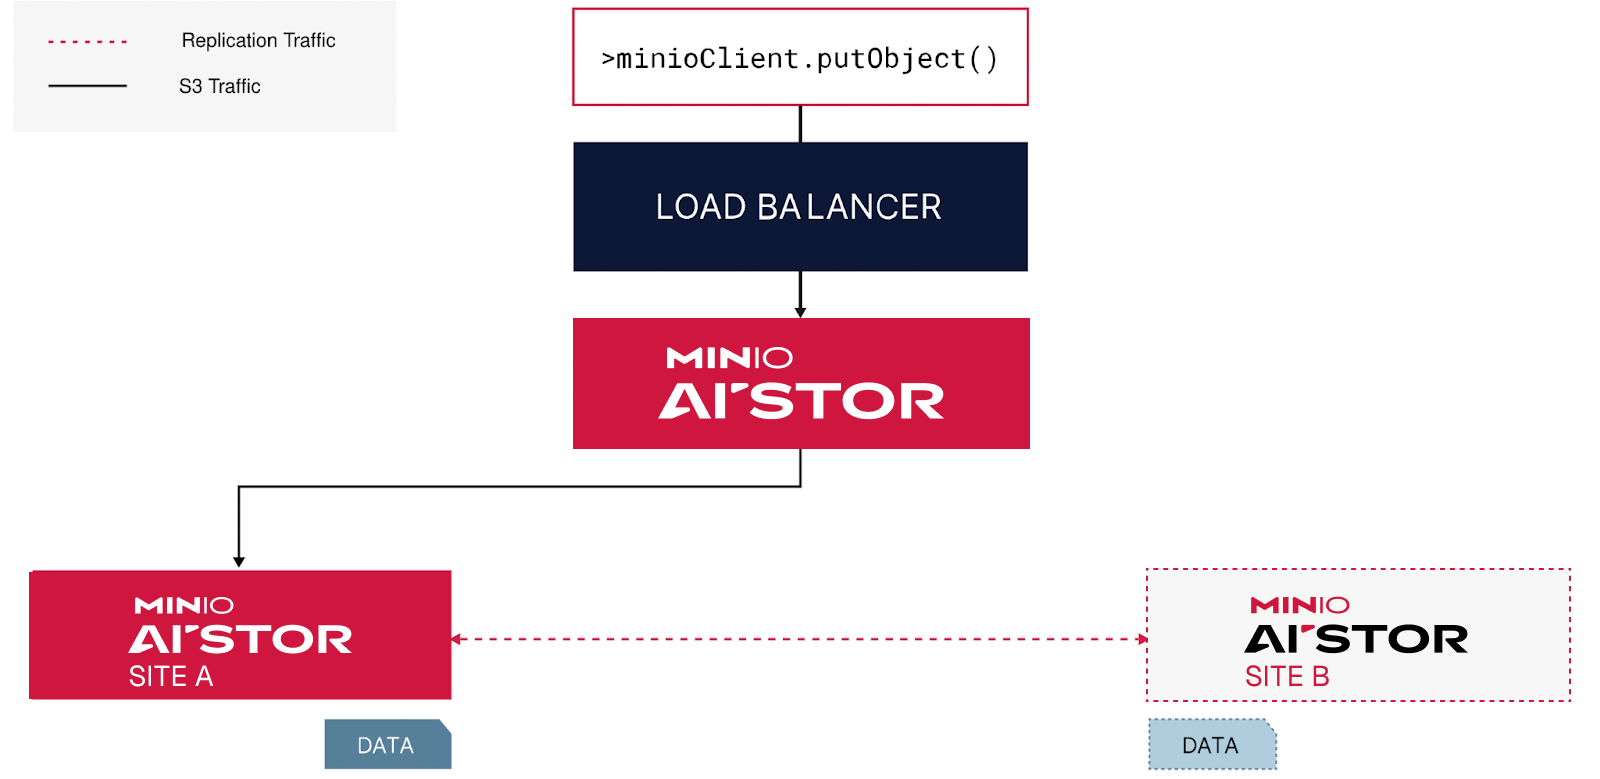
But what if you have AIStor across different sites or regions? How can you configure it effectively to ensure there are no performance bottlenecks? Well, there are several different types of replication configurations that AIStor offers for some of the most stringent use cases out there.
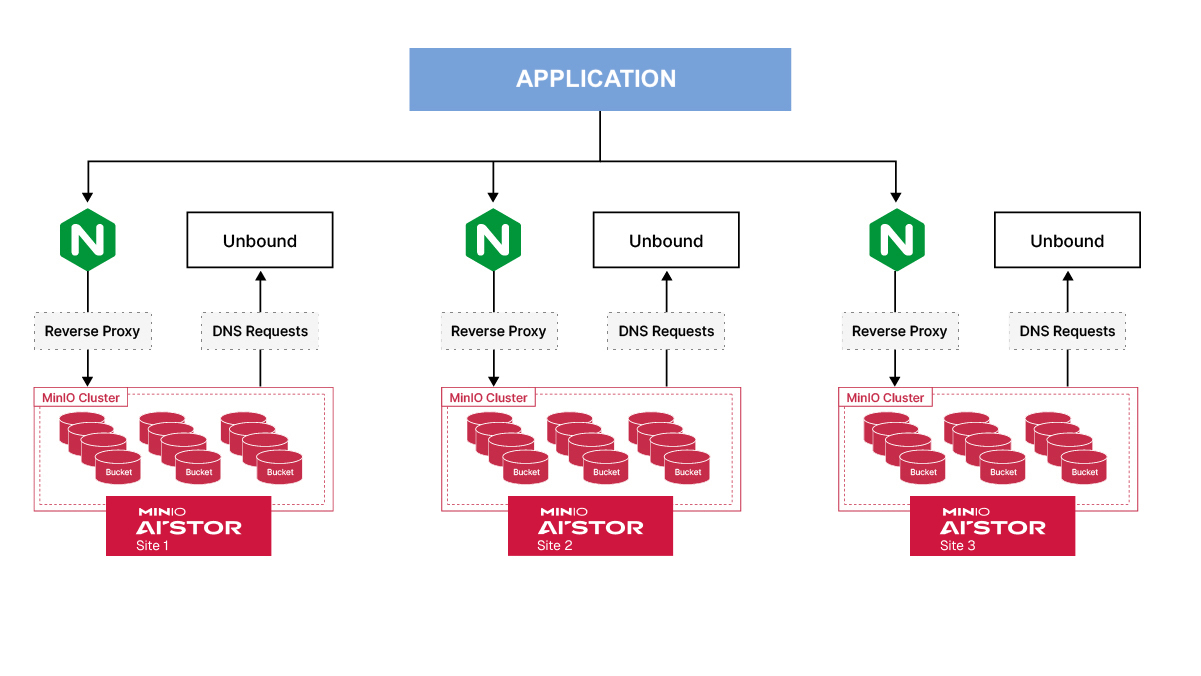
One of the most prolific of the replication strategies is the site-to-site replication. This allows you to start AIStor with a single cluster and expand to N number as the need increases. Assume you have an ETL/ELT application that runs on 3 different sites. Generally, the data is only available in one of the regions and the other regions need to pull enormous volumes of data across regions in order to run its process. Needless to say, this is not only highly inefficient but it puts tremendous pressure on the networking infrastructure and potentially causes bottlenecks for other applications that share the WAN.

In a site-to-site replication configuration, you write the data only to the AIStor cluster in the first site. The replication process will copy the data to the other sites automagically. There are no additional changes needed to be made to the ETL/ELT application. You simply point the jobs in each site to their respective AIStor cluster backed by a reverse proxy such as Nginx and the reads will be much faster than they would be over WAN across regions as shown below.

But that begs the question, is it possible to further fine-tune the traffic? Let's say you add the data file to site 1 it will immediately replicate it to other sites no matter the time of day. It could be during the peak when perhaps other ETL/ELT jobs are running and simultaneously network resources are being used to replicate data that might not be used until the next day when the next batch is supposed to run. What can be done in that case? This is where AIStor’s Batch Replication comes in handy. Batch replication allows you to pick and choose the type of data you want to replicate at a specific time, it's completely configurable. In this case, a batch replication job can be set to run during off hours when traffic is the lowest. As application access times could vary throughout the day, week and even month, this is where monitoring AIStor network traffic comes in handy so you can configure your batch job to run at exactly the right time. You can deploy peer sites in different racks, data centers, or geographic regions to support functions like BC/DR or geo-local read/write performance in a globally distributed AIStor object store.
Final Thoughts
To recap, AIStor’s network architecture is one of the most simple and straightforward out there. Rather than reinventing the wheel AIStor uses networking basics to achieve parity with some of the other data stores with complex network and gateway setup that is almost next to impossible to debug. No matter how many times you debug the same issue it will feel like it's the first time you are running into it due to the obfuscated nature of the architecture. Rather AIStor focuses on higher-level abstractions that take the burden away from the application developer from having to maintain the data replication and rather focus on storing and processing the data.
As usual, if you have any questions on the AIStor Network configuration or how to set it up be sure to reach out to us on Slack or better yet sign up for the SUBNET subscription!


