Building an ML Training Pipeline with MinIO and Kubeflow v2.0

Introduction
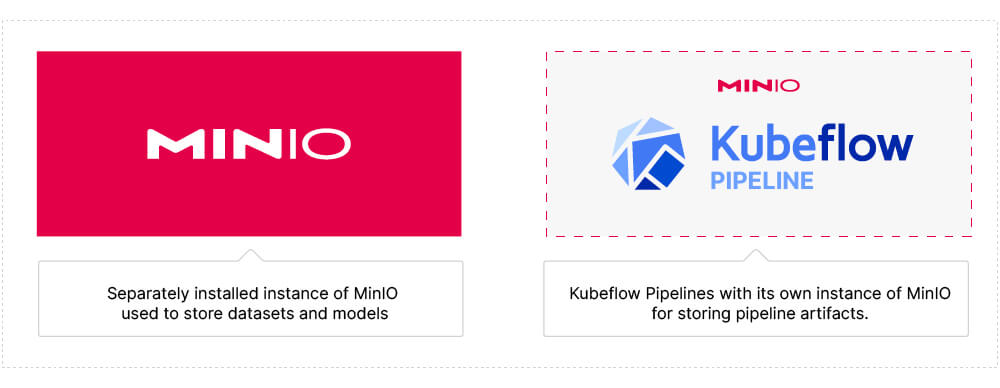
In a previous post, I covered Building an ML Data Pipeline with MinIO and Kubeflow v2.0. The data pipeline I created downloaded US Census data to a dedicated instance of MinIO. This is different from the MinIO instance Kubeflow Pipelines (KFP) uses internally. We could have tried to use KFP’s instance of MinIO - however, this is not the best design for a machine learning Model Training Pipeline. With GPUs getting faster and faster - it is possible for a GPU to finish its calculations and have to wait for new data. A GPU that is waiting is an underutilized GPU. You will want a high-speed storage solution that is totally under your control. Below is a diagram of our MinIO deployments that illustrates the purpose of each instance.

It is important to note that my data pipeline code could be easily modified to interface with any data source - another external API, an SFTP location, or a queue. If you have an external data source that is slow and unreliable, and you need a copy of the data in a high-speed resilient storage solution, then use my code as a starting point to get the data into MinIO.
In this post, I will take the next step and train a model. I’ll assume you are familiar with the Kubeflow decorators used to create components and pipelines. I’ll also assume you are familiar with passing data between components. If these constructs are new to you, check out my previous post on building a data pipeline.
If we are going to train a model, then we need something to predict. In other words, we need a dataset with features and labels.
The Dataset
Kaggle is a great place to hunt for datasets. Not only will you find a wide variety of datasets, but many have been the subject of a challenge where individuals and teams have competed for prizes. Since the results of past challenges are preserved, we can compare our results to the winners.
The dataset we will use is from the GoDaddy - Microbusiness Density Forecasting challenge. I like this dataset for a handful of reasons. First, the goal of this competition was to predict monthly microbusiness density by US county. The winning model would be used by policymakers to gain visibility into microbusinesses, resulting in new policies and programs to improve the success and impact of these smallest businesses. Second, the data is broken down by US county - so we can augment this data with US Census data (remember the pipeline I built in my previous post) to increase accuracy. This was allowed in the competition - so we are not giving ourselves an unfair advantage when we compare our results to the leaderboard. Finally, while our model will predict microbusiness density, it could easily be adapted to provide other predictions for a data set that contains information by geography.
Below is a sample of the dataset provided for this challenge. The `microbusiness_density` column is the label (what our model will try to predict), and all other columns are potential features.

Training a model is really a pipeline that moves data through a series of tasks resulting in a trained model. This is why MinIO and KFP are powerful tools for training models. MinIO for performant and reliable access to your raw data and KFP for repeatable pipelines with documented results.
Let’s build a logical design of our pipeline before writing code.
Logical Pipeline Design
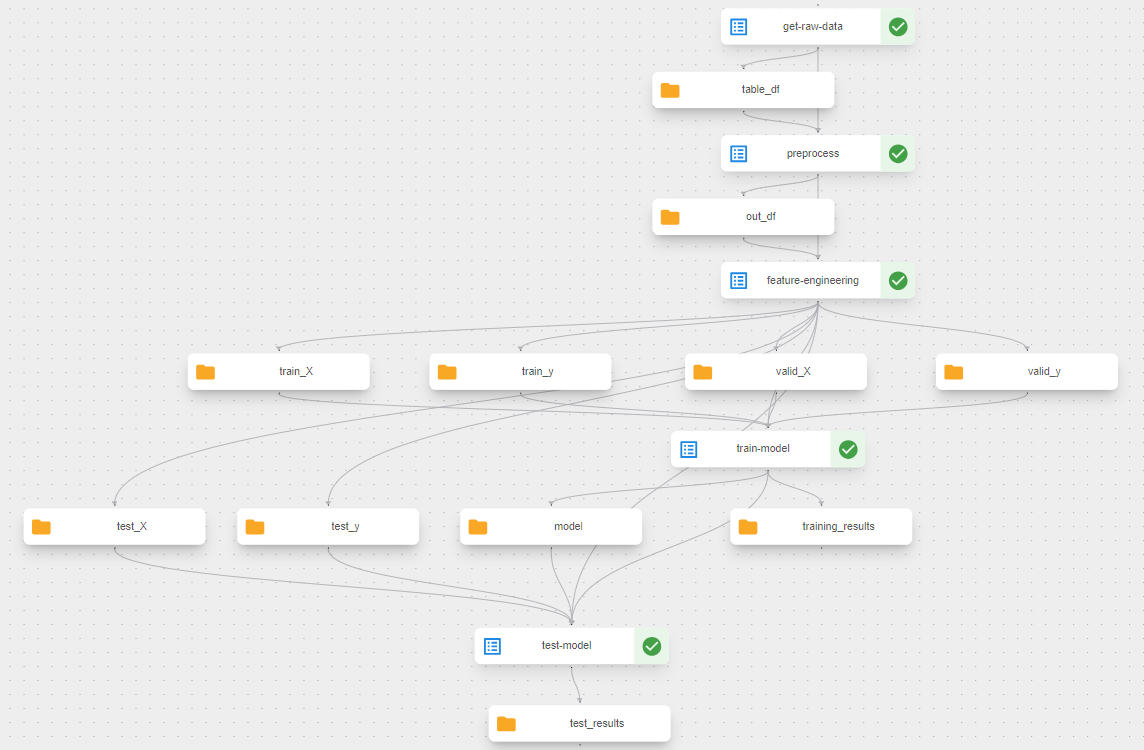
Below is the logical design of our pipeline. It is self-explanatory, and if you have ever trained a model, you have seen these tasks before.

Each block shows a high-level task in our pipeline. When building our data pipeline, we were able to use Lightweight Python Components exclusively. Lightweight Python Components are created from hermetic functions - in other words, functions that do not call out to other functions and require minimal imports. These functions get built into an image which gets deployed to a container where it will run. KFP takes care of the build, deployment, and cross-container marshaling data. This is the easiest way to get your code set up within KFP. However, if you have a lot of dependencies or if you want an entire module (or modules) packaged into a single image, then you can use Containerized Python Components. We will use Containerized Python components in this pipeline. Training a Pytorch model requires creating a DataSet class, a class for your model, as well as a handful of other helper functions for validation, testing, and moving data to a GPU if available.
Additionally, notice the artifacts that are passed between our tasks: Dataset, Model, and HTML in the graphic above. I will assume you are familiar with Datasets and setting them up within your code. (This is how we will pass DataFrames through the first part of the pipeline.) In this post, I will introduce a few of the other artifacts.
Let’s start off by creating a Containerized Python Component.
Containerized Python Components
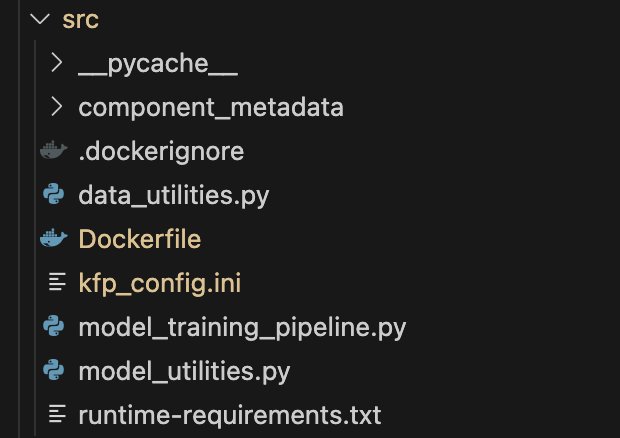
Containerized Python Components allow us to dictate what gets built into the image that KFP uses. Let’s look at a simple example demonstrating how to create a Containerized Python Component and its benefits. The first thing you need to do is create a subfolder within your project. I created a subfolder named ‘src.’ Below is a screenshot showing my `src` folder and all the modules needed to create and train our model. All modules you place in this subfolder will become a part of the image KFP uses for all pipeline components.

Next, consider the function below, which is in the `model_utilities.py` module. This function contains the epoch loop for training a model. It calls out to other functions - `get_optimizer()`, `train_epoch()`, and `validate_loss()`. It also instantiates classes in this module - specifically `CountyDataset` and `MBDModel`.
If we were to use Lightweight Python Components, then all of these function calls would occur in another container, and data would need to get marshaled across a container boundary. This is not ideal. We want model training to be a task that starts in its own container, but we want the helper functions listed above to run in this same container so that these calls are local and fast. This is what Containerized Python Components allow us to do, and we can use the function below, which encapsulates the function above.
You do not need to use any KFP decorators in helper modules. In the example being used here, my helper modules are `data_utilities.py` and `model_utilities.py`. These modules are plain old Python. There is nothing KFP specific within them. Using helper functions the way I am using them here is a nice feature. I am doing all the heavy lifting required to preprocess data and train models in my helper functions, which can be written using plain old Python. All the functions that need to be decorated with KFP decorators are in the `model_training_pipeline.py` module, and they are nothing more than shims between KFP and my helper modules. Consequently, all KFP specific code is encapsulated in a single small module.
Notice that we still use the `dsl.component` decorator. There are a few additional parameters that must get set on the component decorator when using Containerized Python Components. The `base_image` will be used in the FROM command within the docker file that KFP creates for our image. This is optional and will default to Python 3.7 if not specified. The target image parameter is a URI that tells KFP where to put your image. This URI needs to point to an image registry. I am running this demo within Docker Desktop, so the URI I used is a local registry within Docker Desktop. If you are in a public cloud or your organization has its own internal registry, then change this accordingly. Below is an example of what this URI would look like if I needed my image in GCP’s Google Cloud Artifact Registry (notice the `gcr.io` URI).
Finally, you still need to use the `packages_to_install` parameter so that KFP can install any needed third-party libraries into your image. However, you no longer need to place imports within your functions. These imports can now be at the module level. The code for the remaining components is shown below. I am not showing the helper modules for brevity because they contain a lot of code. However, you can get them here. They are plain old Python and Pytorch and can be run outside of KFP in a script or notebook if you want to experiment before sending to KFP.
Once all needed modules are in a common folder and the functions that represent pipeline components are decorated correctly, you are ready to build an image for KFP. The KFP command line utility makes this easy.
This command tells KFP the location of the folder containing all modules as well as the module which contains component definitions. Once this command completes successfully, you will notice that several files have been added to your subfolder, as shown below.

Examining these files will give you a deeper understanding of how KFP works. Basically, KFP used all the information placed in the component decorators to create these files. These files were then used to create an image and push it to your registry. If you use Docker Desktop and you used the same `target_image` parameter, then you will see the following in your list of images.

We are now ready to build a pipeline that orchestrates all the functions shown above that were designated as pipeline components.
The Pipeline
The pipeline function for pulling everything together is shown below. It is very straightforward. The output of one component is the input of the next. Notice that all the functions called map to a task in our conceptual pipeline.
To submit this pipeline to KFP, run the following code.
Running this pipeline in KFP produces the following visualization in KFP’s Run tab.

Using Artifacts for Reporting Results
Artifacts are used to pass large or complex data between components. Under the hood, KFP saves this data to its instance of MinIO to make it available to any component in your pipeline. A side benefit is that KFP can do type checking and let you know if your datatypes are incorrect when passing the output of one component to the input of another. KFP also provides artifacts for reporting results. Let’s explore these reporting artifacts further.
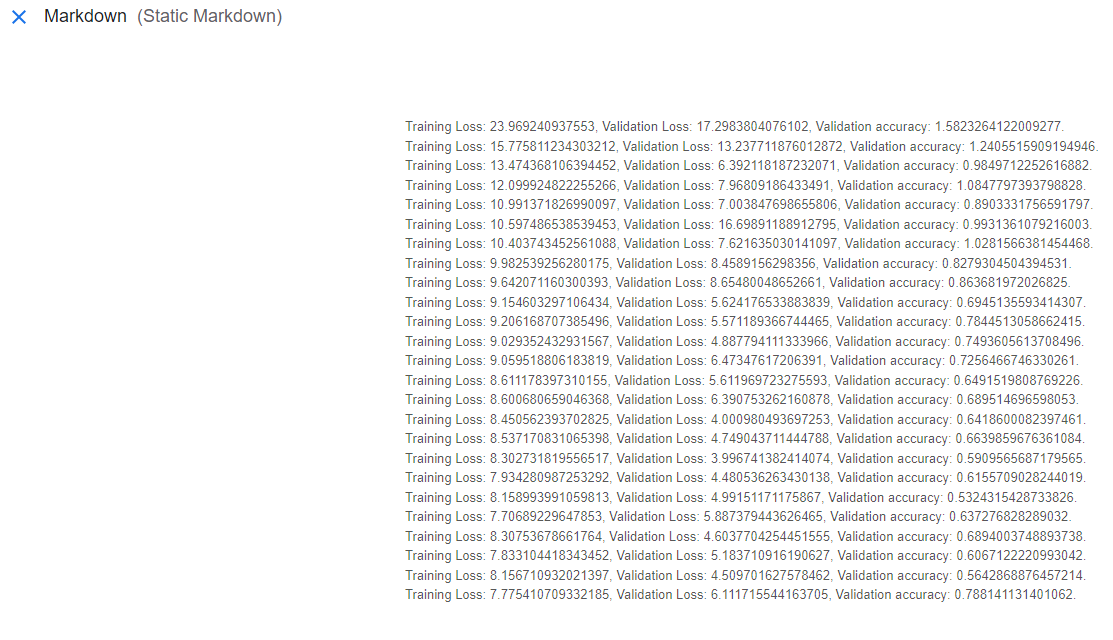
While training a model, it is a best practice to track the results of your loss function and the accuracy of your model against the validation set. The Metrics, HTML, and Markdown artifacts have a visual component to them. The contents of these artifacts will be easily observable within KFP’s UI. This post used a Markdown object to report model performance during training and testing. Refer to the last few lines of code in the `train_model` component which creates a Markdown object named 'training_results'.
Once this artifact is created, the data it contains will automatically appear in the `Visualization` tab within `training_results`. Below is a screenshot of this visualization.

It is also a best practice to do the same thing after testing your model against the test set.
A Comment on the Model
I want to call out one slick feature within the model used in this post - even if it is slightly orthogonal to the topic at hand. Below is the code - the layer of interest is highlighted. This layer is an embedding layer. It is used to learn about the relationship of counties and states to Microbusiness Density. Embeddings, as used here, are small in memory vector databases. Within the layers of a neural network these vectors are used on categorical features (or non-continuous features) to allow neural networks to learn meaningful representations of categorical or discrete data. Understanding this layer is a good first step to understanding vector databases. Vector databases enable efficient retrieval of similar items based on their vector representations, allowing for tasks like finding similar images, recommending similar products, or searching for similar documents. We at MinIO are looking at Vectors and will have more to say in the coming months.
Summary
This post picked up where my last post on data pipelines with KFP left off. In this post, I showed how to use KFP to train a model. I introduced Containerized Python Components, which are better suited for training models. When training models, you need to create classes and use helper functions that are best run in the same container where training occurs.
Next Steps
Install MinIO, KFP, and download the code sample so you can perform your own experiments. Try different model architectures, create new features via feature engineering, and see how your results compare to Kaggle’s leaderboard.
If you have questions or you want to share your results, then drop us a line at hello@min.io or join the discussion on our general Slack channel.


