Deploying Models to Kubernetes with AIStor, MLflow and KServe

In several previous posts on MLOps tooling, I showed how many popular MLOps tools track metrics associated with model training experiments. I also showed how they use MinIO to store the unstructured data that is a part of the model training pipeline. However, a good MLOps tool should do more than manage your experiments, datasets, and models. It should be able to deploy your models across your organization's various environments, moving them to development, test, and production environments.
Also, at MinIO, we have noticed an above-average interest in our MLOps content. Many of our partners have seen the same. Perhaps 2025 is the year when enterprises reign in machine learning projects and pull them into formal CI/CD pipelines managed by MLOps tooling.
In this post, I’ll focus on MLflow and show how a trained model can be hosted locally using MLserve, a simple tool Mlflow provides for testing a model’s RESTful interface. Finally, I’ll show how to deploy the model to a Kubernetes cluster using KServe. KServe is an open-source model serving framework designed for Kubernetes, specifically built to deploy and serve machine learning (ML) models at scale. It provides a standardized serverless inference platform that supports various ML frameworks, including TensorFlow, PyTorch, XGBoost, and Scikit-Learn.
MLFlow Set Up
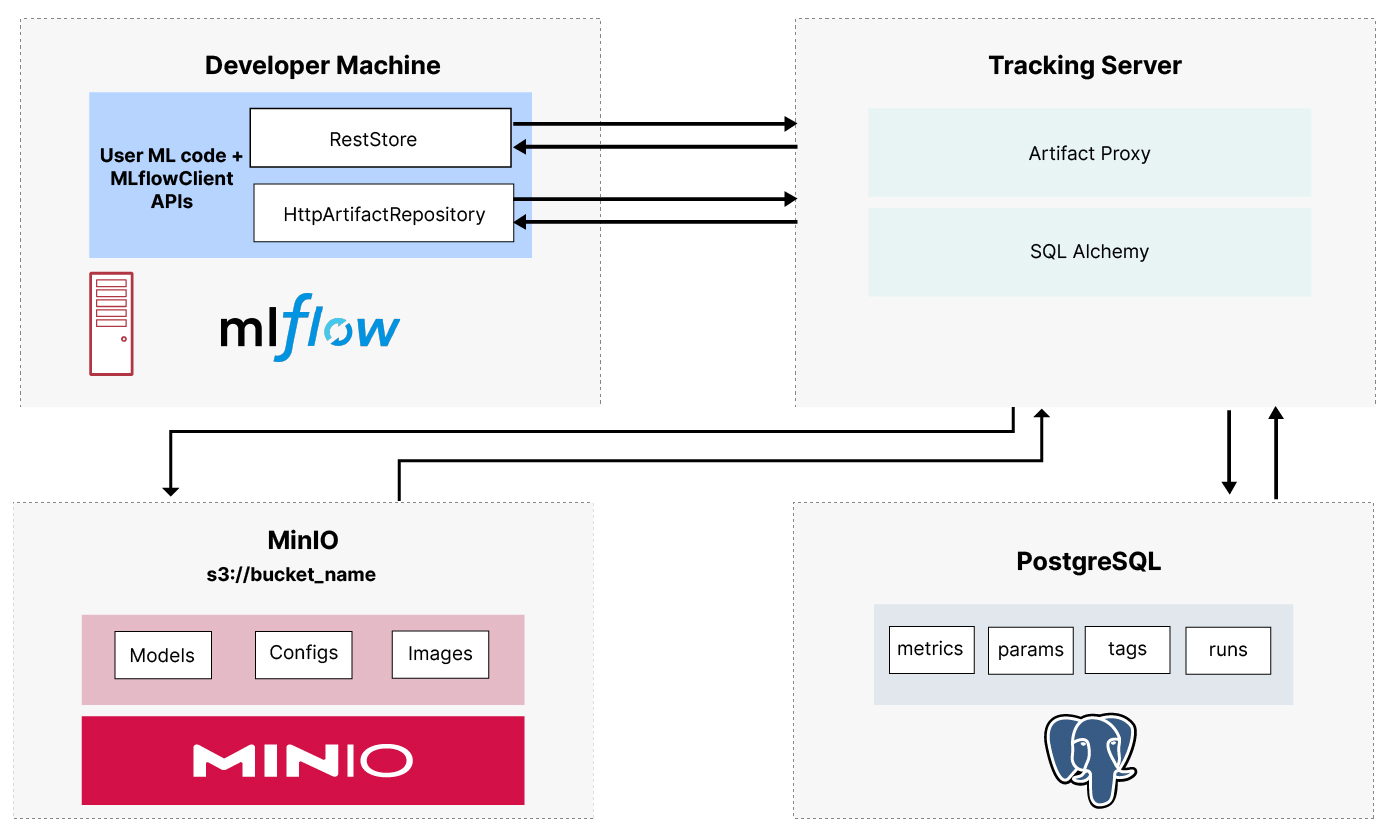
Check out Setting up a Development Machine with MLFlow and MinIO to get MLflow set up on your development machine. This post provides some background on MLflow, describes the products it uses under the hood (PostgreSQL and MinIO), and finally shows how to create and load a docker-compose file for local emulation. The diagram below shows the relationship between the MLflow tracking server, PostreSQLm and MinIO.
KServe Set Up
To set up KServe, you will need to install kind and Helm. You will also need to clone the KServe repository and run an install script within it. I’ll provide a recipe below for installing everything so you do not have to bounce around the internet for various installation instructions. If you are unfamiliar with these tools or want additional information, check out the links I provided.
1. Install kind
Kind has a different download depending on your chip architecture. So, the first thing you need to do is determine your chip architecture using the following command.
You should see something like arm64, amd64, or x86_64. For amd64 or x86_64 run the following command to download the AMD install. This will create a new subdirectory named kind that will contain everything needed to run kind.
For arm64, use the command below. This will also create a new subdirectory.
Finally, change the permissions on this directory so that files contained within it can execute code. Then move it to the usr/local/bin directory.
2. Setup a Kubernetes Cluster
We can now use kind to create a Kubernetes cluster. Run the three commands below to create a default cluster named ‘kind’, use the default ‘kind-kind’ context, and create a namespace for our deployment.
A few other helpful kind and kubectl commands for managing clusters are below.
3. Install Helm
To install Helm, run the three commands below, which will download the Helm shell install script, change its permissions so it can run, and then run it.
4. Install KServe
KServe’s online guide for Getting Started with KServe on a local Kubernetes cluster has a broken link to their quick-install script. To get around this until the link is fixed, we will clone the KServe GitHub repo and navigate directly to the install script.
This command will take a while to complete. It installs KServe and all the KServe dependencies: Istio, Knative, and Cert-manager. These dependencies are described below.
Istio is an open-source service mesh that helps manage microservices in cloud-native applications. It allows applications to communicate and share data securely.
Knative is an open-source project that extends Kubernetes to help users build, run, and manage serverless functions. Knative is an alternative to proprietary serverless solutions like AWS Lambda and Azure Functions.
Cert-manager is an open-source tool that automates the management of TLS certificates for Kubernetes and OpenShift workloads.
Logging and Registering Models
The rest of this post will use a simple model created with the sklearn code shown below. This training function creates an sklearn model that takes 13 features of a bottle of wine and predicts whether it is a red wine or a white wine.
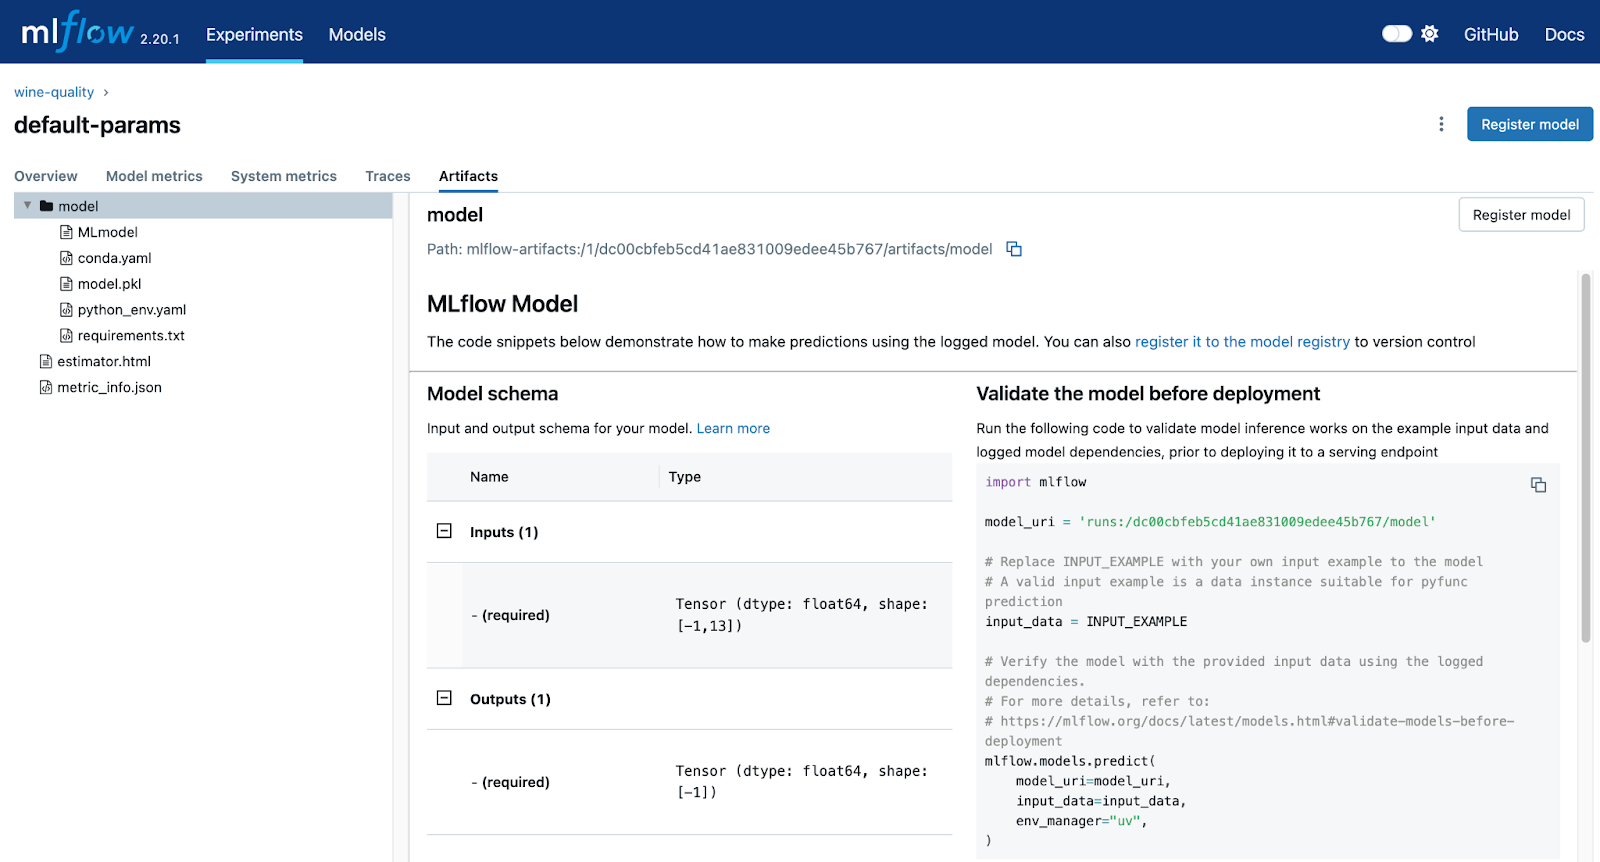
This code logs and registers the model in MLflow’s (highlighted code) model registry. When the registered_model_name parameter is specified, the log_model function will log and register the model. This is where we will pull the model when we deploy it to KServe. The screenshot below shows our logged model in the MLflow UI. The path shows the location of this model in MinIO, and the model_uri shows the URI that needs to be used when we deploy the model.
If you want more information on logging and registering models, check out MLflow Model Registry and MinIO.
Testing Model Deployments with MLServe
MLflow comes with a handy command line tool that allows you to run a local inference server with just a single command. Remember to use the enable-mlserver flag, which instructs MLflow to use MLServer as the inference server. This ensures the model runs in the same manner as it would in Kubernetes. The command below will deploy a logged model to MLServer. The model uri (highlighted) must match the model uri shown in the screenshot above.
If you wish to deploy a registered model, use the below command. Here, the model reference is of the form “models/{model name}/{version}. The model name was assigned when the model was registered.
The snippet below will send a sample input to the service and return a prediction. Models prefer batches of input; consequently, the input below is a list of lists (or matrix). If you specify a simple list (or vector), the service will throw an error.
The output should look like the text below, which represents a probability that the input features represent a bottle of red wine.
Building a Docker Image
In this tutorial, I will create a docker image that contains the model we trained above. This image will eventually get deployed to Kubernetes and run via KServe. MLflow has a nice command line utility that will take a reference to our logged (or registered) model and create a docker image with it. This command is shown below.
Pay attention to the model parameter (-m), which specifies the model in MLflow that you wish to place into an image. This string must match the model name we saw in the MLflow UI after logging the trained model. The image name parameter (-n) is how you specify the name of your image. Make sure that the first part of this name is your docker username, as we need to push this to Docker’s image registry. We will do this next. The command below will push the image we just created to Docker Hub.
Once the image is created and pushed to Docker Hub, you can sign into Docker Hub to view the image.
Deploying an Inference Service to Kubernetes
To deploy our image to Kubernetes using KServe we need to create a kubectl file. This is shown below.
This kubectl file will create a KServe inference service. Pay attention to the namespace and image fields highlighted above. The namespace needs to be the namespace previously created. The image needs to be the image that was pushed to Docker Hub. Assuming that the file above is named sklearn-wine.yaml we can run the command below to deploy the image.
The service will take a while to deploy. Once it is deployed, you can run the command below to see the details of the new inference service.
An abbreviated version of the output of this command is shown below.
Below are a few useful Kubernetes commands to help troubleshoot problems with this service and delete the service if you need to start over. Looking at pod logs is especially useful if your service is not starting and the previous command is not reporting a ready status.
Determine Ingress Host and Service Host
Before sending a request to our new Inference Service, we must determine the ingress and service hosts. Recall that when we installed KServe, it came with istio, which will act as a proxy for our inference service. Consequently, we need to determine the address the istio is listening on. We also need to determine the address of our inference service so that we can include this address in the header or our request so that istio can direct the request appropriately. First, let's figure out the address for istio.
If the EXTERNAL-IP value is set, you are running in an environment with an external load balancer that you can use for the ingress gateway. Use the commands below to get the ingress host address and ingress port.
To run on a local cluster like kind, which we are doing in this post, use port forwarding by running the commands below.
Finally, we need the service hostname that points to the pod in our cluster that contains our model.
Testing the Inference Service
We are now ready to test the inference service running in KServe. The snippet below is similar to the snippet we used earlier. However, the payload is slightly different. This is KServe’s V2 protocol. Be careful with the URL used for the address of this request. The MLflow documentation states that this URL must contain the model's name. This will not work when you build your own image as we did here. For some reason, the model name gets hardcoded to “mlflow-model”. (This took me a long time to figure out.) KServe will find your inference service using the host header.
Summary
If you have gotten this far, you have used MLflow end to end. In this post, we created a model, tracked its metrics after training it, logged the model, and deployed it to a local Kubernetes cluster using KServe, which we installed from scratch. If you follow the online documentation from MLflow and KServe, there are a few gotchas, so use this guide as your starting point. If you want more details on setting up Mlflow, metric tracking, model logging, and using MLflow for distributed model training, then check out these posts:
Setting up a Development Machine with MLFlow and MinIO
MLflow Model Registry and MinIO
Distributed Training and Experiment Tracking with Ray Train, MLflow, and MinIO
If you run into any problems or have any questions, be sure to reach out to me on Slack.


