Feature Extraction with Large Language Models, Hugging Face and MinIO

Introduction
In this post, I am going to present a technique that every engineer should know for utilizing open source large models. Specifically, I will show how to perform feature extraction.
Feature extraction is one of two ways to use the knowledge a model already has for a task that is different from what the model was originally trained to accomplish. The other technique is known as fine-tuning - collectively, feature extraction and fine-tuning are known as transfer learning.
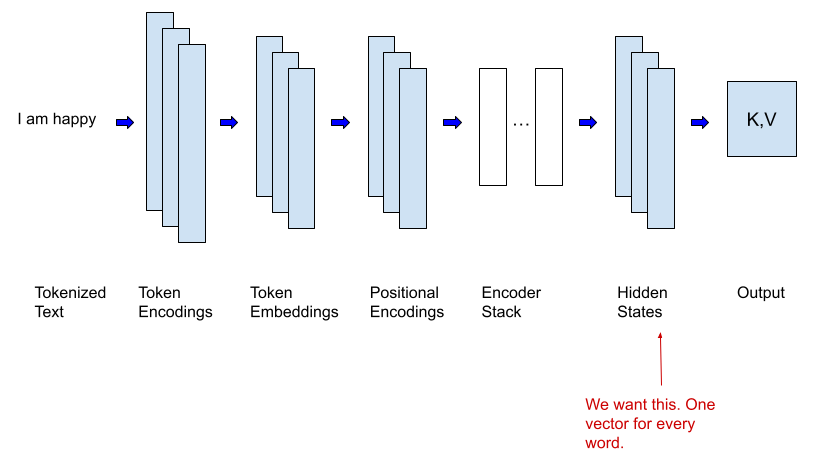
Feature extraction is a technique that has been around for a while and predates models that use the transformer architecture - like the large language models that have been making headlines recently. As a concrete example, let’s say that you have built a complex deep neural network that predicts whether an image contains animals - and the model is performing very well. This same model could be used to detect animals that are eating tomatoes in your garden without retraining the entire model. The basic idea is that you create a training set that identifies thieving animals (skunks and rats) and respectful animals. You then send these images into the model in the same fashion as if you wanted to use it for its original task - animal detection. However, instead of taking the output of the model, you take the output of the last hidden layer for each image and use this hidden layer along with your new labels as input to a new model that will identify thieving versus respectful animals. Once you have such a model performing well, all you need to do is connect it to a surveillance system to alert you when your garden is in danger. This technique is especially valuable with models built using the transformer architecture as they are large and expensive to train. This process for transformers is visualized in the diagram below.

The code sample in this post will do something very similar. I will download a pre-trained Large Language Model (LLM) from the Hugging Face Hub that was trained for generative AI (to be a chatbot or to summarize) and use it for detecting emotions. You can think of it as having a lot of general knowledge about the English language. I’ll send a training set that contains text samples through this model, then I will use the last hidden layer of the model along with the original label that contains the primary emotion of the text (sadness, joy, love, anger, fear, surprise) to train another model.
Let’s take a quick tour of the tools we will need to implement transfer learning using feature extraction.
The Tools we will Use
To accomplish our mission, we will need the following tools:
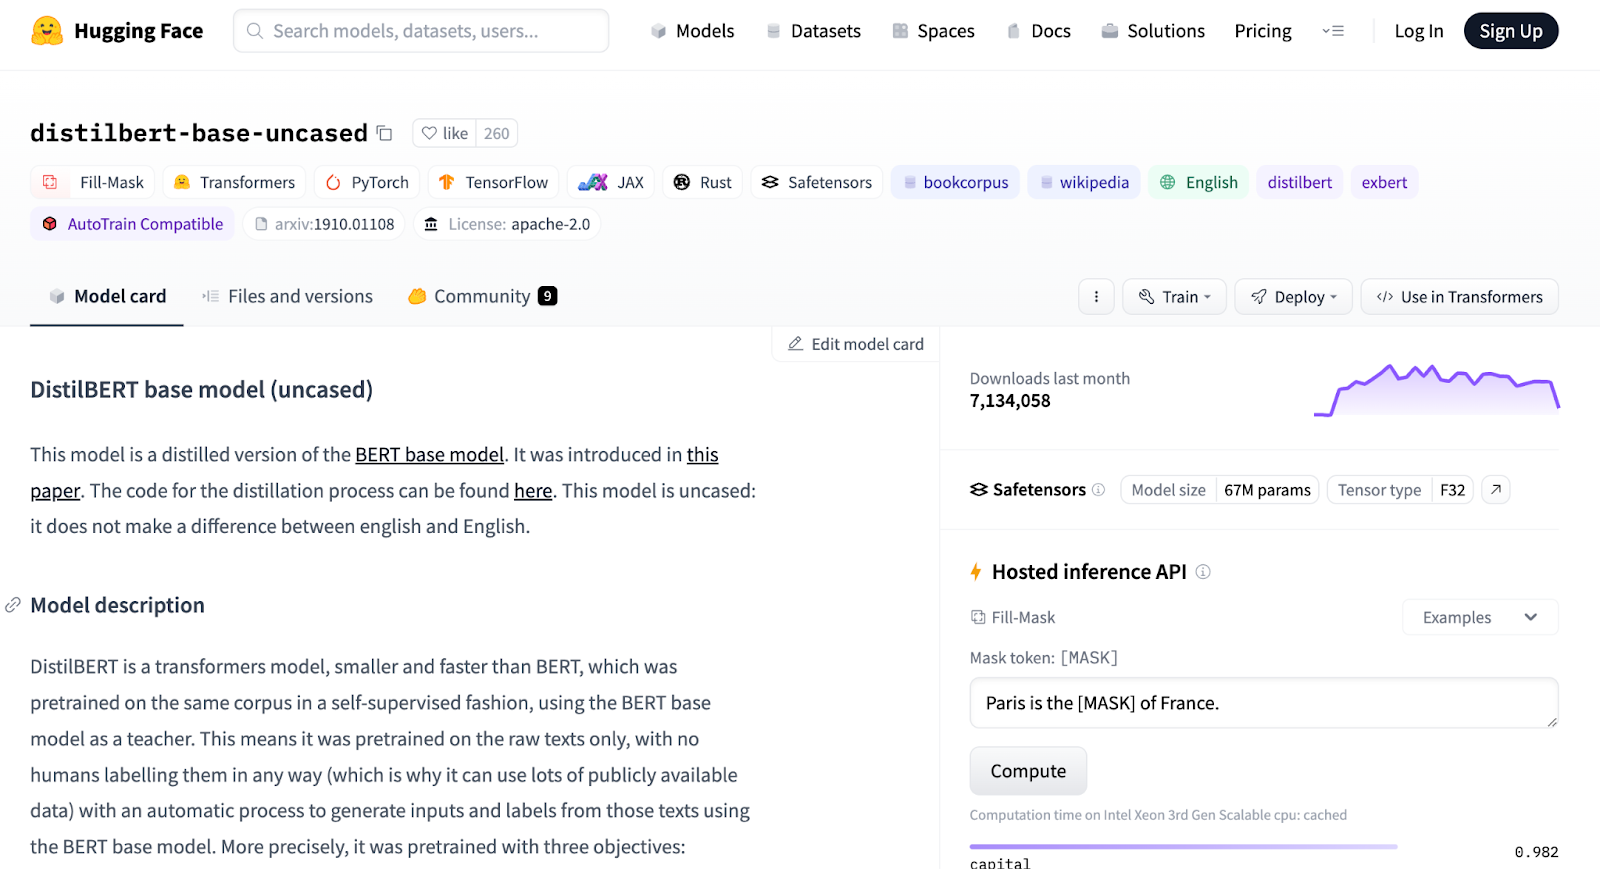
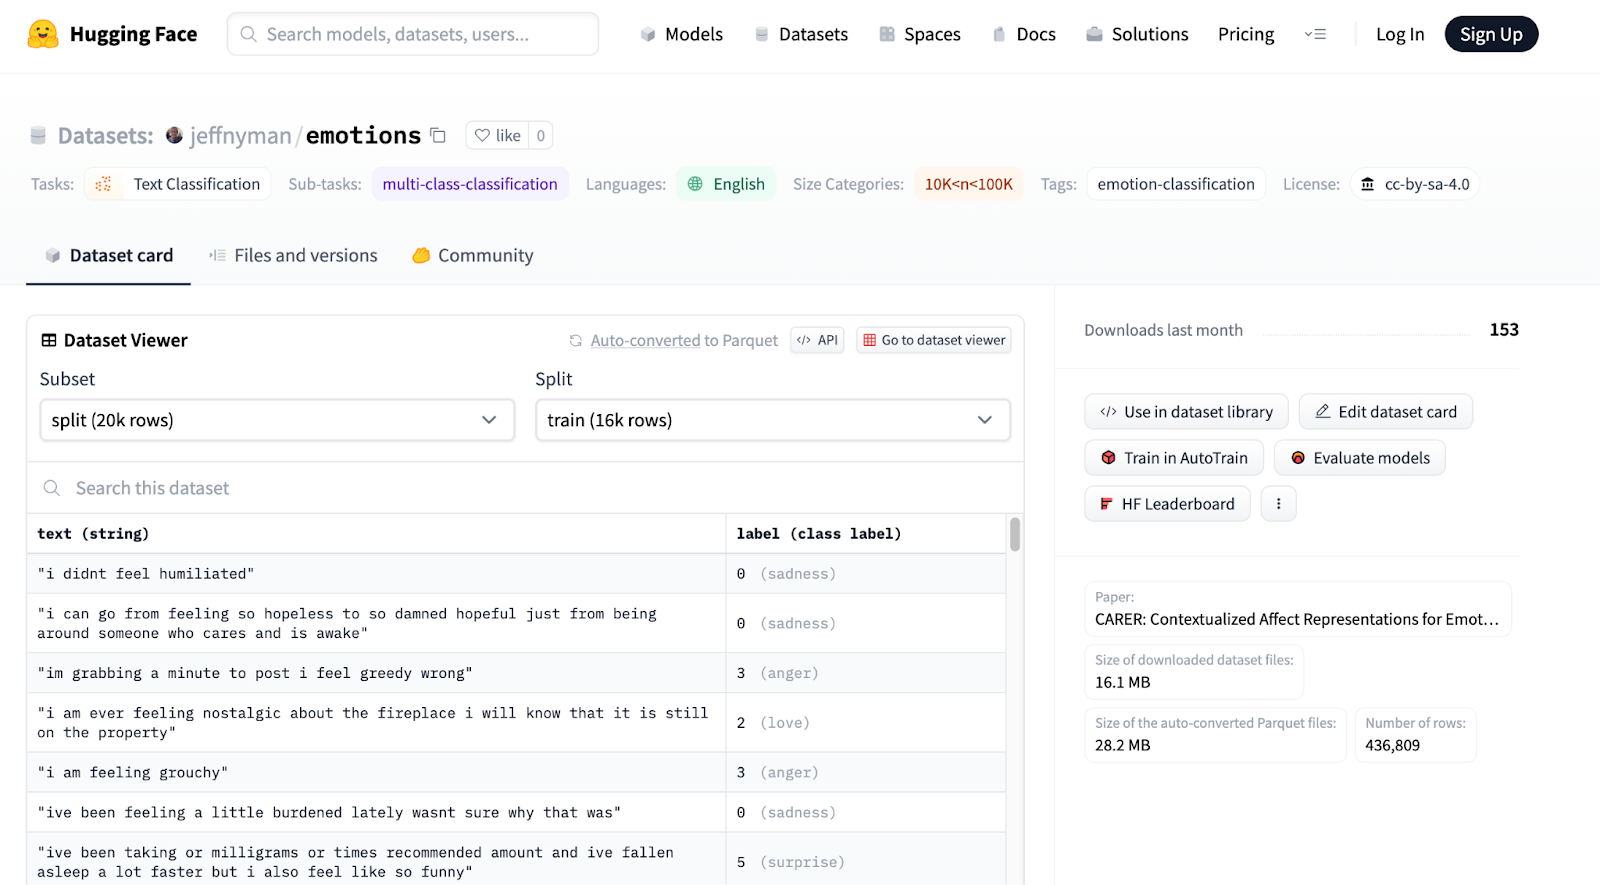
The Hugging Face Hub - Hugging Face is the Github of machine learning. You can find open sourced models in the Hub. The Hugging Face hub also contains thousands of datasets that you can use for experimentation. We will use the distilbert-base-uncased Large Language Model. For our data, we will use the emotions dataset, which is a collection of Twitter (X) tweets that have been classified according to the emotions they emit. Below are screenshots from the Hub showing details about the distilbert-base-uncased model and the emotions dataset.


Hugging Face Transformer and Dataset Libraries - The Hugging Face transformer and dataset libraries provide programmatic access to the Hugging Face Hub for models and datasets, respectively. The Transformer library is a high level API for working with models that come from the Hugging Face Hub. Everything you do with this API, you could do with plain old Python and the framework of your choice (PyTorch, TensorFlow, etc.). However, you will write a lot less code using the Hugging Face libraries. Additionally, these libraries have a lot of useful functions for common tasks. For example, the transformer library has a property to retrieve the last hidden state of a model after inference has occurred. This library also provides tokenizers and keeps track of which tokenizer was used for a given model.
To install these two libraries, run the commands below.
MinIO for Object Storage - to make our code sample realistic, our data will come from a MinIO bucket. The Hugging Face Dataset library can download data directly from the Hugging Face Hub however, using this library to access the Hugging Face Hub is not realistic when you are dealing with enterprise data. A better solution is to get data stored in MinIO buckets and objects into the Dataset library’s internal structures. I’ll provide some reusable utilities for doing this in this post.
I’ll assume you have MinIO up and running in a Docker container. If you would like to see how to do this, then check out the MinIO portion of this post. You will also need an access token to use the MinIO SDK. This same post shows how to obtain an access token.
To install the MinIO Python SDK, run the command below.
Now that we have a conceptual understanding of the goal and the tools we will be using - let’s get our data set up.
Hugging Face Datasets and MinIO
The easiest way to get data into the objects provided by the Hugging Face Dataset library is to download data directly from the Hub using the `load_dataset()` function and the name of the dataset. The following code will download the emotions dataset. (The complete notebook for this post can be found here.)
The output of this cell shows the type of the underlying object used to hold data that is loaded using this function.
While this is the easiest way to get data into a dataset, it requires you to upload your data to the Hugging Face Hub. This may not always be feasible - especially if your data contains proprietary or sensitive information. So, to emulate an enterprise scenario, I will pull this dataset apart and create a jsonl file for the training set, validation set, and test set. Once I have these files, I will upload them to MinIO. Finally, I will recreate the dataset by connecting to MinIO, downloading the files, and reloading them using the `load_dataset()` function.
First, let’s create some helper functions for getting data into and out of MinIO. These functions are below - they are straightforward. The `get_object()` function will retrieve an object from MinIO and save it as a file. The `put_file()` function will upload a file to a specified bucket within MinIO. If the bucket does not exist, it will be created.
To create the files and upload them to MinIO, run the snippet below. You will get one file for each set. Other file types that are supported are CSV, Arrow and Parquet.
Once this code completes, your MinIO bucket should have three files in it. A screenshot from the MinIO console is shown below.

Finally, we can reload our data from MinIO using the code below.
We now have an emotions DatasetDict object loaded with a training set, validation set, and test set. We can look at the columns using the `column_names` property.
The output is:
Note: the data loaded into the Dataset library’s object can be preprocessed just like the data you load into a Pandas DataFrame. Therefore, the techniques shown in this section can be used to save processed data to MinIO once you have it in the format you need for training.
We are now ready to load our model and tokenizer from the Hub.
Load the Model and Tokenizer
Before loading our model and tokenizer, let’s write some code that detects a GPU if one exists. The code below will create a device object that points to your GPU if you have one otherwise, it points to your CPU.
Running this code on a Mac produces the following output.
On a machine that has a GPU, you will get the output below. (Make sure you are using the version of torch that has support for cuda.)
We can now create our model and tokenizer. The Hugging Face Transformers library makes this easy. Notice that the model gets moved to our device.
Tokenize the Data
At this point, we have data, a model, and a tokenizer. The next step is to tokenize our text. Let’s encapsulate the tokenizer so that it can be called from a map function.
Tokenizing now requires one line of code.
The Hugging Face map() function is similar to Python’s map function - it executes a specified function for each item in an iterable. In our case, the emotions dataset is essentially a dictionary with the following keys: “train”, “validation”, and “test”. So, the tokenize function gets called three times: tokenize(emotions[“train”]), tokenize(emotions[“validation”]), and tokenize(emotions[“test”]).
Once the tokenize function is called, it will add two new columns to our data.
And the output:
Feature Extraction
Digging into a model during inference to retrieve the last hidden state may sound hard. Actually, it would be a little tricky if we were directly using an ML framework like Pytorch. Fortunately, Hugging Face makes this as simple as reading a property off of the model itself. We will set up our code similar to how we set up the tokenizing code. Let’s start by creating a function that will be called from a map function.
Notice that the data gets moved to our device. If you have a GPU, you now have the data and the model on the GPU. This is not a function that performs training. Rather, this function uses the model for inference, after which the last hidden state is read, moved to the CPU and then returned.
We can now use the DatasetDict’s map function. Notice that we are only using the fields created by the tokenizer and the original label.
Looking again at our columns, we see the additional field.
Transfer Learning
We will now perform transfer learning with the feature (last hidden state) that we extracted in the previous section. For our purposes, we will use LogisticRegression from scikit-learn to train a new and much simpler model with the extracted features. The first step is to get our data into Numpy arrays.
We can see that our hidden state contains a lot of information. There is one vector of length 768 for each tweet.
The next step is to create a logistic regression model and train it. After that, we can score the mode using our validation set.
The score returned is .6335, meaning that the model predicts correctly 63% of the time. However, scoring a classification model like ours does not tell the complete story. Let’s analyze the results further.
Analyzing the Results
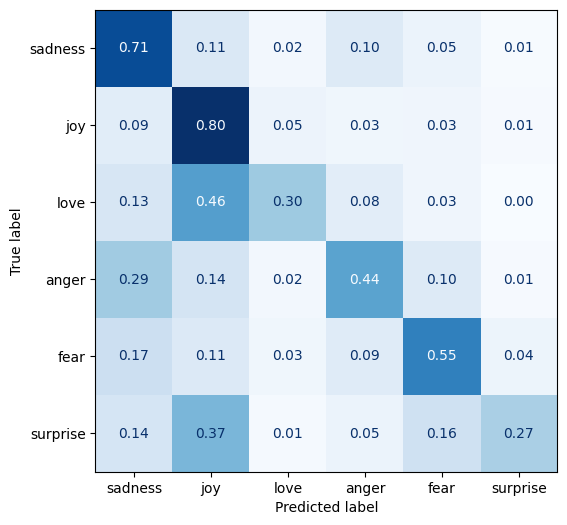
The best way to analyze the result of a categorization task is to use a confusion matrix. The code below will create a confusion matrix. The confusion matrix from our results is also displayed below.

As we can see from our confusion matrix, the results are better than the score would lead us to believe. Surprise is often predicted as joy. Love is also predicted as joy. Finally, anger is often confused with sadness. These mistakes are actually near misses. We can also see that anger and love are rarely confused with each other.
Summary
In this post, we accomplished two important results when it comes to working with models and data that comes from the Hugging Face Hub.
First, we created reusable code that can be used to get data from MinIO into the Hugging Face DatasetDict object. This is important because enterprise data cannot be uploaded and downloaded from the Hugging Face Hub like open source datasets. Organizations will want to secure and manage important data in MinIO and have a way to load it into Hugging Face tools so that it can be easily processed and passed to a model.
Our second accomplishment was downloading a large language model, running our data through it, and performing feature extraction. Using feature extraction, you can take advantage of the knowledge already trained into an existing model. No additional training is necessary. This represents a serious cost saving for organizations that want to use transformer-based models, which are expensive to train, on their own data for their own tasks.
Additionally, it should be noted that feature extraction is not the only way to take advantage of pre-trained models. Another transfer learning technique is fine-tuning. Fine-tuning a model involves performing additional training on a model using a small amount of custom data. Finally, Retrieval Augmented Generation (RAG) is useful for NLP tasks such as document creation, question answering, and summarization. RAG makes use of text in a custom corpus to help a large language model locate a more specific result.
If you have any questions, please drop us a line at hello@min.io or join the discussion on our general Slack channel.


