MLflow Model Registry and MinIO

MLflow Model Registry allows you to manage models that are destined for a production environment. This post picks up where my last post on MLflow Tracking left off. In my Tracking post I showed how to log parameters, metrics, artifacts, and models. If you have not read it, then give it a read when you get a chance. In this post I’ll show how to register and version a logged model. As an added bonus I’ll also show how to load a registered model from MLflow Model Registry into memory.
MLflow Model Registry is one of the many features that MLflow provides for managing all aspects of model creation to model hosting. A brief description of the high-level capabilities of MLflow is below.
- MLflow AI Gateway - The AI Gateway is a tool designed to streamline the usage and management of large language model (LLM) providers within an organization. For example, OpenAI and Anthropic. It offers a high-level interface that simplifies the interaction with these LLMs by providing a unified endpoint to handle LLM requests.
- MLflow Projects - An MLflow Project is a format for packaging data science code such that the code is reusable and the results are reproducible. In addition, Projects includes an API and command-line tools for running projects, making it possible to for projects to participate in pipelines or workflows.
- MLflow Models - An MLflow Model is a standard format for packaging machine learning models so they can be used in various downstream tools.
- MLflow Model Registry - Model Registry allows for storing, annotating, discovering, and managing of models in a central repository.
- MLflow Recipes - MLflow Recipes (previously known as MLflow Pipelines) is a basic framework that enables data scientists to develop and deploy models to production quickly. For complex deployments, use MLflow Serving.
- MLflow Serving - Serving models can be complex. MLflow simplifies model serving by offering an easy toolset for deploying your ML models to various targets, including local environments, cloud services, and Kubernetes clusters.
- MLflow Tracing - Tracing is a feature that enhances LLM observability in generative AI applications by capturing information during the execution of model hosting services. Tracing records the inputs, outputs, and data associated with the intermediate steps of a request, allowing bugs and unexpected behavior to be corrected.
- MLflow Tracking - MLflow Tracking provides an API for logging parameters, code versions, metrics, and output files when training models. It also provides a UI for visualizing results.
- MLflow Evaluation - Evaluation allows for the automated testing of a model’s accuracy, reliability, and efficiency so it can be validated before being promoted beyond the development phase. Evaluation provides tools for testing traditional models as well as LLMs.
I’ll assume you already have MLflow installed on your development machine as a remote server using PostgreSQL and MinIO. If you do not have MLflow installed, check out my post on Setting up a Development Machine with MLflow and MinIO, where I showed how to use Docker Compose to run the services shown below.

MinIO is used in this deployment to store models and datasets. It is important to have a quality object store for these artifacts if you are experimenting with models and eventually moving them into production. This is especially true if you are training large language models.
What is a Registered Model?
A registered model is a candidate for your production environment. You should register the best-performing models within an experiment. Once a model is registered, you can add metadata, such as tags and descriptions. Models can also be versioned within the Registry; each version has its own description and tags. In older versions of the MLflow, you could specify the stage of the model to track its status. Allowable stages were None, Stage, Production, and Archive. In this post, I’ll show how to register a model using the most recent version of MLflow, which at the time of this writing is 2.20.3. All code shown in this post can be found here.
To register a model, you must have previously logged it using the log_model() function I demonstrated in my tracking post. Recall from this post that I used a simple flavor of the log_model() function to save the model to MLflow. This line of code is shown below.
To take advantage of all the features of Model Registry, we need to upgrade this command by adding a signature. A signature is the schema of the model. It tells MLflow the allowable datatypes for inference. You can see from the modified logging code below that MLflow provides an infer_signature() function, which, as the name implies, infers the signature of your model based on a few samples you send from either your training set or test set.
Once a model is logged and has a schema, we can register it. There are two ways to register a model. One way is to use the MLflow APIs. The other way is to use the MLflow UI to locate and register a previously logged model. I’ll show both these techniques. Let’s start with the APIs for registering.
Registering a Model using APIs
The best way to register a previously logged model using APIs is shown below. There are two other techniques which I will briefly describe in a moment - but the technique below is best because it allows you to create the top-level collection entity and the new version of a model using two separate API calls. This gives you the flexibility to give each a different description and different tags. Think of the top-level collection entity as an object that maintains a list of all versions of a model with the same name.
The create_registered_model() function creates the collection entity. Note - it can only be called if the collection does not already exist - otherwise, it throws an error. In the code above, I used the search_registered_models() function to make sure this function never gets called if the model exists. The create_model_version() function creates a new version of the model. Notice in the code above that the collection and the version have different descriptions and tags.
Once you have registered several versions of a model, you will be able to view them in the UI. Let’s look at the Model Registry in the MLflow UI. Start the UI by navigating to http://localhost:5000/. The default view will show you all your experiments. We want to look at registered models, so find the Models tab at the top of the page and click it. You will see a list of all models that have been registered. An example is shown below.
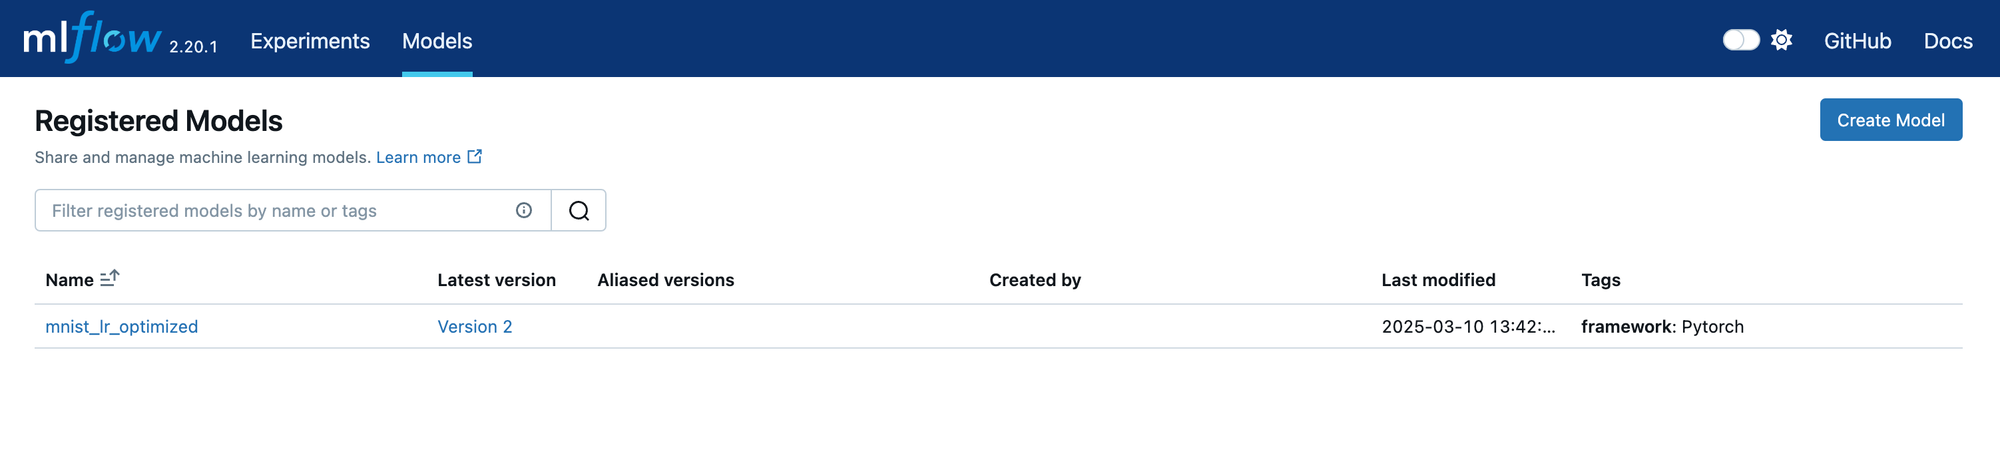
This view shows all the registered models. For each model, the latest version is shown. Clicking on the model name will show the page below.
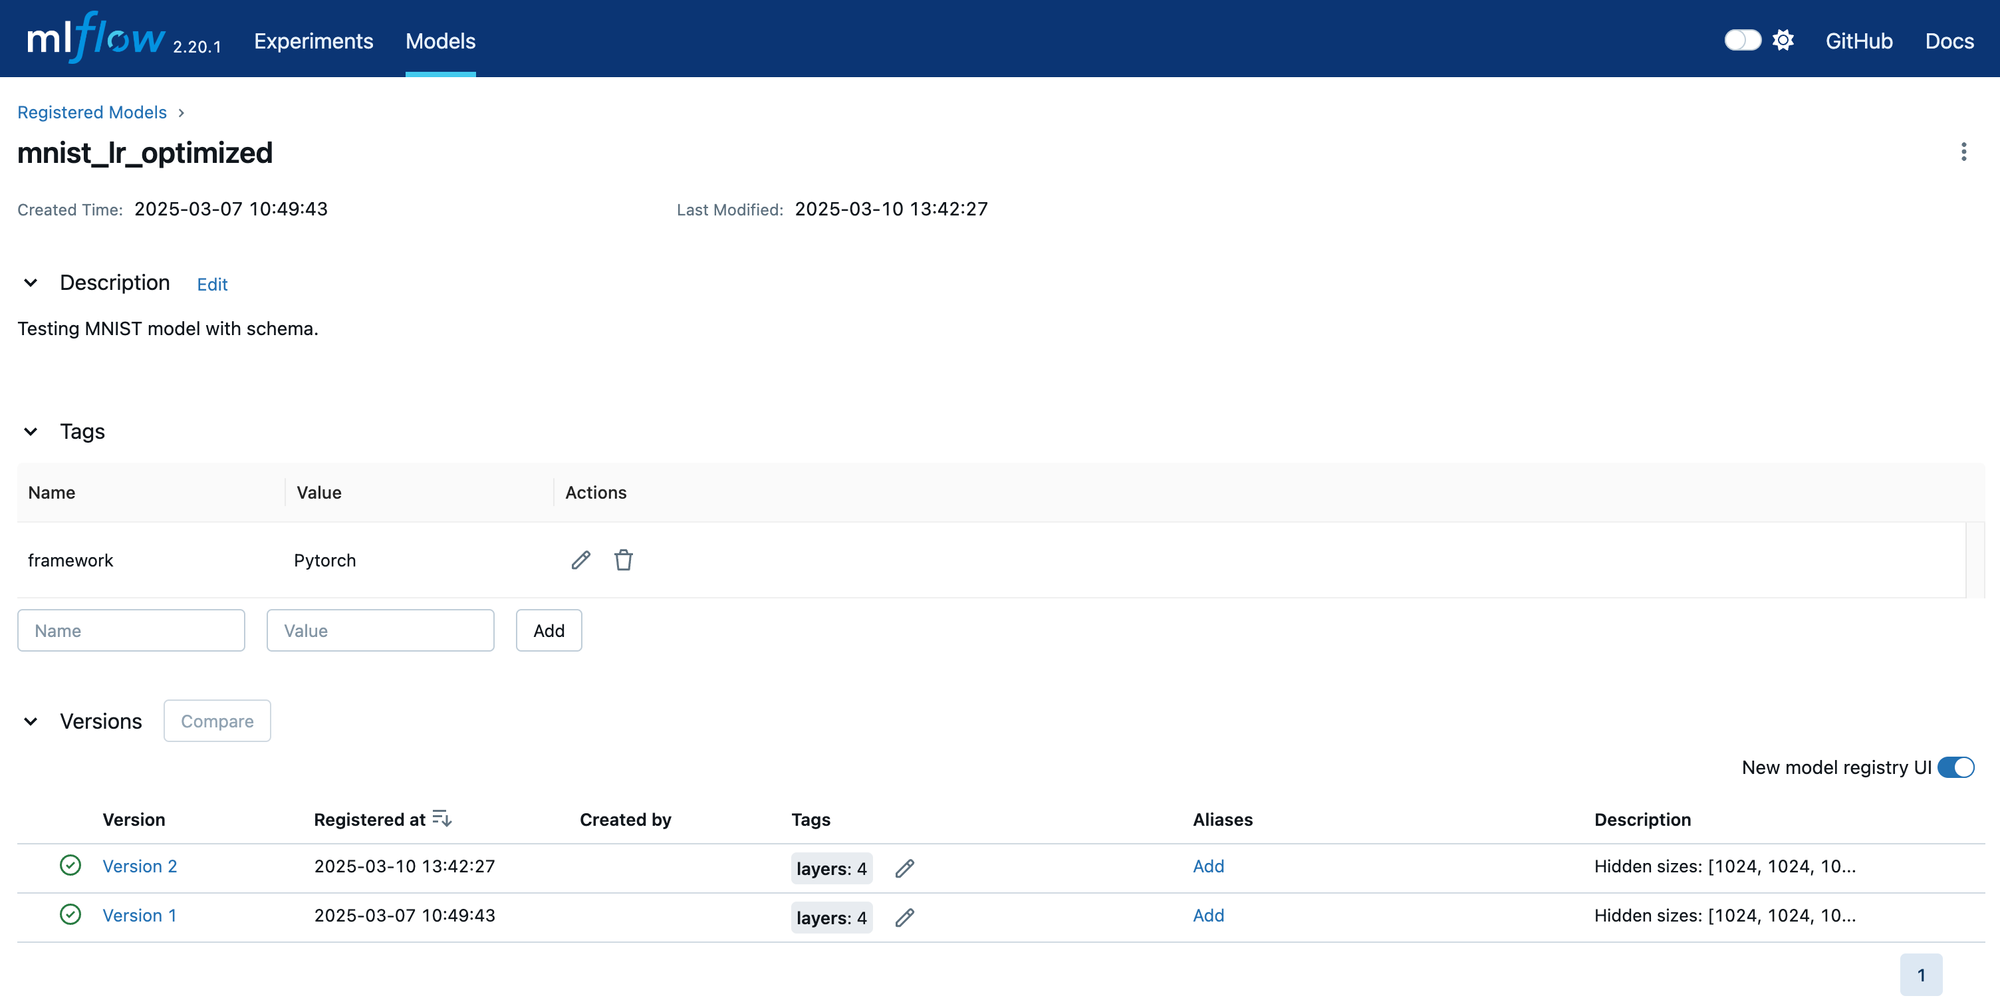
Here, we see all the versions of this model. The description and tags shown here apply to the top-level entry. Consequently, they should be true of all versions.
As a final note, the MLflow documentation also describes two other sets of APIs that can be used to register models. First, the logging APIs that were developed specifically for each framework have registering capabilities. (These would be the functions found under mlflow.sklearn for Sklearn and mlflow.pytorch for Pytorch.) They do not give you the same level of control as I showed above, and support varies from framework to framework. Second, there is also an mlflow.register_model() function. This function does not give you control over how the collection entity is created and does not have a description parameter.
Registering a Model using the MLflow UI
It turns out that you do not need the APIs to register a model. A previously logged model can be registered using the MLflow UI. This may be the preferred method for registering a model if you want a human to determine which logged model should be promoted to the Registry. Let’s take another tour of the UI to see how this is done.
Start by navigating to the Experiements tab of the UI and select the experiment that contains the model you want to register.
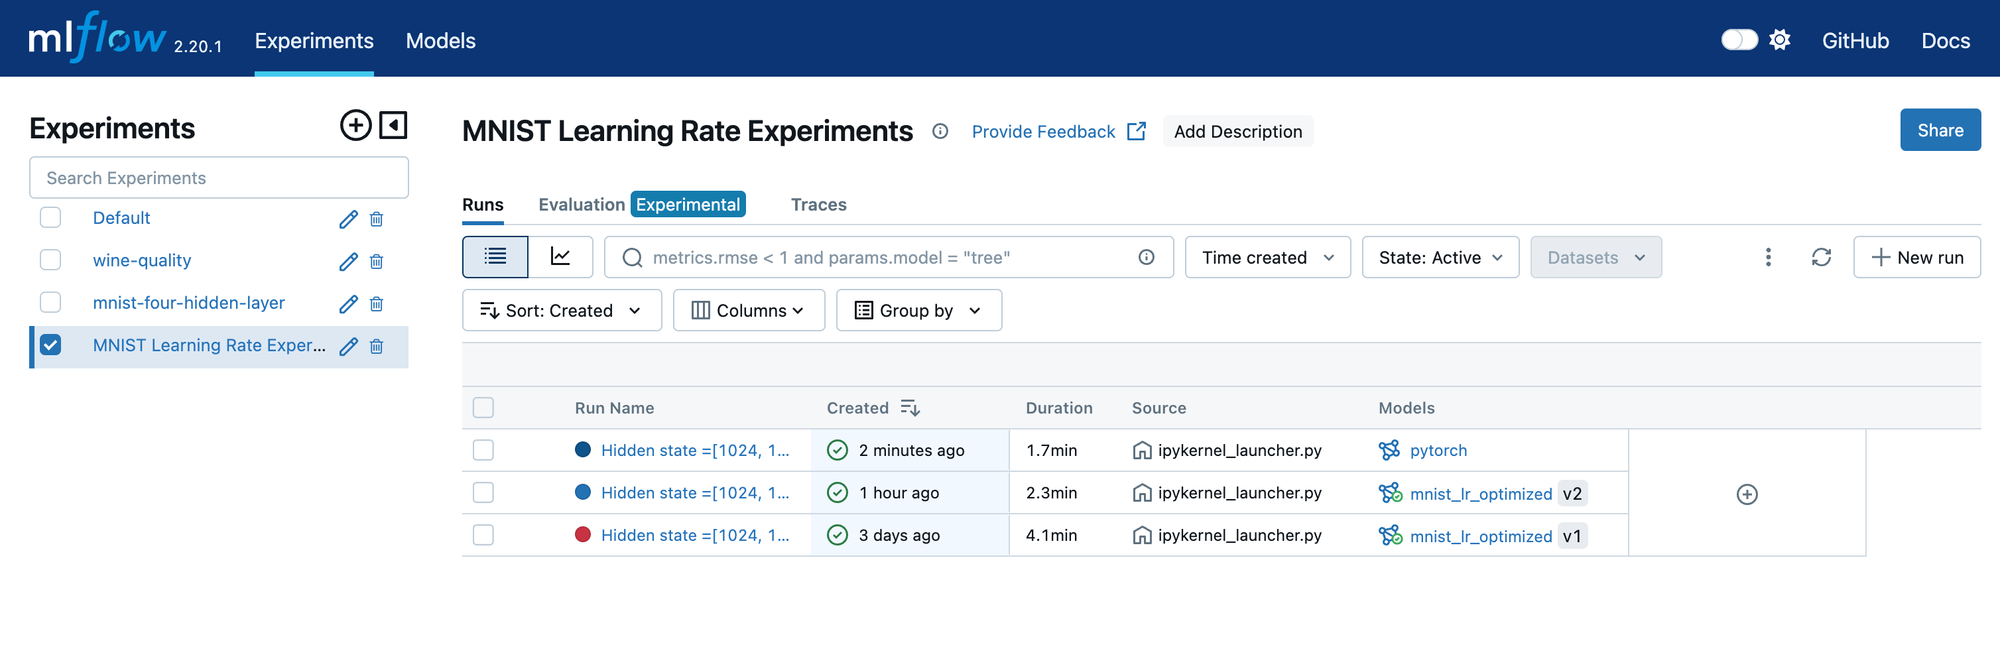
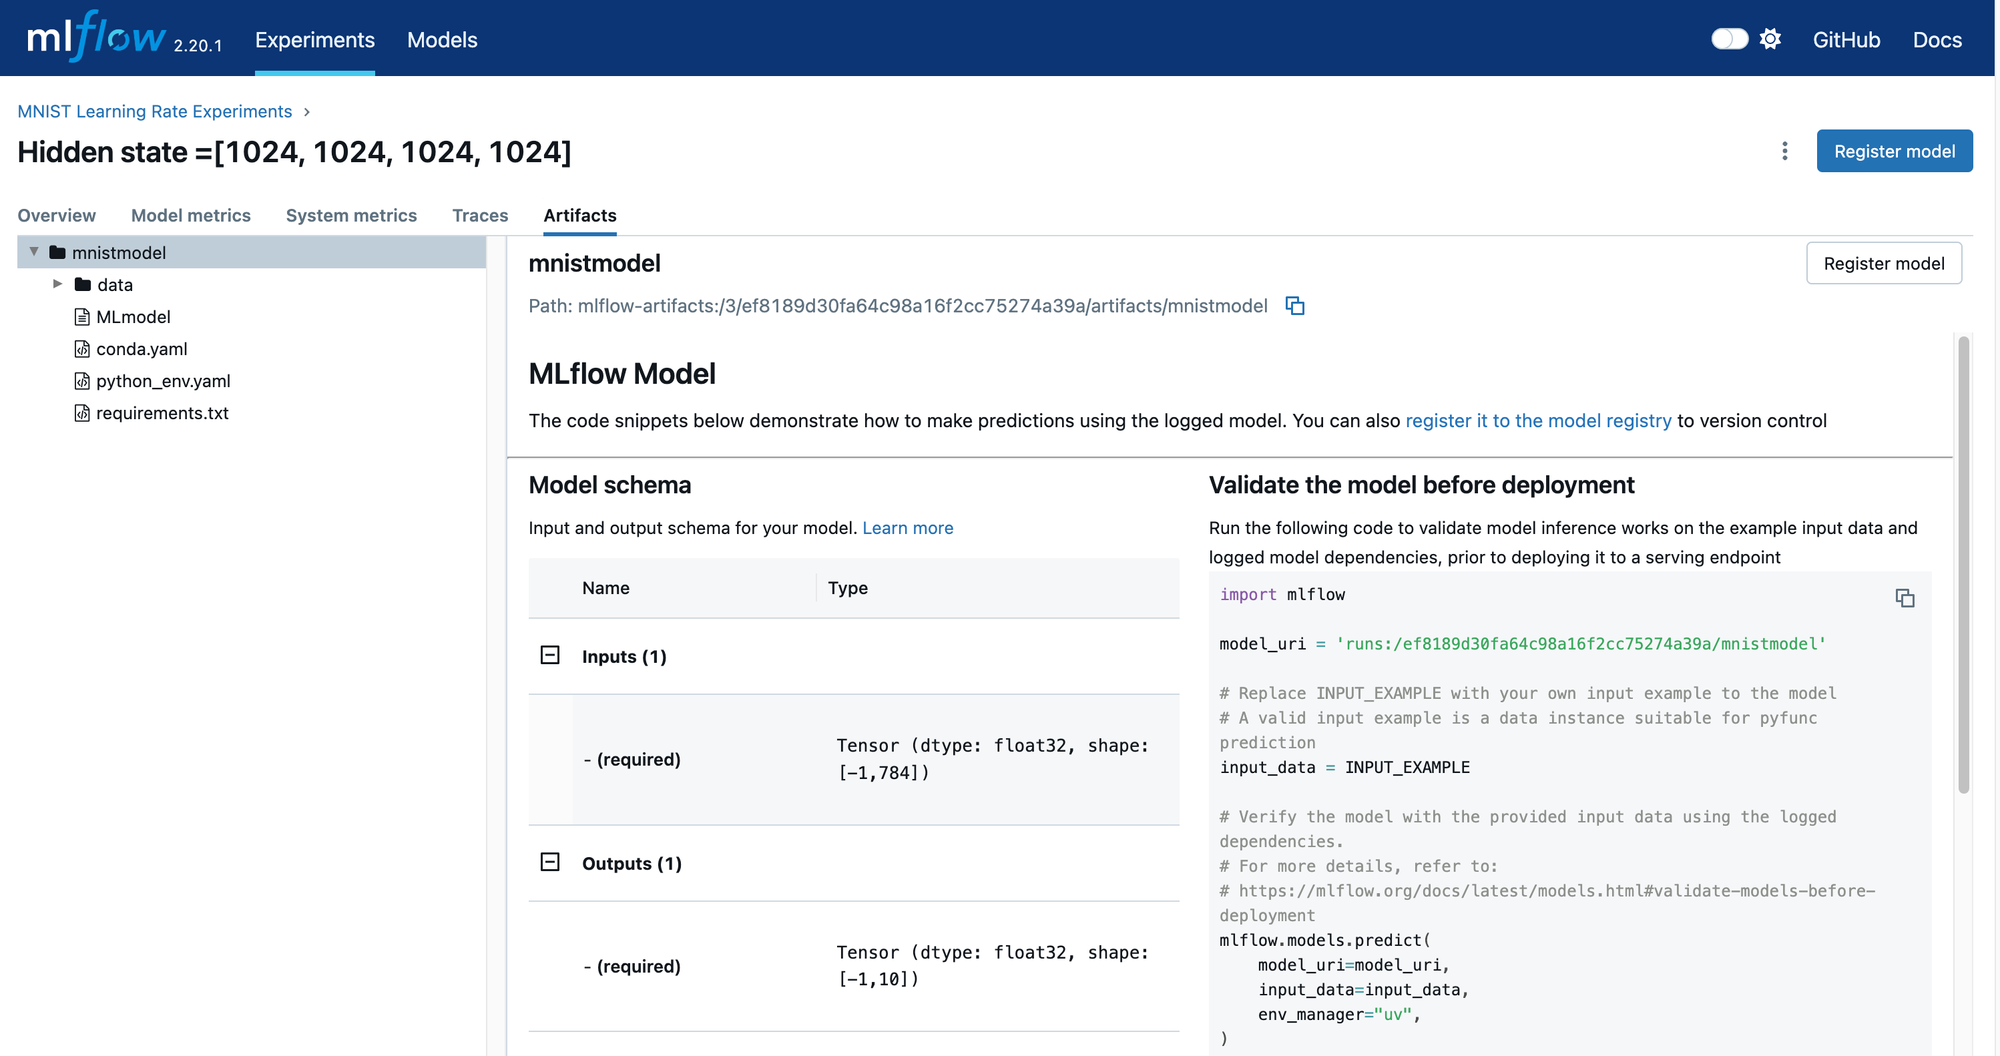
If you add “Model” to the list of columns displayed for each run, you can see which runs have logged models and which are already registered. In the screenshot above, the registered models have a name and a version designation. Select a run that contains an unregistered model that you would like to be in the model registry. This will take you to the run details page shown below. Notice the Register Model button that appears when you select the model in the artifacts section of this page.
Clicking on the `Register Model` button will show the dialog below.
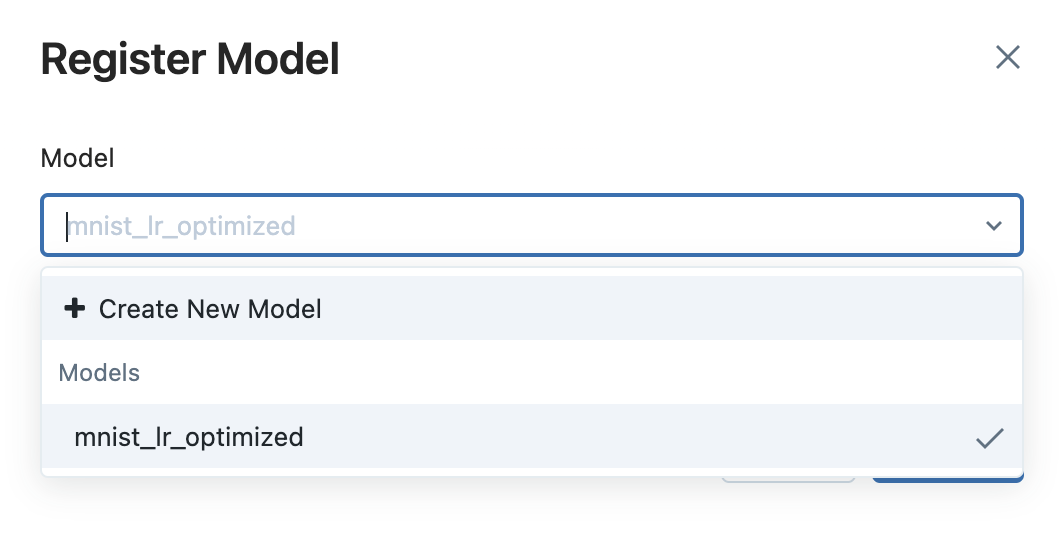
This is where we will create our top-level collection entity if we need a new one, or we can add the model to an existing collection of registered models. Once you complete this dialog, your model will be registered. Navigate to the Models tab and find your newly registered model.
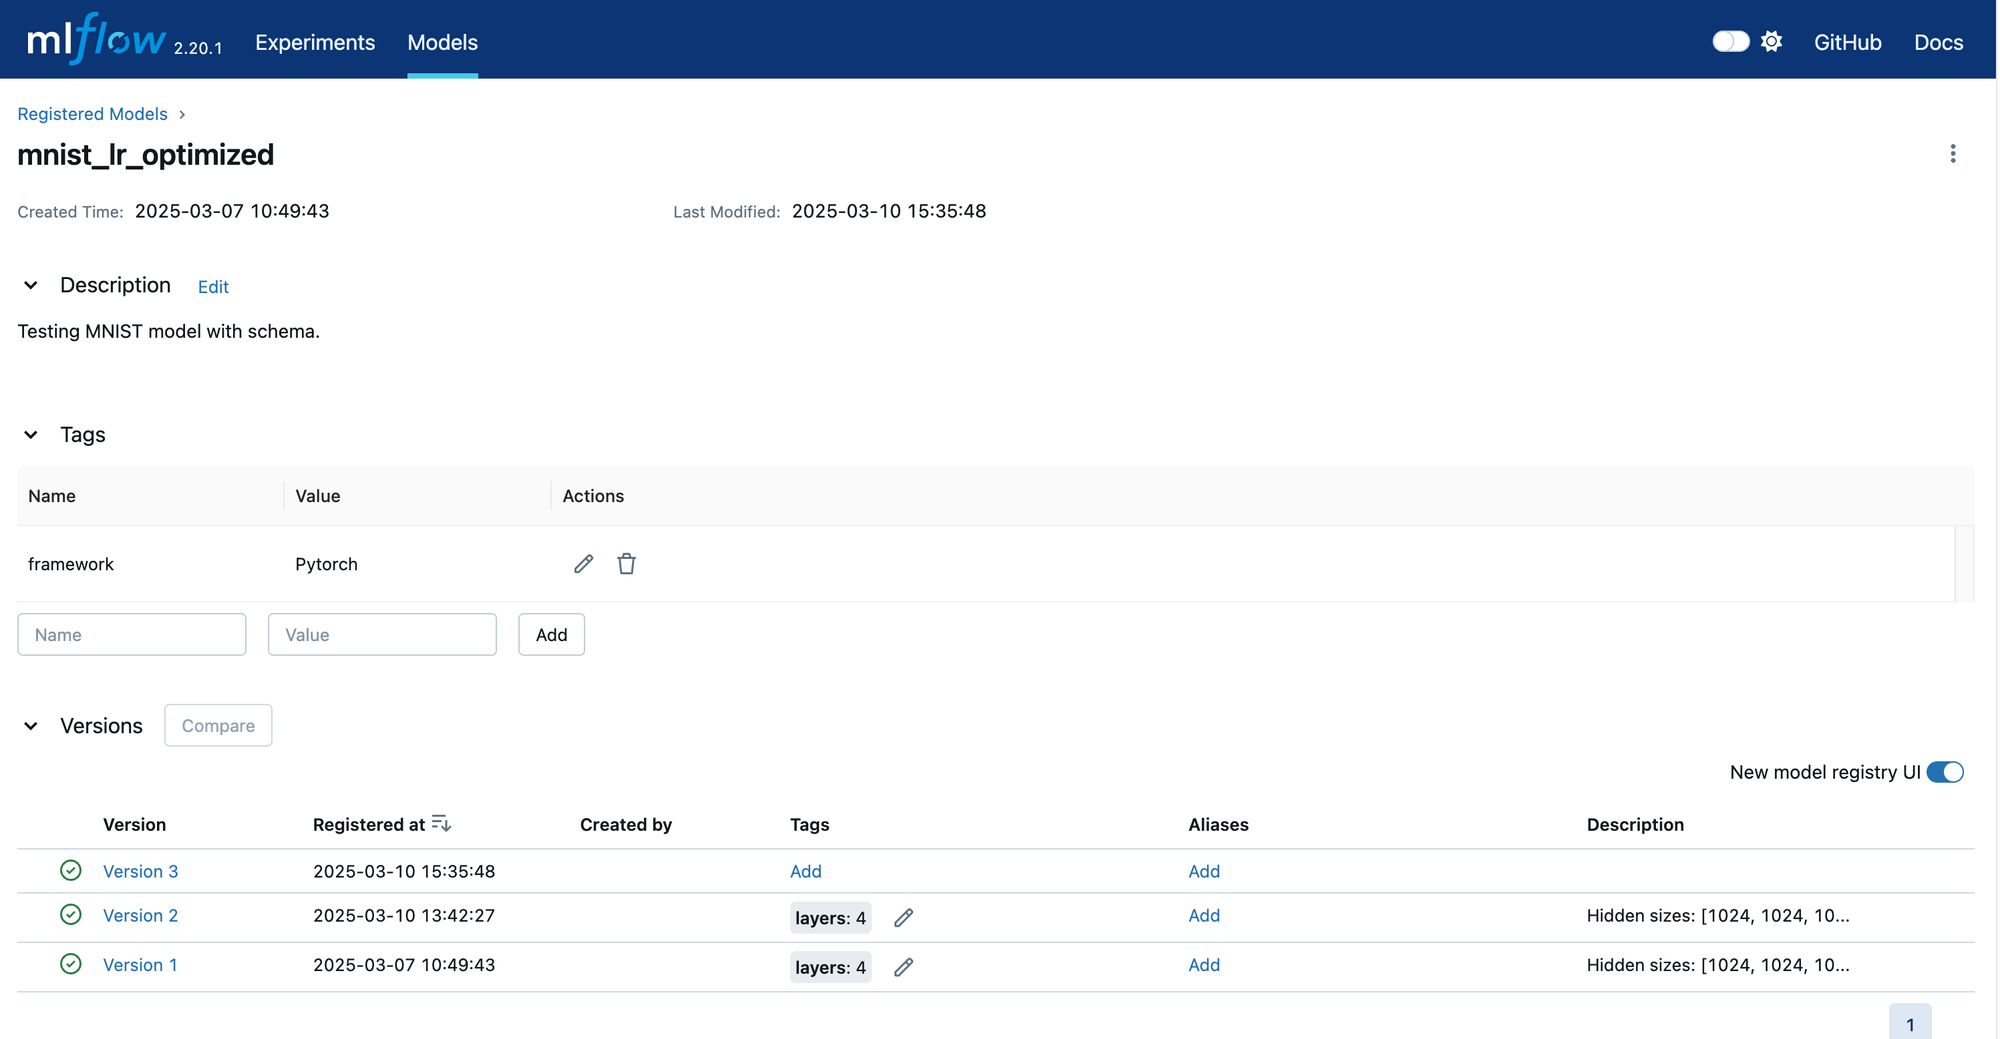
Click on your model to see the list of versions for this model. This is shown below. Also, notice that there are descriptions and tags at the collection level.
Clicking on a specific version, we can look at its details.
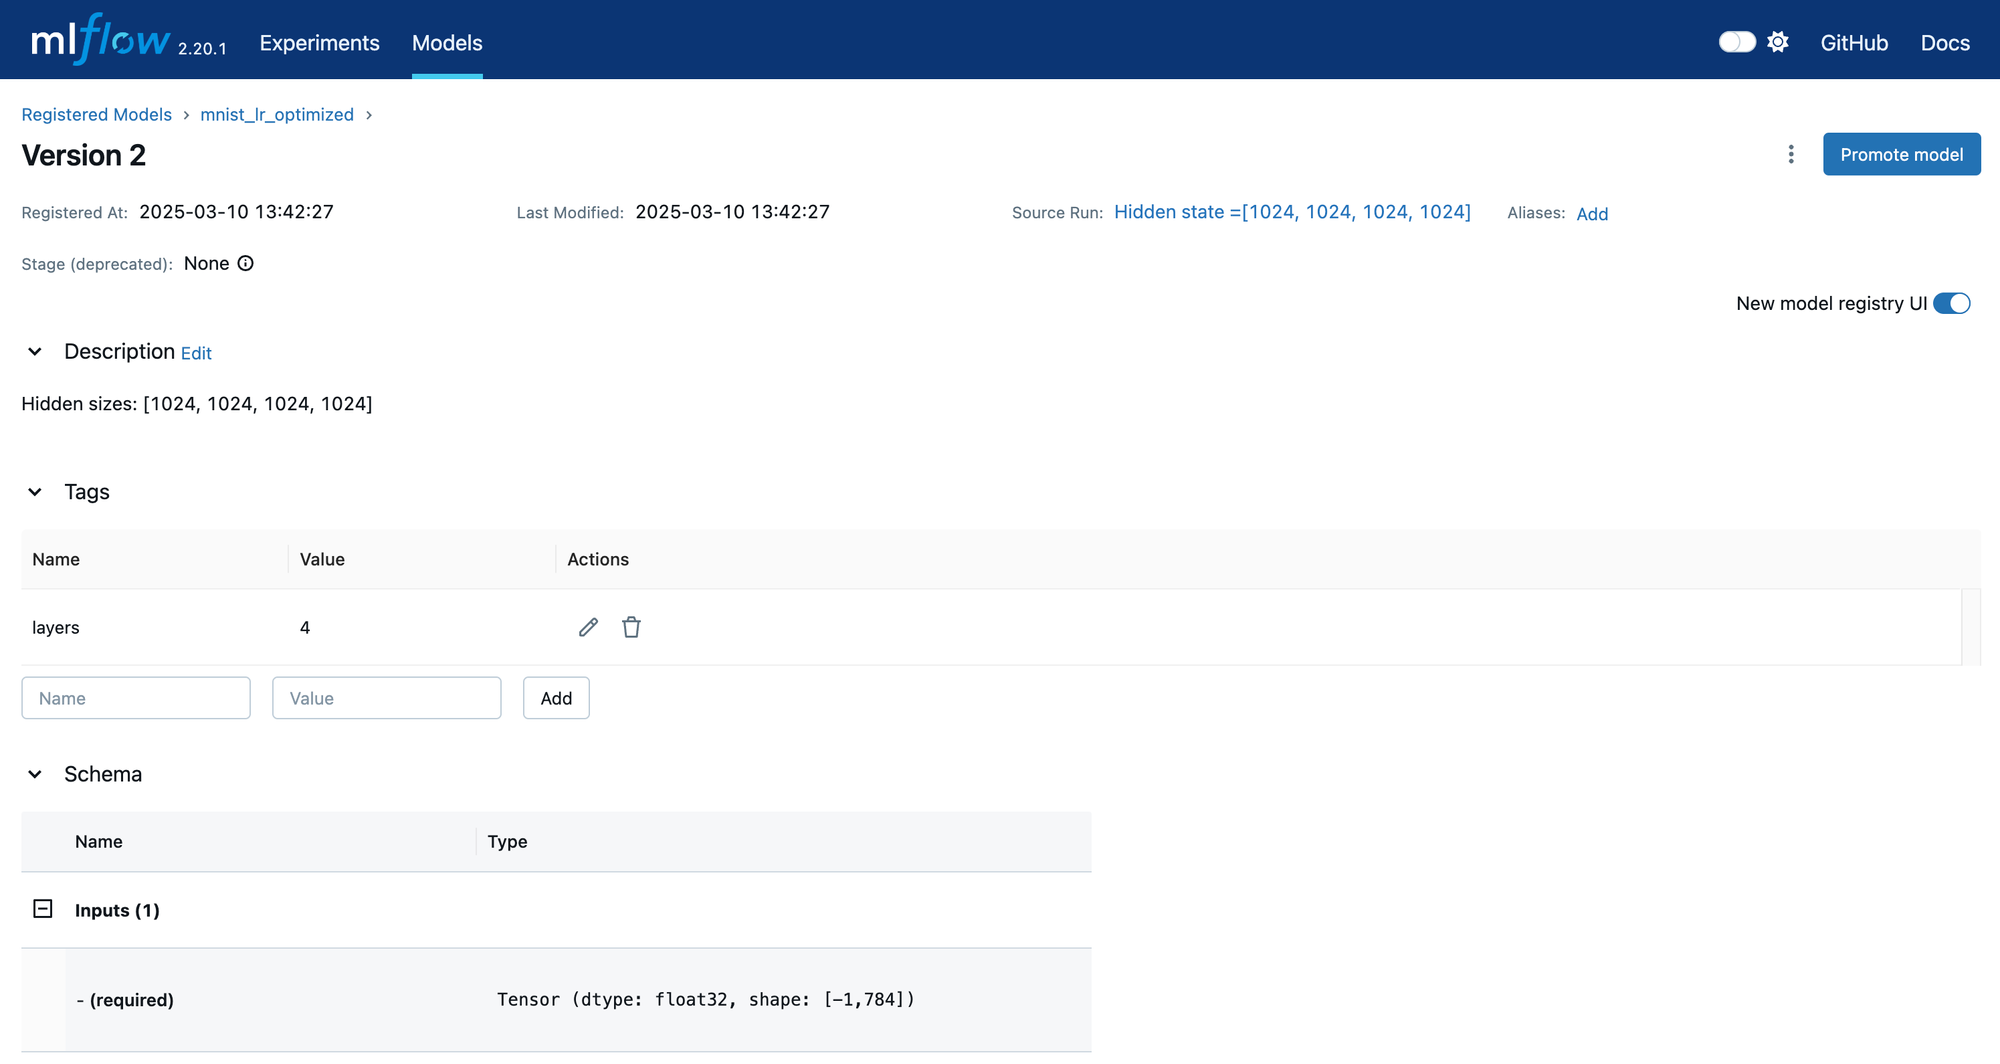
The version has its own description and tags. You can edit these values using this page and you can also set the stage of the model. Also, review the schema of this model. This will come into play when we load the model and perform tests on it, which we will do in the next section.
Loading and Testing a Registered Model
The final thing we will do is load a previously registered model. After all, what good is logging and registering a model if you cannot retrieve it and perform further experiments? What I will show in this section should not be confused with what is known as Model Serving. When you serve a model, you take a previously trained and tested model and deploy it with all its dependencies where it can perform inference as a stand-alone service. What we will do here is merely retrieve a previously registered model. To use this model, you must take care of all dependencies yourself. This is useful if a model is still under development and you want to check out a new version of a model that a colleague just trained. Perhaps the test set was not available when the model was being trained, and you want to see how well the new model performs against data it has never seen.
The code below will load a previously registered model into memory.
All you need to know is the model name and the version number. These values will be used to create a model URI, which is passed to the mlflow.pyfunc.load_model() function. The code above, when run in a notebook, will produce the output below.
The type check in the code above tells us that the model is an instance of mlflow.pyfunc.PyFuncModel. MLflow wraps all models using the PyFuncModel class. This may seem unnecessary but remember that MLflow is a tool for all frameworks. So, if you are on a team that is experimenting with several frameworks like Pytorch, TensorFlow, and Sklearn, then the same downstream testing or inference code will work for all models since they are wrapped in a common class.
Our wrapped model has a predict() function, which is used for inference. Let’s create a test function that uses this model.
For the function above to work, we need a test set. The code below will give us the test set for the MNIST dataset.
That is everything you need to load a registered model from Model Registry and experiment further with it. A word of caution, if the wrapped model’s predict() method throws errors on you, then there is a good chance that your inferred schema is wrong. In this situation, go back to the code that logs your model and make sure that the data type and shape used in the infer_schema function are the same data type and shape that the wrapped model’s predict() method is receiving.
Summary
Combining MLflow and MinIO offers a potent synergy that elevates the machine learning development process. MLflow's streamlined experiment tracking, model versioning, and deployment capabilities ensure efficient collaboration and reproducibility among data scientists and engineers. By integrating MinIO's high-performance object storage, the process gains scalability, cost-effectiveness, and robust data management, facilitating the seamless storage and sharing of large-scale datasets and models. This unified methodology enhances team productivity, accelerates innovation, and establishes a solid foundation for building advanced machine-learning applications with confidence.
If you run into any problems or have any questions, be sure to reach out to me on Slack.


