Model Checkpointing using Amazon’s S3 Connector for PyTorch and MinIO

In November of 2023, Amazon announced the S3 Connector for PyTorch. The Amazon S3 Connector for PyTorch provides implementations of PyTorch's dataset primitives (Datasets and DataLoaders) that are purpose-built for S3 object storage. It supports map-style datasets for random data access patterns and iterable-style datasets for streaming sequential data access patterns.
The S3 Connector for PyTorch also includes a checkpointing interface to save and load checkpoints directly to an S3 bucket without first saving to local storage. This is a really nice touch—if you are not ready to adopt a formal MLOps tool and just need an easy way to save your models. This is what I will cover in this post. The documentation for the S3 Connector only shows how to use it with Amazon S3 - I will show you how to use it against MinIO here. Let’s do this first - let’s set up the S3 Connector so that it writes and reads checkpoints from MinIO.
Connecting the S3 Connector to MinIO
Connecting the S3 Connector to MinIO is as simple as setting up environment variables. Afterwards, everything will just work. The trick is setting up the correct environment variables in the proper way.
The code download for this post uses a .env file to set up environment variables, as shown below. This file also shows the environment variables I used to connect to MinIO directly using the MinIO Python SDK. Notice that the AWS_ENDPOINT_URL needs the protocol, whereas the MinIO variable does not.
We are now ready to start checkpointing models.
Writing and Reading Checkpoints
I’ll start with a simple example. The snippet below creates an S3Checkpointing object and uses its writer() method to send a model’s state dictionary to MinIO. I am also creating a ResNet-18 (18-layer) model with Torchvision for demonstration purposes.
Notice that there is a mandatory parameter for the region. Technically, it is unnecessary when accessing MinIO, but internal checks may fail if you pick the wrong value for this variable. Also, your bucket has to exist for the code above to work. The writer() method will throw an error if it does not exist. Unfortunately, the writer() method throws the same error regardless of what went wrong. For example, if your bucket does not exist, you will get the error shown below. You will also get this same error if the writer() method does not like the region you specified. Hopefully, future versions will provide more descriptive error messages.
The code to read a previously saved model into memory is similar to writing to MinIO. Instead of the writer() method, use the reader() method. The code below shows how to do this.
Next, let’s look at some real-world considerations of checkpointing during model training.
Writing Checkpoints During Model Training
If you train large models using large datasets, consider checkpointing after each epoch. These training runs can take hours or even days to complete so it is important to be able to pick up where you left off in the event of a failure. Also, let’s assume you must use a shared bucket to hold model checkpoints for multiple models from multiple teams.
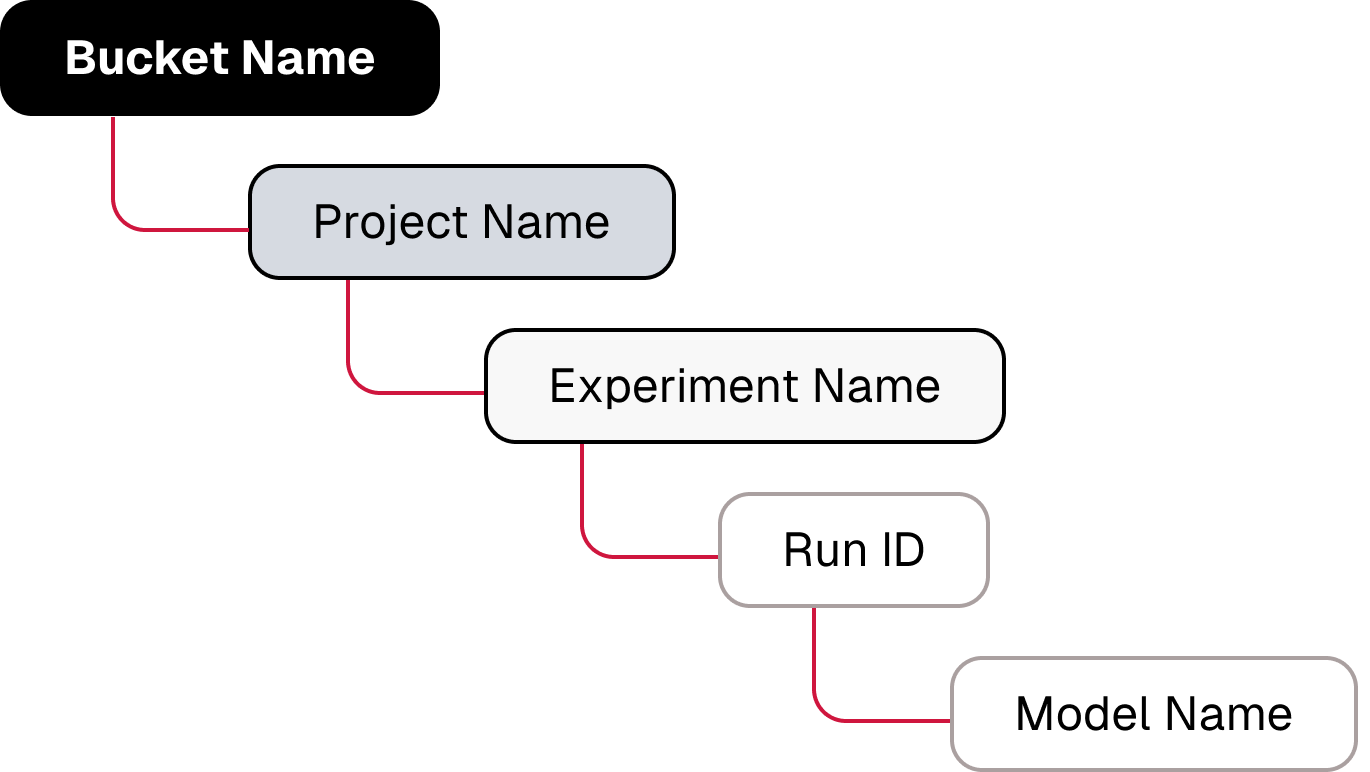
An MLOps convention is to organize training runs by experiment. For example, if you are investigating an architecture with four hidden layers, then you will have multiple runs with this architecture as you look for the optimal values for various hyperparameters. If a colleague runs experiments with a five-layer architecture, you need a way to prevent name collisions. This can be solved using object paths that emulate the hierarchy shown below.

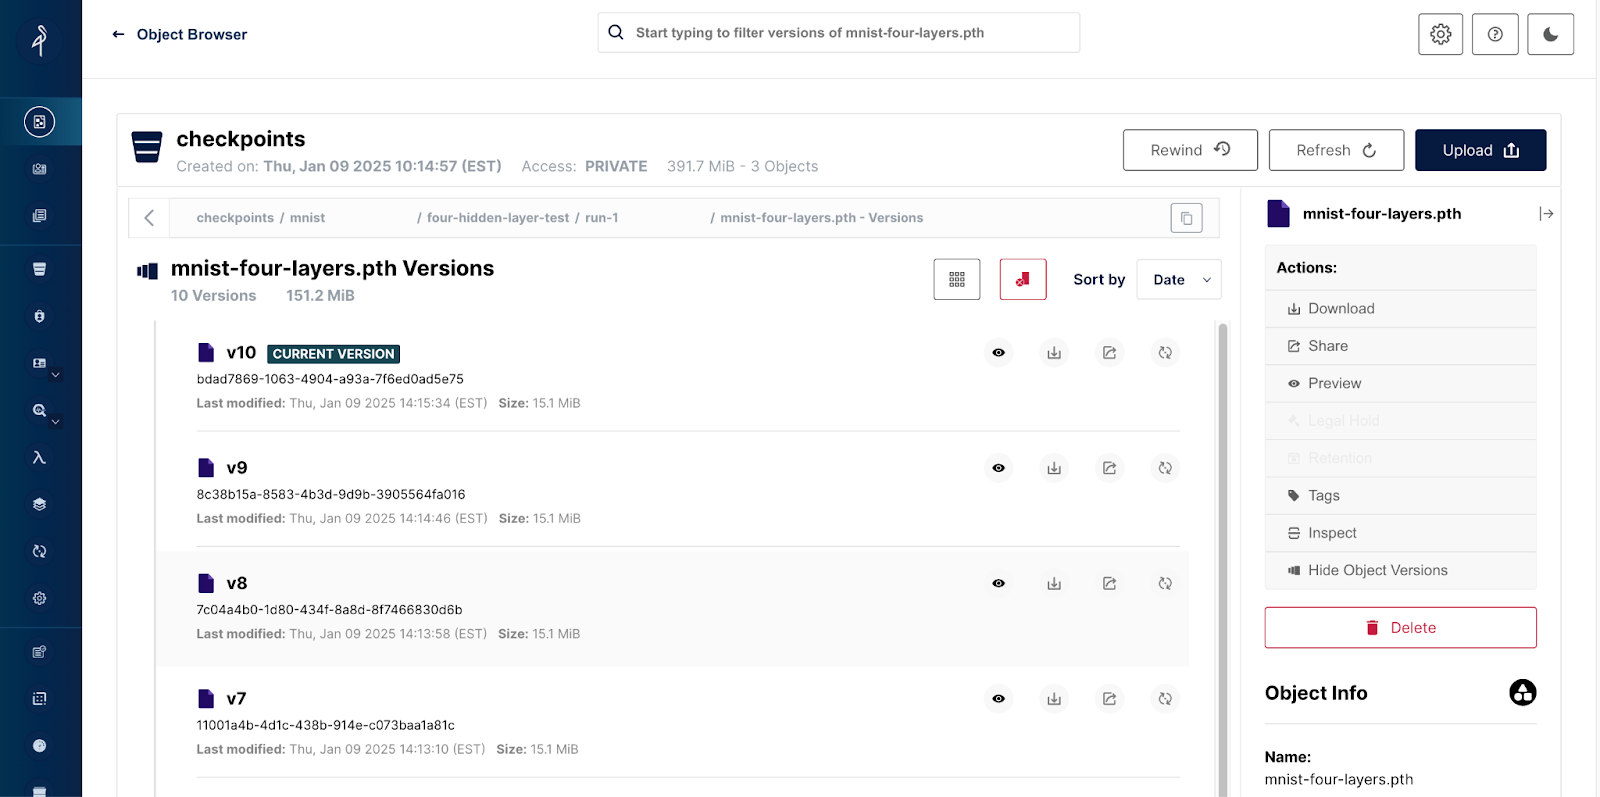
Finally, to ensure that you get a new version of your model with each epoch, ensure that versioning is enabled on the bucket you use to hold your checkpoints. The training function below checkpoints the model after each epoch using the path structure described above. (A more robust version of this training function can be found in the code download for this post.)
Notice that the model name does not contain a substring indicating the epoch. As stated previously, I used a bucket with versioning enabled - in other words, the version number indicates the epoch. What is nice about this approach is that you do not need to know the number of epochs to reference the most recent model. Once the above training code runs for a run of ten epochs my checkpoint bucket looked like the screenshot below.

This training demo can be considered the start of a do-it-yourself MLOps solution.
Conclusion
The S3 Connector for PyTorch is easy to use, and engineers will write fewer lines of data access code when using it. In this post, I showed how to configure it to connect to MinIO using environment variables. Once configured, engineers can write and read checkpoints to MinIO using the writer() and reader() methods, respectively. In this post I showed how to configure the S3 Connect to connect to MinIO. I also showed basic usage of the S3Checkpoint class and its reader() and writer() methods. Finally, I showed a way to use these checkpointing features in a real training function against a checkpoint bucket with versions enabled.
In this post I did not cover techniques and tools needed to checkpoint during distributed training which can be a bit tricky. Checkpointing during distributed training is different depending on the framework you are using (PyTorch, Ray, or DeepSpeed to name a few) and the type of distributed training you are doing: data parallel (every worker has a full copy of the model) or model parallel (every worker has only a shard of the model). In future posts I will cover a few of these techniques.
If you have any questions, be sure to reach out to us on Slack.


